DIY dog cuddle bed

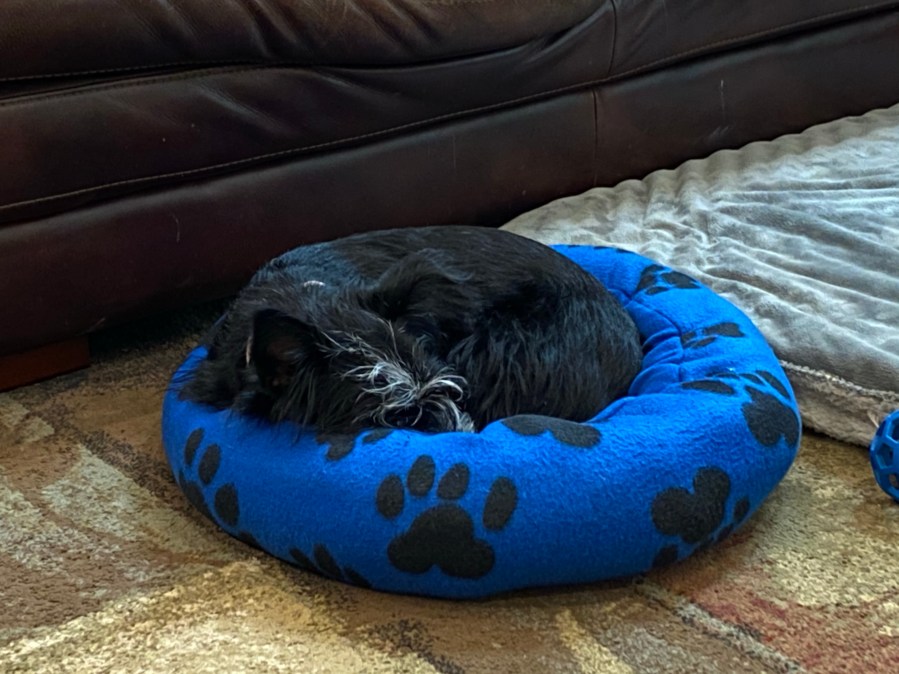
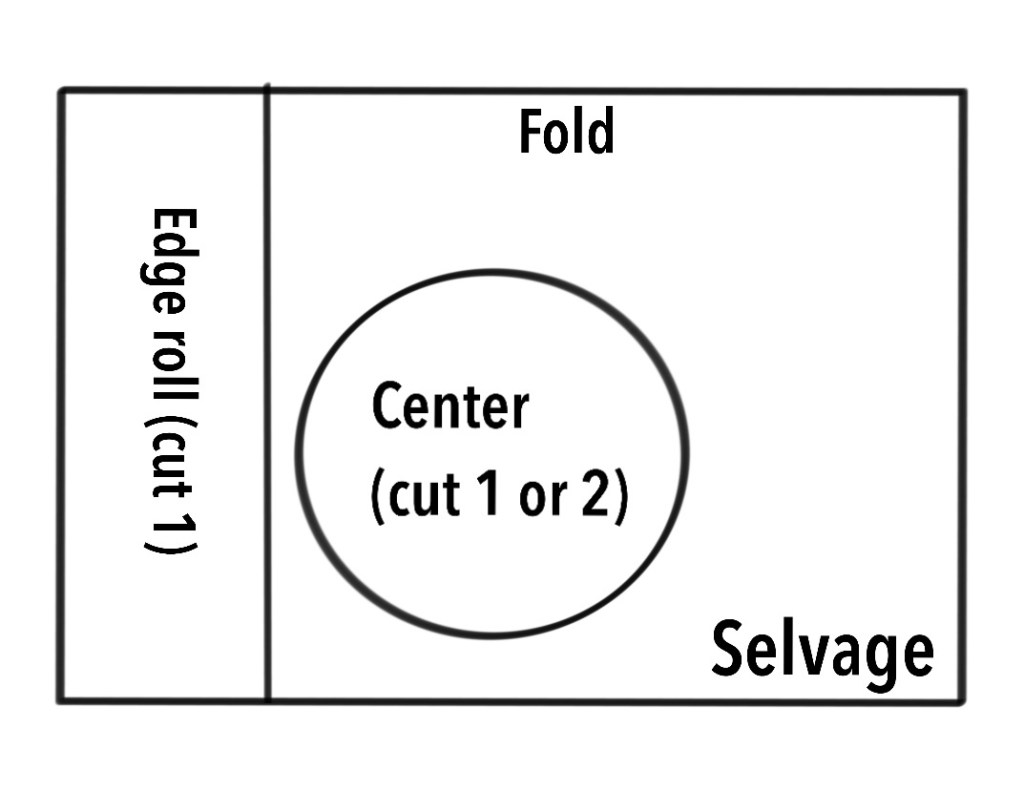
I read that some dogs find comfort in the donut style cuddle beds. I had some fleece and stuffing so decided to make one. I started by cutting off about 14” from one end of the fabric, from selvage to selvage. This will form the roll. Then I laid the strip loosely in a circle with ends overlapping a couple inches on the remaining fabric and cut a circle to the outside diameter. (If you want a stuffed base, cut two circles.)

Using the cut end to cut the center round
Sketch of cuts for donut bed (not to scale)

To sew, fold the edge roll in half length-wise, with the circle inside and one section of the circle edge lined up with the edge roll cut sides. I used a jersey stitch on my machine. Start an inch or two into the seam.

Showing how the cut edge of the circle lines up between the edges of the folded roll fabric

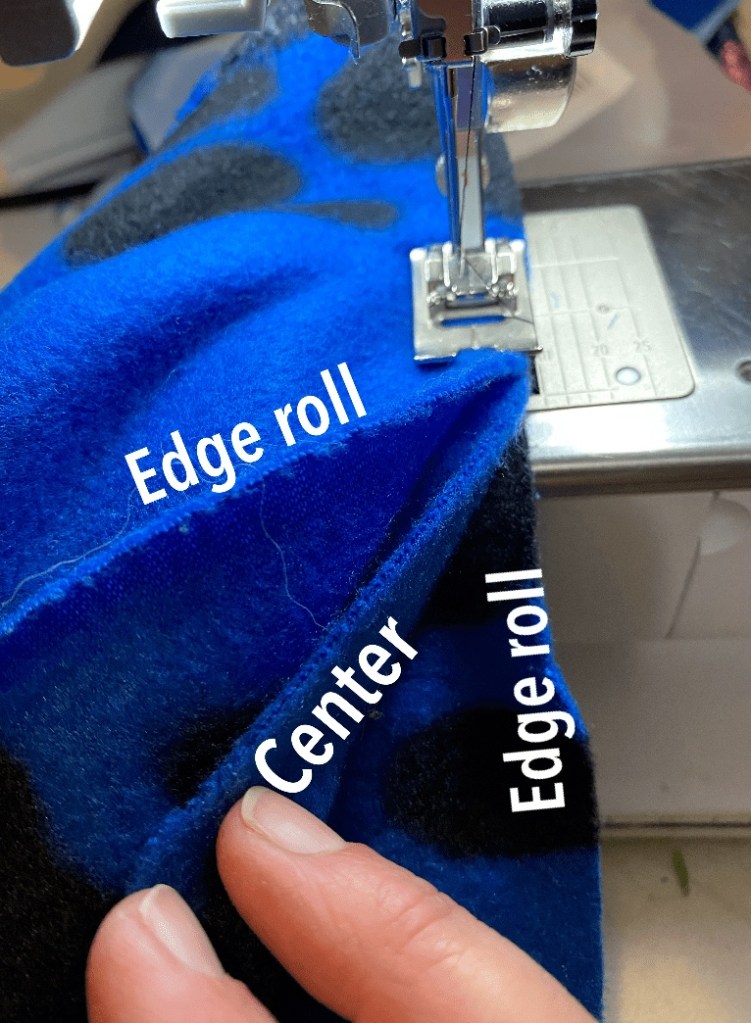
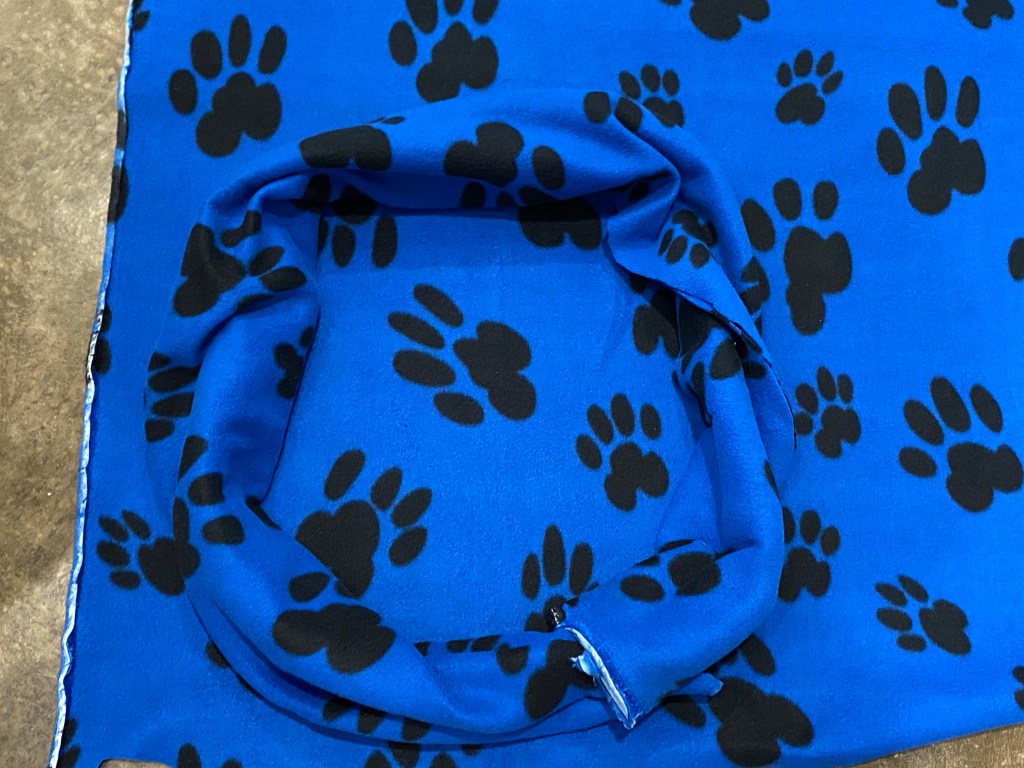
If you have ever sewn trim into a seam, this is a similar technique. The center is sewn inside the tube, so that when it is turned right side out it lays correctly. It is a little fiddly sewing the layers together without catching unwanted fabric, and the circle bunches up inside the roll, but it turned out easier than I feared! It wouldn’t be a problem to make two circles so the bottom could be stuffed. I sewed the entire circumference of the circle, but to stuff it, stop short a few inches. I used polyfil to stuff the edge roll, but shredded memory foam would work too. If you cut two inner circles, stuff those as well before hand sewing everything closed. I ended up with some extra fabric on the edge roll, which I just tucked in before sewing.

Finished cuddle bed, with seam rolled under
Missy likes the cuddle bed

Chasing fluff

I am doing a spinning experiment (the results of which will be posted later, but this was funny, so I thought I would share.) The gist is that I am spinning bits of fluff as I am walking, which gets a bit problematic when there is some wind and a loose tuff of fiber. It must have been quite the scene with my bit of alpaca fleece rolling merrily down the street with me chasing after it.

Alpaca fleece rolling down the road, making a run for it

Crochet waffle stitch baby blanket

I had a small bag of little skeins of cotton in a variety of colors. The bright hues and soft cotton seemed a good match for a baby blanket. I found an intriguing pattern for a waffle stitch blanket that starts in the middle, which is ideal for an item made of odds and ends, as when the yarn is done, so is the project. I also wanted stripes (which frankly made my project more complicated for yardage calculations, but the color interaction in this stitch was worth it). The reason the stripes increased the difficulty is that I needed enough yarn of one color to make it all the way around. Not a problem at the beginning, but quite the conundrum nearing the edge. I ended up weighing the last few skeins and putting them in order from lightest to heaviest to make it more likely to have enough.

Baby blanket in cotton, crocheted waffle stitch, center start

The instructions had me turn the work at the end, which to me seems to defeat the purpose of crocheting in the round. I do really like the two-row repeat, which makes it a very easy pattern to memorize, and the simple row pattern makes it easier to recognize where the stitches need to go. This idea works fine working only from the front, with no turns. To illustrate, I put together a chart (I like charts better anyway). I made this one in Adobe Fresco, but I think if I needed to make one with any more rows, I would work on a desktop in Illustrator so I could align the rows more precisely.

Crochet chart for waffle stitch with a center start, to increase size, repeat rows 3 and 4

I’m still a student of colors and how they interact (and probably always will be), and the fascinating thing about the build of this blanket was the way the the colors looked pastel crammed together in the bag, but became quite bright the way I ordered them in the blanket. I made a hat in double crochet stitch (American notation) from the bits and bobs left over from the odds and ends of the blanket and the overall color feel is quite different.

Baby blanket and baby hat

Skinny shirt

I know skinny t-shirts are a thing, but there are times when they are too skinny! My eldest has a favorite print shirt that fits this category, and drives her crazy when it rides up. We did look for a larger size, but it has been a few years since she received it as a gift. To fix it, I found a thin knit fabric that matched the weight of the shirt (and coordinated with the print), then picked out the side seams all the way up, including the sleeve seam. Using a different, well-fitted shirt as a guide, I cut 3” strips of the new fabric and sewed them in using the jersey stitch on my sewing machine.

Skinny shirt given some wiggle room by adding side panels (shown on a dress maker’s form)

Cosplay

My eldest and I collaborated on a little cosplay project. She needed a crown for an English project (they are reading Julius Caesar by Shakespeare), but wanted to do the diamond circlet from Zelda Breath of the Wild so she could use it again at Halloween. She did not want to do it all in wire and have it get caught in her hair, so we raided the craft room for parts. We found non-woven colored fabric that I originally purchased to make mask filters. Surprisingly, this stuff does not take glue well. We ended up layering Modge Podge with leaf cutouts with a wire in the middle of the sandwich, and leaving it to dry on wax paper; when dry it held together and we could trim the extra dried glue.

Leaf set made of wire, non-woven fabric, and lots of Modge Podge

I did order clear tear drop rhinestones, but the frames are made of yellow Playdoh because it dries hard after a couple days. The “berries” are wood beads (that were in my stash) painted with yellow acrylic paint. It makes painting beads easier if you put them on a wooden skewer first, by the way. The crown is gold colored aluminum wire (yup, from the stash). I did use the crafter’s panacea, hot glue, very sparingly (so as to not catch hair) to keep everything in place.

Front of crown
Back of crown

Not a perfect replica, but it is light and easy to wear.

Screen shot of the back of the real circlet from the game