Crocheted Wisteria

I was going to crochet a spring wreath with multiple flowers and leaves, but when I did the first Wisteria drop, the plan shifted.

Photo description: Crocheted Wisteria wreath made with acrylic yarn hung on a red door

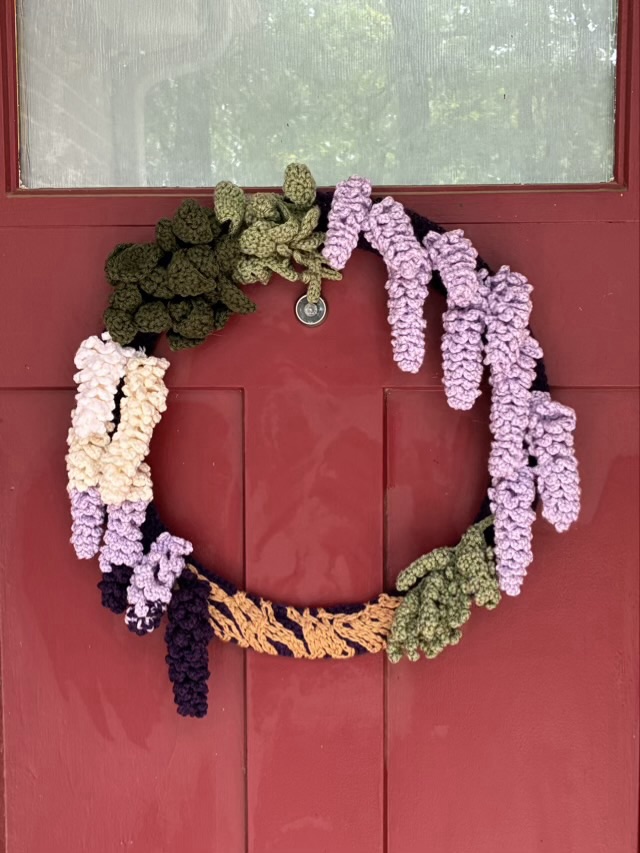
I did make some other types of flowers, then abandoned them all to just make Wisteria. The drops are easy to make and rather addictive. The basic plan is similar to making a crocheted worm or spiral.

Make a chain of 30, then chain 3, single crochet into the same chain three times for 10 chains. In the next 10 chains, make 5 chain loops, and in the last 10 chains, make 7 chain loops.

I varied the number of initial chains, experimented with slip stitches instead of single crochets, and changed the ratios of 3, 5, and 7 chains sections. I also tried different color combinations.

I did use some of the leaves I crocheted and applied them to the crochet covered wire wreath, by sewing them on. The bark-like texture was achieved by doing a chain embroidery stitch (I used my crochet hook, with the yarn held behind the wreath.)

I’m not entirely in love with the multi colored Wisteria drops, but we are rapidly running out of Spring here in Texas, and the winter wreath on the front door needed to come down.

Pitch Pipe Solution

My Barbershop chorus has an electric pitch pipe that is quite versatile, and quite large. It doesn’t fit in a pocket very well and although it comes with a stand, it doesn’t have a way to carry it hands free. We did have a lanyard loop stuck on the back with double sided tape for a long time, but then the tape gave out and the pitch pipe fell to the floor. So I came up with a mechanical connection.

Photo description: the back of the pitch pipe removed from the body, and a small hole drilled at the top
Photo description: round head pin inserted through the hole then bent into a loop and the end wrapped back around the stem for security
Photo description: pitch pipe reassembled and a key chain ring attached to the new wire loop, with a cross-should strap clipped to the ring

The back of this kind of pitch pipe removes with a single screw. Use the smallest drill bit possible to drill the hole through the thick section of the plastic. Head pins are available in the jewelry section of most hobby stores, as are split rings. I used a clip-on strap from a small purse.

I wear the pitch pipe over one shoulder, which puts the device in easy reach of one hand and keeps it off to the side. One of the benefits of this method is that the pitch pipe hangs straight down and easily rotates, which makes dialing in the pitch and pushing the button easier.

Throwback Thursday: horsehair bracelet

In September 2016 I made a braided horse hair bracelet for a friend with tail hairs from her three horses.

Photo description: three color three strand flat braid with sterling silver hand made clasp

There are other jewelry makers that glue the ends into metal caps. I don’t trust glue to hold, so prefer to pair glue with a mechanical join as well, in this case crimping down a wire wrap on the ends of the braids. When I do this again, I will do a different clasp, because the clip is difficult to get on, but easy to accidentally pop open.

Throwback Thursday: ribbon wreath

Sometimes things just don’t work out the way I hope. In December 2015 I made a large wreath from poultry wire and ribbon. It took me over a week to get all the loops of ribbon installed, and I had to buy more ribbon because I underestimated yardage. I should have made it smaller, but the thought of undoing it was worse than just pressing forward.

Photo description: hollow tube wreath frame made from poultry wire
Photo description: closeup of how I attached the wired ribbon to the poultry wire frame
Photo description: in process picture with looped ribbon work in stripes
Photo description: finished wreath sitting on a table that is three feet deep, the wreath overhangs the table
Photo description: wreath hung on an outside window because it was way too big for a door

The little bow I put at the bottom was woefully out of proportion to the huge wreath, but at that point I never wanted so see another loop of ribbon, possibly ever. I also didn’t care for the overall look when finished. I did learn from the process. I learned that looped projects take way more material than wrapped (logical). Storing such a large thing is difficult and the poultry wire frame didn’t hold up to rough handling. Ribbon is expensive, especially before the holiday sales.

Throwback Thursday: wire basket

In July 2015 I was making custom wire baskets for a shelving unit in the house. I would draw out the size needed in chalk on the patio, flatten out 1/2” welded wire hardware cloth, and cut it with metal snips.

Photo description: basket pattern drawn on the patio in pink chalk
Photo description: hardware cloth cut into shape

When I cut the hardware cloth, I left one side of the corner seam with a vertical wire, and the other side with horizontal wires free for a half inch. When I folded the sides up, I used needle nose pliers to loop the horizontal ends around the vertical wire.

Photo description: close up of corner cut showing the free horizontal ends and the solid vertical edge
Photo description: close up of how the wire ends wrap around to secure the sides of the basket
Photo description: finished basket with hanger wire used to stabilize the upper edge of the basket
Photo description: nine wire baskets of various sizes

I experimented with ways to keep the hardware cloth from scraping the wood shelf. I sewed fabric to corners as one solution, and ran hanger wire on the bottom like sled runners on other baskets.