Pitch Pipe Solution

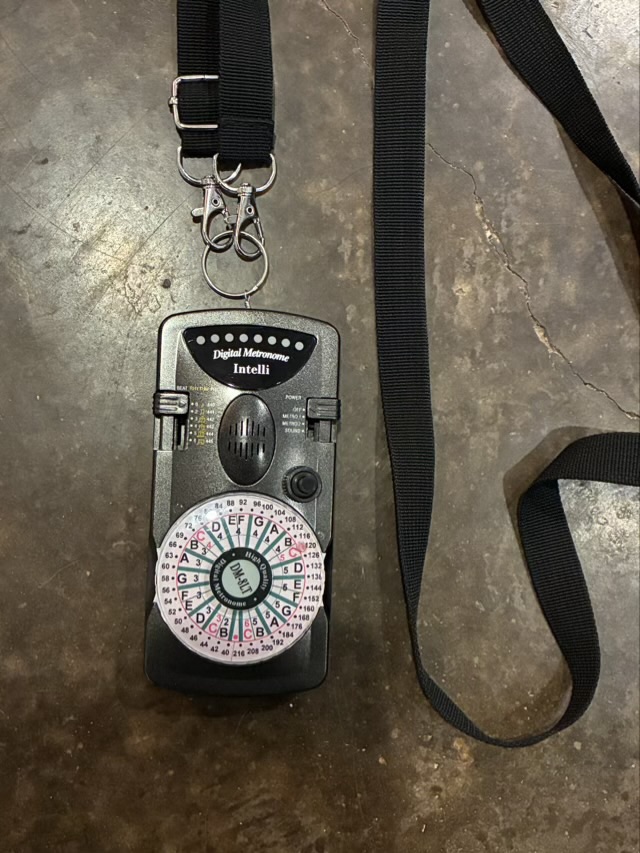
My Barbershop chorus has an electric pitch pipe that is quite versatile, and quite large. It doesn’t fit in a pocket very well and although it comes with a stand, it doesn’t have a way to carry it hands free. We did have a lanyard loop stuck on the back with double sided tape for a long time, but then the tape gave out and the pitch pipe fell to the floor. So I came up with a mechanical connection.

Photo description: the back of the pitch pipe removed from the body, and a small hole drilled at the top
Photo description: round head pin inserted through the hole then bent into a loop and the end wrapped back around the stem for security
Photo description: pitch pipe reassembled and a key chain ring attached to the new wire loop, with a cross-should strap clipped to the ring

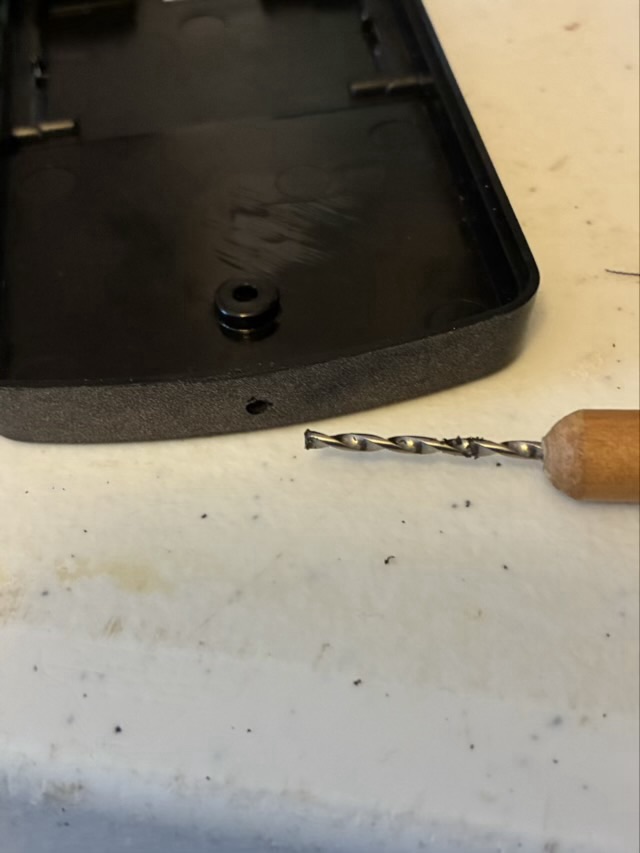
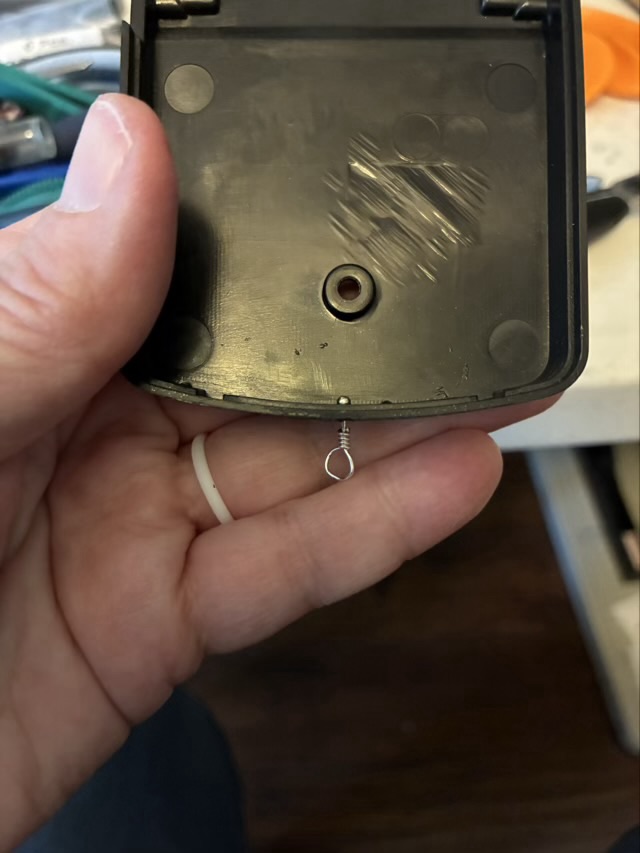
The back of this kind of pitch pipe removes with a single screw. Use the smallest drill bit possible to drill the hole through the thick section of the plastic. Head pins are available in the jewelry section of most hobby stores, as are split rings. I used a clip-on strap from a small purse.

I wear the pitch pipe over one shoulder, which puts the device in easy reach of one hand and keeps it off to the side. One of the benefits of this method is that the pitch pipe hangs straight down and easily rotates, which makes dialing in the pitch and pushing the button easier.

Throwback Thursday: horsehair bracelet

In September 2016 I made a braided horse hair bracelet for a friend with tail hairs from her three horses.

Photo description: three color three strand flat braid with sterling silver hand made clasp

There are other jewelry makers that glue the ends into metal caps. I don’t trust glue to hold, so prefer to pair glue with a mechanical join as well, in this case crimping down a wire wrap on the ends of the braids. When I do this again, I will do a different clasp, because the clip is difficult to get on, but easy to accidentally pop open.

Star earrings

I wanted a pair of star earrings to wear to chorus events. I started looking at preassembled sets and was dismayed at materials and pricing, so I ordered parts from Fire Mountain Gems and assembled them myself. Since buying in bulk makes the individual item less expensive, I ordered enough for my whole chorus.

Photo description: antique silver plated open star charms on simple silver plated ear wires and threaded into a card with our chorus logo

I picked a simple star charm and an open loop ear wire so assembly was a just matter of using needle nose pliers to open the wire loop, put in the charm, and close the loop again. Here is a tip for opening wire loops, either on ear wires or for jump rings: twist, don’t pull. Rather than pulling the ends of the loop apart and widening the loop, if you twist them, one side forward, one side back, they are much easier to twist back closed.

Photo description: close up of a wire loop that has been twisted open

The thing that took the longest time was getting the cards with earrings into the little 2×3” bag. The sets, with shipping, cost less than $1 per pair plus time. The components are silver-plated, which is fine for costume jewelry. The assembly is simple enough that if someone does have a nickel allergy, the charm can easily be transferred to a pair of titanium or niobium ear wires instead. (Those are just considerably more expensive.)

Sparkly

I like using combs to hold my hair back from my face. I tried finding some that had a little bling for chorus performances, but was only finding the kind for weddings and formal updos, where the tines stick into the hair, but need pins or other methods to stay put. So I sparkled up my own pair using Loctite super glue and flat backed AB rhinestones. (AB stands for aura borealis, a coating put on beads to give them a color shifting shine.)

Photo description: plastic hair comb with rhinestones glued to the spine

I used a little too much superglue for regular applications of rhinestones, but it turned out OK for the combs because it filled in the spaces between the jewels so hairs don’t get caught in the sparkle.

Throwback Thursday: wrap bracelet

This is a wrap bracelet that I made for my sister in April of 2015. It is made from red leather cord, 4mm garnet and quartz beads, and beading thread. The remarkable thing about it is that it was sitting next to my chair next to the fireplace when the house caught on fire in March of 2015. I had been working on it and it was in a project bag. I needed to give everything a rinse to get rid of the ash, but I was able to complete the bracelet.

Photo description: red wrap bracelet with four wraps of natural garnet and quartz beads sewn between two leather cords

I really missed an opportunity to do a morse code message in the beading.