Heritage Wheat Monkey Bread

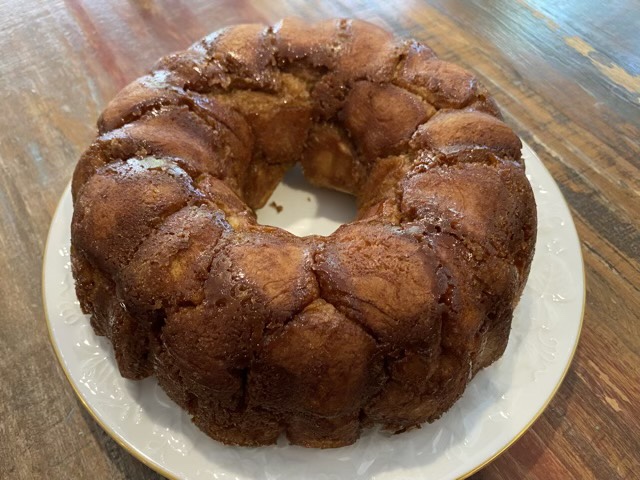
My youngest wanted to try Monkey Bread. We can’t do biscuits in a can, because they use modern wheat, so we made biscuit dough with all-purpose heritage wheat from Sunrise Flour Mill and combined that with a different Monkey bread recipe. I like that this Monkey Bread is not super sticky, and doesn’t taste super sweet (but it still uses lots of sugar!)

Photo description: Monkey Bread formed in a bundt pan showing a nice brown color and sugar deposits in the areas between the pieces of cooked dough.
  • 4 cups (480g) all-purpose Heritage Wheat flour
  • 2 Tbsp baking powder
  • 2 tsp salt
  • 12 Tbsp cold unsalted butter
  • 1 1/2 cups whole milk
  • 1 cup granulated white sugar
  • 2 1/2 tsp cinnamon
  • 12 Tbsp melted butter
  • 1/2 cup brown sugar

Combine flour, baking powder, and salt. Cut in butter, then use fingers rub and flatten the butter pieces. Mix in milk until incorporated (not too much) and turn out onto a floured surface. Sprinkle with flour to make it easy to handle, and the gently flatten and fold gently in half 4-5 times. Shape by hand into a rectangle about 1” thick. Cut into 1 inch squares. In a gallon plastic bag add white sugar and cinnamon, shake to mix. Add squares of dough to the bag and shake to coat in the sugar mixture. Place the coated squares in a bundt pan greased with cooking spray. In a sauce pan melt butter and add brown sugar. Cook on medium high until bubbly and you can’t feel sugar crystals with a wooden spoon, the color should be consistent. Pour the mixture evenly over the pieces of dough in the bundt pan. Bake at 350 degrees for 30-40 minutes or until internal temperature is about 204 degrees. Let cool for 10 minutes before turning out onto a plate. Tear and share!

Broom storage

We store our broom and swiffer in our laundry closet and they are constantly falling over or getting in the way. I had a spare curtain rod, so decided to try installing it on the wall at an angle to corral the long handles. Works great!

How close can I get?

Thor the kitten (he is almost seven months old, but he’s huge) would really like to give Izzy the cat (who is 10) snuggles and wrestles. Izzy is having none of it. It is a game for Thor to see how close he can get to her without being attacked.

Photo description: Calico female and Gray Tabby male cats stretched out on a blue and gray carpet, facing each other. The Calico is eye-balling the Tabby. The Tabby is looking at the camera with his ears toward the Calico, looking surprised at his progress.

His latest trick is to climb up underneath the fuzzy blanket at nap time when Izzy is getting lap time. He can get quite close to her without repercussions, but then, as if he just can’t help himself, he has to push it too far and reach out and touch her. Here is a short.

Photo description: Same Calico cat, on a fuzzy blanket on my lap, the Tabby is under the blanket next to her.

Spinning demonstration

I volunteered at the Mansfield Founder’s Day Festival recently, demonstrating spinning on a drop spindle and helping people try it out for themselves. I even sold a few spinning starter kits! The Man House was setup beautifully, and I was quite spoiled with a tent, table, and chairs already setup for me. The hands-on spinning was popular, and there were wows over the animal-to-wearable knit alpaca shawl I brought, but the biggest hit was my fiber book. I’m glad I set it up consistently with multiple touchable swatches; it made it both visual and tactile friendly. My book held up great for the seven hours of the event!

Photo description: Canvas, 2×4, and rope canopy setup in mowed grass with a covered table and chairs setup underneath. On the table I put my alpaca shawl, a basket of wool nests, three practice spindles, a basket of starter kits, and my fiber book.
Photo description: Four drop spindles, the three on the left have Corriedale wool spun by many hands, the one on the right has Shetland wool spun by me between helping sessions.

Custom packaging

As much as I love cloth bags, sometimes you need packaging you can see through that is inexpensive. For my spinning starter kits I needed a long narrow plastic bag. I have a whole bundle of large clear plastic bags, but they are twice as wide as I needed for this application. I found that if I ran my quilting mini iron, set to high, down the center of the bags, it was enough to melt and separate the bag into two, with a well sealed seam. The iron does come with a blade attachment, but the blade cut the plastic too fast and didn’t heat the plastic up enough to melt it.

Photo description: Cork squares laid down on the table to protect the surface, two newly created long narrow plastic bags, with a mini iron to the side, blade assembly unused.
Photo description: Same table with one bag filled with a spindle and three samples of different animal fibers.
Photo description: Two completed Spinning starter packs, with insert containing instructions and resources.

I tied off my bags with some of my old hand-spun yarn oddments. Another good use for left-over yarn!