Crocheted leaf cluster

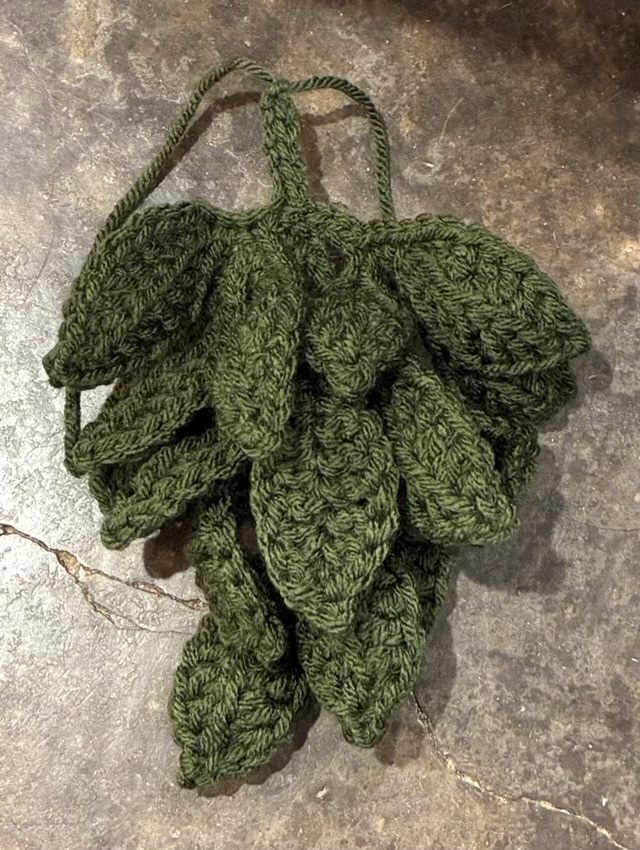
To crochet a simple leaf, my favorite method is to make a foundation row, then crochet in the back loop back down from tip to stem. The foundation row is regular crochet stitches with a single chain added in the middle of working the stitch. This gives a chain-like structure on both sides.

Photo description: crocheted leaf made in two “rows”

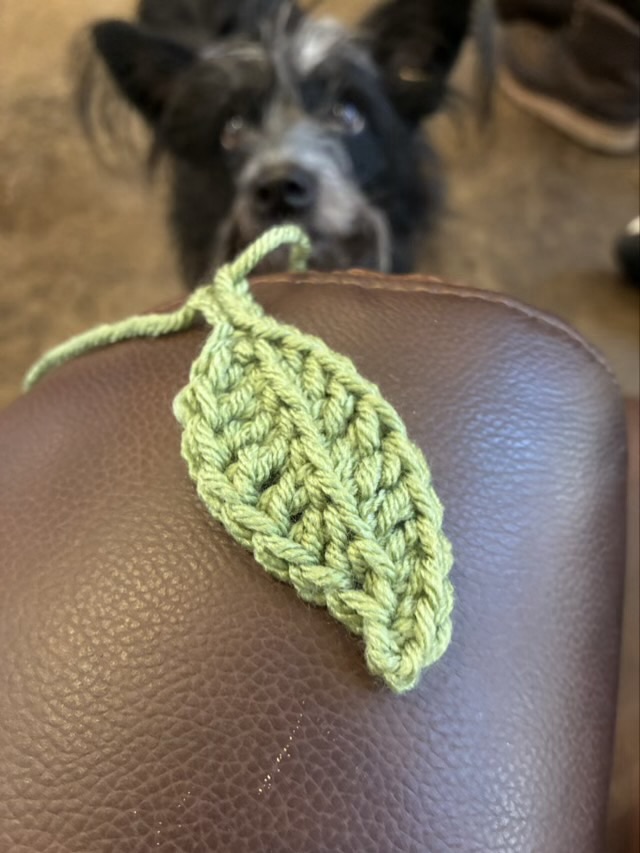
Here is a video, and below are written instructions.

Instructions for the leaf (American notation):

Stem: chain (ch) 5

First Foundation Half Double Crochet (ffhdc): yarn over (yo), insert hook in second chain from the hook, yo, pull up loop, ch 1, yo, pull through three loops.

Foundation Double Crochet (fdc): yo, insert hook through two side loops, yo, pull up loop, ch 1, yo, pull through two loops, yo, pull through two loops.

Fdc again.

Foundation Triple Crochet (ftc): yo, insert hook through two side loops, yo, pull up loop, ch 1, yo, pull through two loops, yo, pull through two loops, yo, pull through two loops.

Ftc again.

Two fdc.

Foundation Half Double Crochet (fhdc): yo, insert hook through two side loops, yo, pull up loop, ch 1, yo, pull through three loops.

Foundation Single Crochet (fsc): insert hook through two side loops, ch 1, yo, pull through two loops.

Ch 3.

Single crochet in back loop (scbl).

Double crochet in back loop (dcbl).

Dcbl.

Triple crochet in back loop (tcbl).

Tcbl.

Dcbl twice.

Half Double Crochet in back loop (hdcbl).

Slip stitch down the initial chain.

To make a sharper leaf tip, slip stitch the ch 3 together. To make different shapes, combine different numbers of stitches. You don’t necessarily need to match fdc with a dcbl.

To make a cluster, finish a leaf, then chain again without tying off. Vary stem lengths. clusters of three work well.

Photo description: cluster of crocheted leaves

Cactus terrarium update

Of the original planting of my tea jar terrarium, I had three varieties survive. It was looking rather sparse, so I added succulents from another pot we had hanging in a window.

Photo description: top down photo of my tea jar terrarium with six varieties of succulents and two carved stone figurines

I’ve increased the artificial light from 9 hours to 12 to see if that makes the cactus happier.

Paper serendipity

Sometimes, not very often, when I’m wrapping presents the paper pattern and the box size coincide and the fold at the back is a perfect continuation of the pattern. Ah.

Photo description: “let it snow” wrapping paper that has been wrapped around a box with the two ends meeting up to complete the snowman pattern

Next pair

I’ve cast on a new pair of spiral socks. This time I’m trying a 3×3 offset rib. The yarn I purchased years ago, tried to make a sweater, but frogged the whole project, so am now using the yarn for socks.

Photo description: top down spiral socks in progress using variegated blue and yellow fingering weight super wash wool and nylon yarn

I do think it is an interesting phenomenon that the spiral rib presents the garter stitch, while a straight rib shows the stockinette as predominant.

Star earrings

I wanted a pair of star earrings to wear to chorus events. I started looking at preassembled sets and was dismayed at materials and pricing, so I ordered parts from Fire Mountain Gems and assembled them myself. Since buying in bulk makes the individual item less expensive, I ordered enough for my whole chorus.

Photo description: antique silver plated open star charms on simple silver plated ear wires and threaded into a card with our chorus logo

I picked a simple star charm and an open loop ear wire so assembly was a just matter of using needle nose pliers to open the wire loop, put in the charm, and close the loop again. Here is a tip for opening wire loops, either on ear wires or for jump rings: twist, don’t pull. Rather than pulling the ends of the loop apart and widening the loop, if you twist them, one side forward, one side back, they are much easier to twist back closed.

Photo description: close up of a wire loop that has been twisted open

The thing that took the longest time was getting the cards with earrings into the little 2×3” bag. The sets, with shipping, cost less than $1 per pair plus time. The components are silver-plated, which is fine for costume jewelry. The assembly is simple enough that if someone does have a nickel allergy, the charm can easily be transferred to a pair of titanium or niobium ear wires instead. (Those are just considerably more expensive.)