Winding a center pull yarn ball

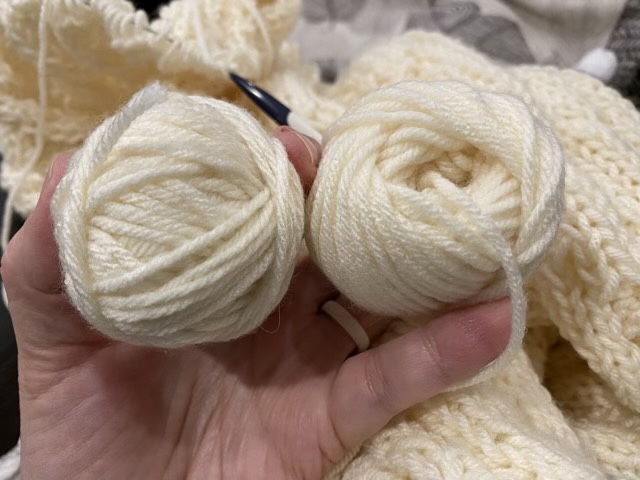
When I was learning to knit and crochet, I was taught to roll up extra yarn into a ball. Generally, you started with a small nest of yarn and wrapped more yarn around, changing directions every so often so it came out more or less round. Inevitably, I would drop the ball, it would roll across the floor, the cat might help its progress, and I would have to wind it up again. When I was older, I obtained a “new wool winder” which winds yarn from a hank into a cake-like structure, but was wonderful because the cake sat still and yarn could be pulled from the center. It did not work so well with small amounts of yarn, and I had to go and find the machine and a place to secure it to use it. Fast forward many years (better just skip, because there is quite a lot of time from then to now), and I was learning about spinning on a dealgan (a Scottish type of drop spindle), and the presenter in the video said the newly made yarn was wrapped around the spindle in the same way as for a nostepinne. What? The resulting cop of yarn could come directly off the spindle and the yarn could be pulled from the center. Hm. New rabbit hole. Nostepinne is a word for a fancy stick. I used a 1” dowel, which worked just fine the first time, but you really don’t even need a stick. A rolled up piece of paper will also work (especially if the cat is comfy on your lap and you can’t reach your stick, but there is a handy piece of paper).

Wrapped yarn ball (left) versus center pull ball (right)

Here is a video: https://youtu.be/Fk6PVyzV6BY

I’m sharing because I really found this way of winding to be life changing. And it is so simple.

On a separate note, Adobe Premier now will make captions from my audio automatically. So that saves me a bit of typing. It still needed editing because “nostepinne” is not in its transcription vocabulary. Shocking. The video isn’t fancy because I’m still learning the software.

A little spinning

It felt good to do a little spinning again. I’ve been busy making things with yarn, but haven’t spun any in over a month. My eldest recently used shades of green and white wool to fill a clear plastic cup for a “kelp-achino” prop for a play (it came out well, by the way. Did I take a picture? No, of course not, darn it.) There was left over wool. Hm. It found its way into my fiber bag, and onto a drop spindle. Then we wandered outside because the weather was nice. I prefer to spin standing up because there is more vertical space for the spindle to spin, which is a problem in an orthotic boot, at least for long periods of time. The doc told me to rest, and I’m trying, truly.

Spinning mixed green wool outside

Paper flower wreath

That was more work than I anticipated. Folding all the flowers from slightly off-sized origami paper torn from a book wasn’t bad, but adding the twisting of the wire stems doubled the time for each. Then I decided to cut down some of the paper to make three different sizes. Then my kids’ school was cancelled for three days because there weren’t enough teachers and subs due to COVID infections. Hm. Anyway, I did finally complete the wreath by adding the flowers to a grape vine circle. I regularly change out the picks on this wreath, so no gluing, I just hooked the wire around the vine so I can use the base again. Rather than fill the wreath full of flowers, I did a size gradient so I can still see the lovely woody vines. I do like this wreath!

Paper flower wreath on a grape vine base

Switching skeins

I’m ready to add in a new skein on Grandma’s blanket. I actually made it through the skein she was working on, which bodes well for the project! Grandma did not let the yarn run out willy nilly, but gauged if she had enough for a new row, and did her joins at the edges with an overhand knot. I’m guessing that she addressed the ends when she added the border.

Joining yarn at the edge of the project

I can appreciate this method because making joins in the middle of a row can leave unsightly lumps. There are many methods of joining (that might be another post), but leaving them on the edge is a sure fire way of avoiding seeing them in the field of work. Now I’m really hoping Grandma added the yarn waste into her yardage calculations.

Switching needles

I don’t like metal knitting needles. The are so slick I feel like I’m going to drop them, and if you don’t notice them coming unscrewed from the cable, you have an extreme panic moment when you suddenly have loose stitches at the end of the needle. The nylon cable has also taken on a permanent twist, which makes it fight the needle movement.

Interchangeable circular knitting needles with stiff nylon cord

My Grandma used metal replaceable needle tips on her interchangeable circular needles. Although I want to finish her project, it won’t be with her needles if I want to retain what sanity I have left. I understand that at the time they were the latest thing and better than what came before, but there are now even better options. I ordered some Prym circular needles in the same size Grandma used, but with a fixed multi-strand steel cable, which is strong and flexible. These needles are easier on my hands as I knit because I don’t have a death grip on slippery slidey needles that have a mind of their own.

Switching from metal needles to Prym ergonomic knitting needles

I do not get a kick back from Prym, in case you are wondering, I just really enjoy the thought and engineering that went into their design.