Pattern Review: Diamond Hat

It is that time again. I have a build up of gifted acrylic yarn, and a chorus craft fair coming up, so it is time to crochet hats. I can’t bring myself to make the same hat over and over, so it is also a time for me to explore patterns and techniques. Moogy is running a campaign with Warm Up America for a hats, scarves, and mitten drive. Moogy graciously provided some of their free patterns for the drive, including a Diamond Hat pattern. This pattern had two techniques that were new to me: using treble crochet stitches to make diamonds, and using back loop single crochet to make ribbing. I like both methods! This hat crochets up quickly because of the double crochets, but has a very classic look. It did take me a few rows to figure out exactly where to hook in the treble crochets: under the leg so all four legs have a single join point. The picture below is actually my second hat. The first did not have as much definition near the crown. There is a PDF version available of the pattern for a price, but unfortunately the designer included links for the special stitches in the PDF, which don’t work when you print the pattern (obviously).

Photo description: Diamond crochet hat in green acrylic using a pattern by Moogly

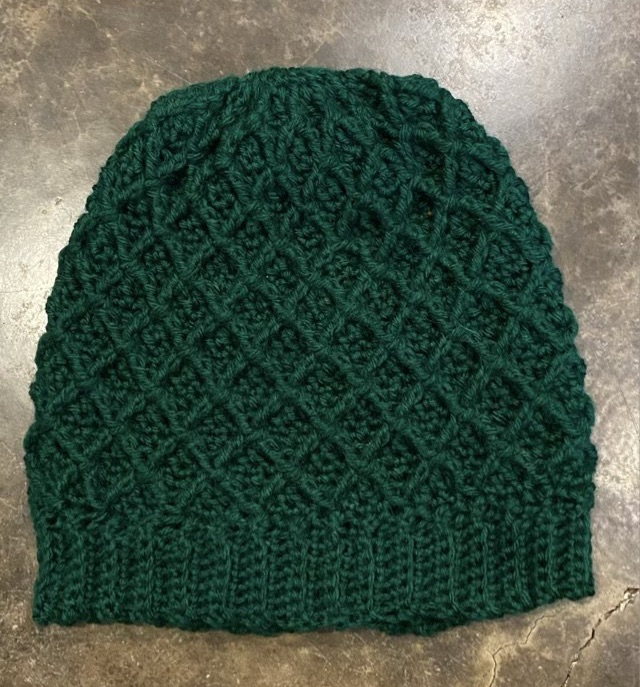
The hat is flexible, thick, and warm. I think I will make a few in different colors without getting distracted (much). This is definitely a pattern that I will keep in my repertoire.

Fiber Page: Ramie

I completed the fiber page for my spindle spun Ramie top fiber from Hearthside fibers. Ramie was pleasant to spin and has a cottony feel but with a long staple length. I experimented with three and four ply yarns.

Photo description: 12 x 13.5 inch fiber page with (clockwise) a sample of macrame on a bamboo stick, the card from Hearthside Fibers that says “Ramie Top Developed in China about 4,000 BC Non-stinging member of the nettle family”, paper bobbins containing single spun, 3-ply, and 4-ply yarn, finger woven sample, crocheted basket weave swatch, plain weave swatch, knitted swatch, unspun fiber in a clear topped drawer
Photo description: sample fiber page with the swatches flipped up to show the descriptions written in white ink on the blue card stock

Hot

My outside vegetable garden didn’t happen this year. I started basil and bell peppers inside, then waited to plant because a friend planted outside too soon and their peppers all died. Then it got hot (it’s Texas y’all), and the raised bed needed an overhaul because it isn’t draining, which is a yucky job in the heat. So now it is September and my peppers and basil are still in the window. The pepper leaves are a rich dark green and the plant is fruiting. What is pollinating them inside? I’ve actually had more fruit set inside than outside. Hm.

Photo description: small red orange pepper peeking out between dark green pepper plant leaves

The seeds I started were labeled Bell Pepper Carnival Mix, and I am getting some different colors: red, green, purple. The peppers are quite small, probably because they are still in their starter pots. We picked and ate the pepper pictured above and were surprised at the heat, not like a bell pepper at all. It also is shaped more like a fresno pepper. So I’m wondering if my Carnival mix was a pepper mix rather than a bell pepper mix, or if smaller fruit from restricted growing conditions makes for a hotter pepper. Hm.

Dishwasher magnet

The problem with multiple parallel projects is sometimes bits get buried and I forget I have a work in progress. That happened with the dishwasher signs that I made with my folks’ laser cutter. I brought the parts home then got distracted. It happens. I found the parts again, realized I had everything I needed to complete it, I just had to make the magnet hole a little larger.

Photo description: laser cut wood disc with roll of sandpaper. The center hole was slightly too small for the magnet, so it had to be sanded until the magnet could be pressed in.

After fixing the magnet to the middle of the center layer, I could then glue all three layers together: the sign, the magnet layer, and the laser cut felt. To make sure everything set tight, after brushing on the wood glue and assembling, I wrapped the magnet in wax paper and clamped it in a book press to dry.

Photo caption: two dishwasher magnets, one sign up, one felt up, sitting on two book presses

To finish and protect the wood, I used Howard’s Feed-n-Wax.

Photo description: dishwasher magnet in use with four labels on a rotating circle: Dirty, Delay, Washing, and Clean

Throwback Thursday: silver clay

In April of 2009 I made one of my favorite metal clay jewelry sets. Metal clay is fine particles of silver suspended in a medium to make it workable like clay. It is then fired in a kiln to burn off the organics leaving nearly pure silver in the slightly smaller shaped form, all without forging or soldering.

Photo description: silver clay pieces ready for the kiln. The cork supports burn away in the high temperatures.
Photo description: after firing the pieces need to be cleaned with a brass brush
Photo description: fired metal pieces polished to a mirror finish by tumbling with polishing media
Photo description: custom metal clay links and clasps combined with sterling silver production elements and Swarovski crystal to make a necklace, bracelet, and earring set

The metal clay does give options for designs that are difficult to achieve with traditional gold smithing tools, but requires its own set of specialty tools like the kiln.