That was unexpected

I wanted to try my new professional wood burner setup on some paper. I ordered some handmade paper that looked vintage and setup my wood burner with a small writing tip. Since this was new, I started on a low setting on the control box. I had an unexpected result. The lines on the paper where lighter, not burned. I turned up the dial and then achieved the brown color I was expecting from hot metal applied to paper. I made little circles and wrote down my dial settings.

Different effects at different temperatures of a wood burner with a writing tip on handmade paper

The light color was intriguing. Was it a fluke? Could I reproduce the effect? Being able to add dark and light to a drawing certainly opens up interesting possibilities. I turned the dial back down and was able to get light lines again. Maybe the fibers are being ironed down. Maybe the gentle heat is reacting with what ever was used to age the paper. What if I use a different tip?

Different burn results using a loop tip

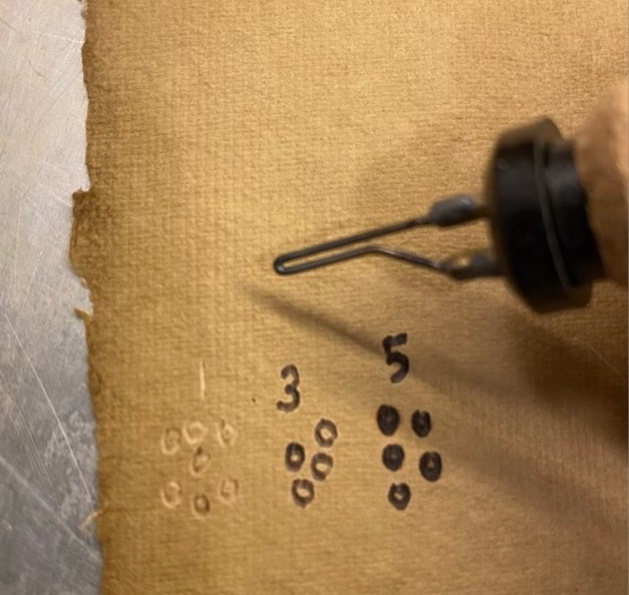
Different tips do carry the heat differently. I was almost able to achieve the lightened effect with a slightly larger tip, but only at the lowest setting. Still, so many possibilities.

And Happy Father’s Day to all those that fill the Father’s role!

Update on Grandma’s blanket

I’m still working on my Grandma’s last unfinished project. I’ve been knitting along on the main body of the blanket and I had a chilling thought. What if I don’t have enough yarn to do the border? I have an idea of how long she intended it to be, but what if I’m wrong? What if I’m missing a skein or two? Yikes! Deep breath. I’ll just make the borders now, while I have plenty of yarn.

Grandma’s blanket with one border side complete

The top and bottom border strip are a fixed length, so I’m starting with those. For the side borders, I will knit them as long as I think the blanket should be, but not finish the taper, rather I’ll put the stitches on a stitch holder, and if I need to rip out, I can do so. Then I can go back and put 90% of the rest of the yarn into the central field. When almost all the yarn is gone, I can finish the side tapers and sew it all together. I don’t need to save yarn for the tassels called for in the pattern (I don’t like tassels, they just get tangled), so I just need to save enough to piece it all together. I have a plan.

Spinning upgrade

I’ve been stalking online spinning groups, reading others’ questions and the answers given. On a post about drive bands on spinning wheels, I read a discussion on cotton versus hemp bands and adjusting the tension, and in that discussion someone causally mentioned stretchy drive bands. Hm? What an intriguing idea. I dug through my stash and found some stretchy cord usually used for jewelry. Only the largest diameter (1.5mm) was still in decent condition, the rest had dry rotted and was brittle. Taking the warning for the long term stability of rubber, I tossed the useless bits and used the thicker cord for my bicycle spinning wheel.

Clear rubber cord used as a drive band

I had been having trouble with the cotton cord drive band slipping, even with a couple coats of beeswax. So I removed it and tried the clear rubber cord with surgeon’s knot. While I was experimenting, I also wrapped a couple tiny rubber bands around the spindle’s hub to give some grip. It took a couple tries to get the tension right, but then everything worked even better! Hurray!

Custom bracelets

Although I have gone away from speculative jewelry making, I do accept custom orders on occasion. I particularly like stamped metal bracelets with dual messages.

Getting ready to stamp metal

After using 0000 steel wool to smooth the edges, I stamp the outside of the aluminum bracelet blank first, then engrave the second saying on the inside with a small rotary engraver. Black ink in the recesses enhances the stamped letters, but doesn’t help the engraved letters. Another pass with fine steel wool and the bracelets are ready for forming.

Engraved side

I did splurge on a new tool for forming the bracelets; a steel bracelet bender (shown in the top right of the top photo). This works very well for the middle, but I still like my nylon forming pliers to get the curve on the very ends. After bending, a couple coats of microcrystalline wax helps prevent fingerprints and gives a nice finish to the cuffs.

Finished bracelet surrounded by hand stamped muslin pouches

The muslin pouches I blogged about yesterday work wonderfully to protect and package the bracelets. Job done!

Stamped pouches

I had an idea for a small pouch that didn’t require a string tie, or button, or zipper. Inspired by couch pillow covers, these have overlapping flaps in the back that do well to keep small rigid items protected.

Stamping muslin

I wanted 4” square pouches, so tore an 11” strip of washed and ironed unbleached cotton muslin, marked 4.5” sections along the strip, and stamped my logo in the center of each section. To stamp, I squirted some fabric paint into a bowl, then loaded a sponge brush with paint to apply the paint to the stamp.

Making a 1/4” hem

I hemmed both long edges of the strip with a 1/4” hem foot on my sewing machine. (Hands down, this is my favorite foot.)

Sewing adjacent sides of the pouches

To form the pouches, I folded the long strip inside out, with about a 2” overlap, then sewed 1/4” on either side of my pencil lines. A cut between the seams, clips of the corners, turned inside out and pressed, and I was able to fairly quickly produce many small product bags!

Finished stamped product pouches