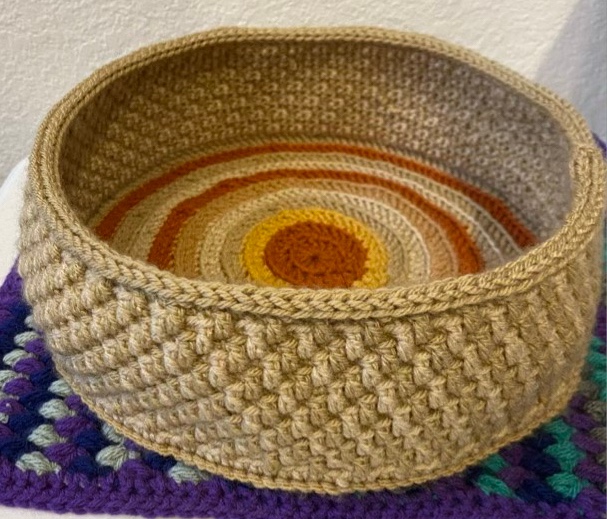
Crocheted bell sleeves

I really wanted bell sleeves on my tie-dyed t-shirt. My first attempt did not please me, so I ripped it out and tried again. I tried some crocheted lace with worsted yarn, but it was too thick and stiff. So I fell back on a crochet standard: number 10 cotton. This cotton is in every craft store, and nearly always comes in at least white, black, and rainbow. It is great for crocheting lace. I sewed a chain stitch to the inside of the sleeve hem, then crocheted in the round a simple alternating shell pattern.

Photo description: Rainbow colored fabric, with a rainbow colored cotton thread sewn as a chain stitch, showing the needle mid-stitch.
Photo description: Rainbow colored crocheted lace bell sleeves on an ironing board with steamer at the ready.

When the sleeves were done, I steamed them, which worked brilliantly to even out the stitches. The rainbow thread made serendipitous color pooling as the stitch pattern changed, which goes along with the tie-dye nicely.

Photo description: Rainbow tie-dyed spiral t-shirt with crocheted lace bell sleeves.
Photo description: Close-up of bell sleeve being held open.

So here comes the crochet pattern and math, for those that are interested.

With needle and crochet thread, make an embroidered chain stitch around the inside hem of the sleeve. The size of the stitches should be slightly larger than a crocheted chain done with a size 0 hook.

Row A: With a size 0 crochet hook (2mm), join the thread to the first chain, chain (ch 3), double crochet (dc) into the same chain, ch 2, 2 dc in same chain. Skip 2 chains, (dc, ch 1, dc) in same chain. *Skip 2 chains, (2dc, ch2, 2dc), skip two chains, (dc, ch1, dc). Repeat from * around. At this point you can tell if the work is bunching up the fabric, or ruffling out, depending on how long the embroidered stitches were. If it is not to your liking, rip out and use a different number of skipped chains. This is the only place it will matter, just note how many shell sequences you make, so you can match it on the second sleeve. For instance, if you have 72 chains and 12 shell sets, each shell set will span 6 chains, so you’ll skip two chains between shells. A shell set consists of a shell stitch and a v-stitch.

Row B: Slip stitch (sl st) into the center of the first shell, (ch3, dc, ch2, 2dc) into same shell, (dc, ch1, dc) in next V-stitch, *(2dc, ch2, 2dc) in next shell, (dc, ch1, dc) in next v-stitch. Repeat from * around.

Repeat row B, 8 more times, or until the straight part of the sleeve is the length you want. Now we will start the bell.

Row C: Sl st into the center of the first shell, (ch3, 2dc, ch2, 3dc) into same shell, (dc, ch1, dc) in next V-stitch, *(3dc, ch2, 3dc) in next shell, (dc, ch1, dc) in next v-stitch. Repeat from * around.

Repeat row C, 4 more times.

Row D: Sl st into the center of the first shell, (ch3, 2dc, ch2, 3dc) into same shell, (2dc, ch2, 2dc) in next V-stitch, *(3dc, ch2, 3dc) in next shell, (2dc, ch2, 2dc) in next v-stitch. Repeat from * around.

Repeat row D, 4 more times.

Row E: Sl st into the center of the first shell, (ch3, 2dc, ch2, 3dc) into same shell, (3dc, ch2, 3dc) in each shell all the way around.

Repeat row E, 4 more times.

Row F: Sl st into the center of the first shell, (ch3, 3dc, ch3, 4dc) into same shell, (4dc, ch3, 4dc) in each shell all the way around.

Row G: Sl st into the center of the first shell, (ch3, 12dc) into same shell, (13dc) in each shell all the way around.

Join first shell, weave in ends, steam.

It writes up much more complicated than it works up.

Wool nests

I have some Baize Shetland wool that came as large batts. I’ve been tearing off strips to spin, but decided that it was inefficient to unroll the batts every time, so separated all of the batts into strips and wound them into loose “nests”.

Photo description: Separating a strip of near white Shetland wool from a batt, showing the approximately two inch strip coming away from the main batt, with a hand wrapped nest above.

To wrap the nest, I loosely wrap the wool strip around four fingers, then tuck the end in the middle. The nests stay together, and are easy to grab when it is time to spin.

Photo description: Eleven visible wool nests in a pile.

Corriedale page

I did a fiber sample page for the Corriedale wool I’ve been using for teaching spinning. The woven sample is my best yet; I started the weaving with a pass of twined weft away from the edge of the loom. My weaving then stayed more even and consistent to the end, where I did another twined pass. The twining keeps the weaving in place better too, so I didn’t need to make knots. If I were making a piece that would see more action than laying in a book, I would secure the fringe better, either with more twined passes, or knotted or sewn fringe.

Photo description: clockwise from top left: 3×5 card with “Corriedale obtained from Mohair & More on Etsy, Huntsville, TX, spun on a drop spindle”; single ply on a paper bobbin; two ply on a paper bobbin; crocheted lace round; woven sample with two salvages; knitted sample with garter stitch edge; sample of un-spun fiber

Corriedale is very nice to spin, has a nice feel, but isn’t the softest. The blended dark and light fibers make it easier to see the twist, which is why I like it for learning.

Happy Surprise

I will be doing a spinning demonstration soon for a local founder’s day, and I thought I should really dress for the part this time. Fabric is crazy expensive, and as much as it saddens me to purchase costumes made from synthetics made in a foreign land, I did not have the time or resources to make all the pieces myself this time. I did not have high hopes for the online order, I have been thoroughly disappointed before, and it was in the plan to make modifications, but I was quite surprised when the garment arrived. Yes, it is made with synthetic fibers, but nicely, and well sewn. There were decorative pleats in the skirt that could actually be let down to give more length. And there were pockets. Yes, you heard me right, pockets. Proper, can-actually-hold-my-phone-without-falling-out, pockets. Color me impressed. I did take out the elastic on the arms, and let out one pleat to so the dress come closer to the floor (but not more since I don’t want to trip over it, but that’s it. No it isn’t authentic, yes, the re-enactors will have things to say, but it is much better than capris and a t-shirt, and I like the color.

Photo description: Green fabric with a pocket and decorative pleats that can give skirt more length.

Two to one

I have Frankenstein’d my shirts before, where I have two shirts with opposite positive attributes, so I combine them. Mostly it involves ripping seams, cutting, and sewing back together. I’m at it again. I found a printed tee that I liked the print and the message: “Keep going, just to see what happens” with singing dancing skeletons. But it is a “women’s” shirt, so has cap sleeves and a snug fit. Bah. I have an old shirt with lovely full sleeves, but a high neck and short body. Also Bah.

Photo description: Peach t-shirt with skeleton print and an olive green shirt with butterfly sleeves.

I like peach and olive green together, so I selected these shirts for tailor surgery. I ripped out the seams on the peach shirt, except for the shoulders, and cut a larger neck hole. I cut the sleeves and the hem off the olive shirt, and a two inch section of the body. I sewed the olive green strips into the side seams of the peach shirt to give it more ease, sewed the butterfly sleeves in, then used the olive green hem to edge the neckline.

Photo description: Printed peach tee with olive green butterfly sleeves, side gussets, and new scoop neckline.

I like how it came out. Before I had two shirts I would not wear, now I have one shirt I will.