Expanding my fiber book

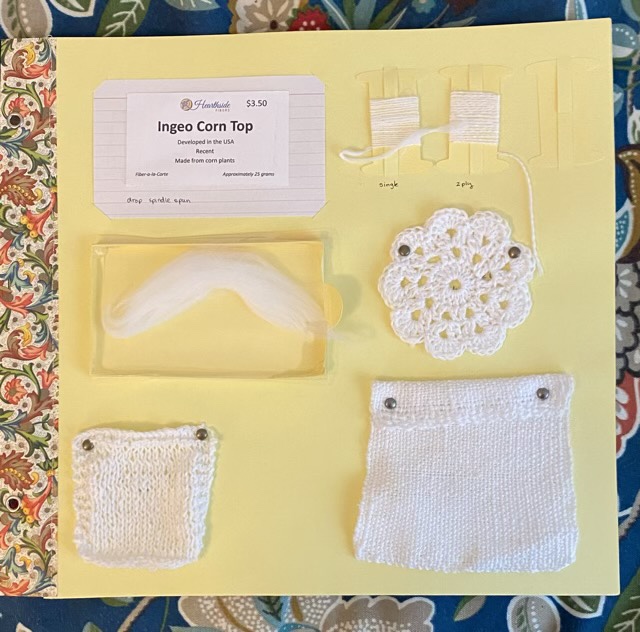
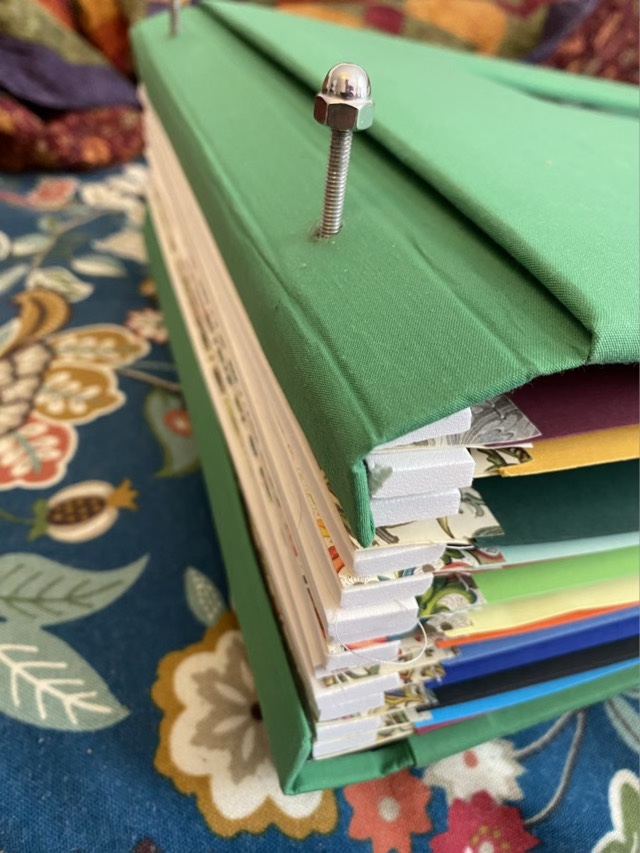
I’ve been quite frustrated with options for expanding my fiber book. The longest binding post screws I could find were not long enough, and the “extenders” had multiple reviews that that the threads didn’t fit, and I couldn’t find extenders that came with the caps. Bah. Time for a trip to the hardware store, specialty fasteners to the rescue. I found 5 inch threaded rods and some acorn nuts. They aren’t as fancy as a binding post, but they get the job done and I can probably fit another 10 pages in my book. I did have to adjust the cover to accommodate the acorn nuts, but it worked just fine to unfold the edge. A photo book this size would be very heavy and unwieldy, but my fiber pages are light and have thick spacers, so it works. I suppose I could separate up the pages into different books (shocking, right?), but right now I’d rather spend my money on fiber than book covers.

Photo description: Acorn nut on a threaded rod going through the edge of a photo book, sticking up about one inch over the cover, colored pages are spaced with white foam.

It is in my plan to eventually have an elegant external presentation, but I’m still cogitating on how I want that to look. This does the job for now.

Side gusset

My youngest has a favorite shirt that was getting snug. To prolong the life of the shirt and make her happy, I added a gusset to the sides and up through the arm. First I picked out the side seams about to the elbow.

Photo description: Gray knit material with blue thread and a seam ripper, showing a partially picked seam.

I had her try on the shirt at this stage to see how wide the gusset needed to be cut. Then I cut long rectangles of a similar weight black knit fabric and tapered the end by the elbow.

Photo description: Gray t-shirt on a white table with a black rectangle of fabric laid on top. The top of the rectangle has been cut to a point.

I put the right sides together, and starting at the arm, sewed in the gusset with a stretch stitch on the machine. To finish the bottom edge, I folded up a hem to match the sides and stitched across with black thread.

Photo description: Gray Oklahoma Thunder shirt with sewn in black gusset, side view.
Photo description: same shirt but laid in the table flat showing the front view of the gusset up to the elbow.

I was quite pleased with how the modification came out. The shirt fits better and looks like it was originally designed that way. My youngest is happy because the shirt is now much more comfy.

Corn fiber page

The Ingeo corn top was an interesting addition in my plant fiber sample bundle. It feels like cotton, but has a much longer staple length (the length of the individual fibers). I spun it up on a drop spindle and made a two-ply yarn.

Photo description: clockwise from the top left: Hearthside Fibers description card; paper bobbin holding the single; paper bobbin holding 2-ply; crocheted round (size C hook); four selvage woven sample(Clover mini loom); knit sample (size 4 needles); un-spun fiber in a paper drawer

I perused an internet search on the fiber, and liked the semi-science description (although it is still marketing speak) from Paradise Fibers:

“Extract dextrose from plant fibers, ferment, distill, and extract lactic acid into a polymer, creating silky, lightweight roving. Ideal for garments, biodegradable, breathable, high wickability, and flame resistance. Crimp and resilience make knitting easy. Low odor, good moisture management, fast drying, and soil release. Dye just like a protein fiber and marvel at the results! Renewable, natural, and simply divine.”

Some other sites also say that it is a good fiber for people with sensitive skin. I would certainly wear it. The samples I made up felt wonderfully soft. This is definitely a fiber I would buy in larger quantities to make full-sized project.

Hemp page

I finished another fiber page (really I did three together, but I’m going to spread it out in this blog). This page is about hemp. The hemp top, combed hemp fibers, came in a collection of plant fibers as a gift from my sister. I spun the singles on a drop spindle, then made a two-ply yarn using a different drop spindle. The fiber was nice to spin, but the resulting yarn was stiff and scratchy, even after setting the twist by boiling. Hemp is usually used to make rope and strong fabrics, certainly not anything you would want next to your skin. I made a knitted swatch with size 4 needles, a crocheted round with size C hook, and a woven sample with four salvages using a Clover mini-loom and doubling the warp threads. Even though I wouldn’t make clothing with this yarn, I think it is the neatest page I’ve done so far.

Photo description: Clockwise from top left, card from Hearthside fibers, three bobbins with single, 2-ply, and set 2-ply yarn, crocheted lace round, woven not-quite rectangle (still working on my weaving tension), knitted rectangle, and a card stock drawer with hemp fiber.

Flax page

I finally finished my flax page. This is internet-sourced combed top flax, which is an unusual preparation. It is the short fibers left over from processing the long fibers, combed together. This particular sample was also dyed, probably with nettle dye. There was very little information from the seller (buyer beware). I did manage to spin it in on a drop spindle, using a sponge to wet my fingers. Linen yarn needs to be boiled to set the twist and soften the fibers. When I boiled mine, I used tap water, which has traces of iron. The soft green color turned to a soft orange. The picture below shows the color change especially across the paper bobbins.

Photo description: 12×12 page with floral paper binding; the original fiber label top left; paper bobbins holding the yarn as a single, a two ply unset (green), and two ply set (orange) top right; unspun fiber in a paper drawer middle left; plain weave sample middle right; knitted sample bottom left; weft-faced weave bottom right.

I did a knit swatch on size 4 needles. It isn’t precise, probably due to the variations in yarn thickness, and has a bias, probably due to over twist of either the single or the ply. Still, it isn’t as rough as I thought it would be and has some nice drape.

I obtained a Clover brand mini-loom to make the woven samples. The first weaving (bottom right) I followed directions on warping the loom and ended up with a weft-faced weave. Interesting, but not what I wanted. The second time (middle right) I wrapped the warp completely around the loom and doubled the number of warp threads. This brought the epi (ends per inch) up and let me do a plain weave that showed both the warp and the weft.

I swear I did a crochet swatch too, but I must have stashed it somewhere safe. I do still want to spin traditionally prepared flax, but I’m not likely to buy combed top flax again.