Distaff experiments part 1

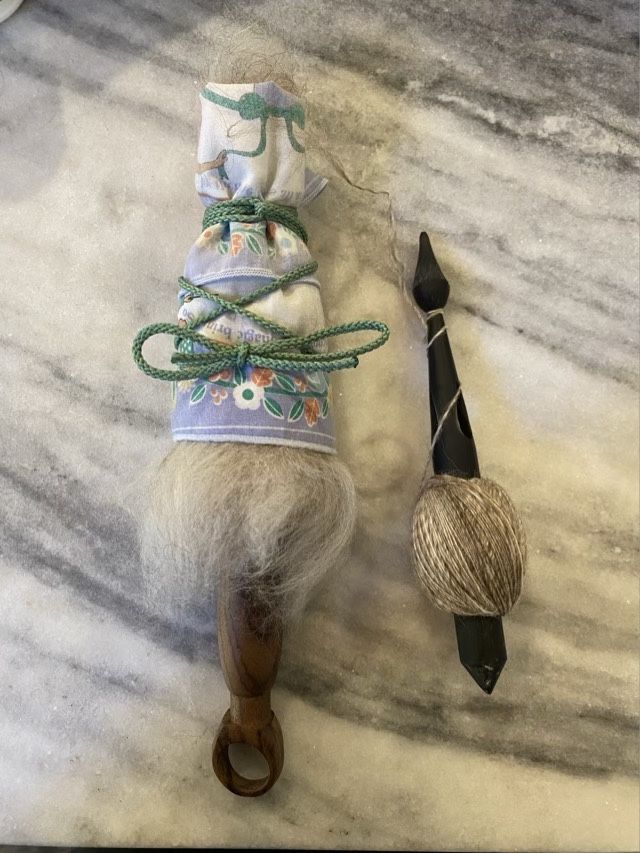
I’ve been trying different ways to dress my distaff. A distaff is a way to hold fiber in preparation for spinning, and placing the fiber on the shaft is called “dressing” because it is very much like placing clothes on a doll.

My first method involved laying out parallel tufts of fiber on a handkerchief, making sure the ends went the same direction and stuck out the bottom. I would then roll up the fiber and fabric on the distaff and tie it loosely with a cord. This worked OK until the fiber was mostly gone, then it preferred to stick to the cloth instead of itself, which made drafting difficult.

The second method I tried didn’t use the handkerchief, rather just the fiber parallel to the distaff shaft, tied round with cord. As I drafted the fibers off, the cord slipped down and became a restricting collar at the base of the shaft, also making it hard to draft.

My third method involved rolling the fiber parallel to the shaft, then adding the handkerchief around the fibers in a layer, and tying the cord so that it was tightest at the top. This top secured trick is the key. It was much easier to draft the fibers off the distaff, the dressing behaved itself to the near end when I had enough fiber to hold in my hand without tangling.

Photo description: Rosewood ring distaff dressed with a blended carded fiber, handkerchief, and cord in a inverted cone shape (left). 3D printed Tough resin spindle with single spun yarn wound nostepinne style (right).

Rolled brim hat

So I thought a rolled brim knit cap was some kind of knitting voodoo. I was looking up patterns to see how to do it. Y’all, it is just knit. Stockinette stitch, which makes the familiar v shaped stitches that we associate with knitting, is unbalanced and curls without a stabilizing edge (like ribbing). So the rolled brim is the natural state of a knit tube. Hm. So I tried one, and sure enough the edge curls. I even managed to do the crown of the hat in knit using seven decreases, then ran the end of the yarn through the last seven stitches and pulled tight to form a nice little rosette in the center. I threw some embroidery on to see how that went.

Photo description: Green and white knit hat with vine embroidery.
Photo description: Crown of the hat showing seven slightly spiraled sections neatly closed at the top.

I used superwash merino sock weight yarn. I would do things differently next time, so I’m not going to write up a pattern. For posterity sake I’ll write down details, though. I used two size 2 circular needles; a slip, slip, knit decrease on each of the seven sections, sometimes separated by a row of knit; and attempted a stem stitch for the embroidery. The stem stitch stretches with the fabric, but I don’t like how it doesn’t make a continuous line. That might just need practice, though. I was hoping for more of a spiral on the top of the hat too.

Crochet embellishments

I modified another t-shirt. I don’t care for crew neck t-shirts (sensory thing with fabric touching my neck), so I cut off the binding, and used black crochet thread to make a blanket stitch all around the neckline, then added a simple chain 3, double crochet repeat pattern row. I like 3/4 sleeves, so I used the same 3 chain, double crochet pattern to lengthen the short sleeves, and added a scalloped edging by making five chain 1, 1 double crochet in every other junction.

Photo description: Black Smashing Pumpkins t-shirt with black crocheted lace at the neck and sleeve.

I am not historically a lace person, but the practicality of it in our Texas heat is appealing. The idea of practical lace also amuses me.

New sling bed

One of the sling beds in the catio gave up under the weight of the kitten and popped its grommet. I removed the rest, it has lasted awhile, and puzzled over a replacement. The two sections of 1 x4” wood that I screwed to the catio supports seemed about the size of a pillow case. It turned out it was a little wider, but with a quick seam and a couple of snipped holes, I converted an old pillow case into a cat sling bed that slides over two parallel boards.

Photo description: Gray tabby sitting in the hammock made with a repurposed green cotton pillowcase suspended by two boards

Cotton does degrade in the sun, but this might be a better design idea than grommets in the corners screwed to the board. I’ll see of the cats use this setup, and if they do, replace the cotton with outdoor resistant fabric.

Pet prints card

I’ve periodically been sending cards to my eldest in college so there is mail in the mail box. We all signed a card, and I thought it would be nice if the pets “signed” it too. There are products that have ink on one side of a thin sheet of plastic, so prints of baby’s feet, or dog feet, can be made without getting ink on the foot. I love when people are clever. I made the paw prints on the card stock provided, the animals were mostly cooperative, then I cut out around the prints so I could arrange them the way I wanted. What I didn’t read closely, though, is that the ink doesn’t dry, so is intended to be framed behind glass where the print can’t be smudged. Oops. Thermal laminate sheets to the rescue. Running a lamination sheet through the heat roller without paper makes a nice clear, cuttable sheet of plastic. I trimmed this to my card size, attached the prints with glue dots, then used washi tape for the frame and to hold it all in place.

Photo description: Pre-assambly: Ink pad from Green Pollywog, teal card stock with animal prints on round white paper, clear plastic sheet, black washi tape, roll of glue dots.
Photo description: Finished card with the animals names written beneath each print and the year written at the bottom.

Can we talk about the size of Thor’s feet? Wowza. Griffin’s is understandably the largest print, he is the largest dog at about 50 pounds. Missy’s doggy print is next largest (she is 20 pounds). Thor’s print is near Missy’s in size; I haven’t weighed him lately, but he is an almost seven-month-old kitten. Izzy the cat’s print is definitely smaller than Thor’s and at last weigh she was 11.9 pounds. Sophie the cat has the most petite print, and was the most trouble to get a print, and of course is the print I wanted to send most. I was able to trim away most of the unwanted ink drag.