So many peaches

Freshly washed Parker County Peaches (about 1/4 of my whole haul)

I recently went to the local Farmer’s Market in town and loaded up on local peaches. I think I had nearly 10 pounds! At home, I put them in a large paper bag to finish ripening. We did eat some right away, and some the next day, and the next, but we still weren’t able to get through them all when they hit peak ripeness. So I decided to freeze them. Ripe peaches are fiddly things to cut! I tried several methods, but found these steps listed below worked well for me.

First two longitudinal cuts allow one section to be removed
Cut one slice at a time and use a slight twisting motion to release the slice from the pit
Skins remove easily by sliding the knife between the flesh and skin

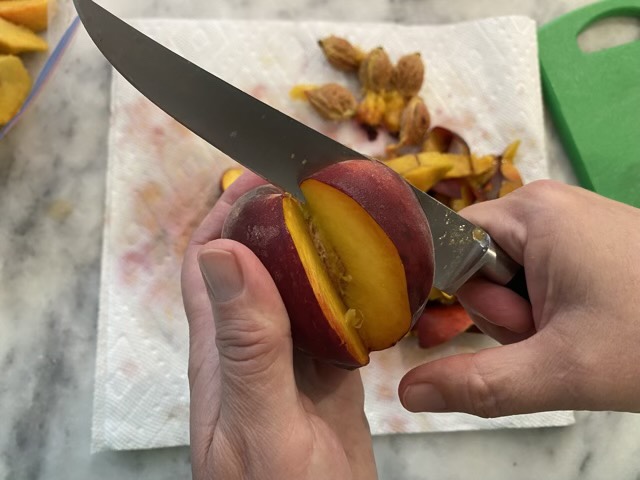
My slices aren’t beautiful, but they froze well and go great in smoothies. The skins I popped into the food processor, then froze as a block to give to the chickens later. (It is rather hot here, frozen treats are favorite.)

Update on Grandma’s blanket

I’m still working on my Grandma’s last unfinished project. I’ve been knitting along on the main body of the blanket and I had a chilling thought. What if I don’t have enough yarn to do the border? I have an idea of how long she intended it to be, but what if I’m wrong? What if I’m missing a skein or two? Yikes! Deep breath. I’ll just make the borders now, while I have plenty of yarn.

Grandma’s blanket with one border side complete

The top and bottom border strip are a fixed length, so I’m starting with those. For the side borders, I will knit them as long as I think the blanket should be, but not finish the taper, rather I’ll put the stitches on a stitch holder, and if I need to rip out, I can do so. Then I can go back and put 90% of the rest of the yarn into the central field. When almost all the yarn is gone, I can finish the side tapers and sew it all together. I don’t need to save yarn for the tassels called for in the pattern (I don’t like tassels, they just get tangled), so I just need to save enough to piece it all together. I have a plan.

Nodes

I have been diligently using clean shears to remove the spent blooms on our hearty hibiscus. I’ve read that Thrips get to the dirt when the blooms fall, and there can complete their life cycle. So any damaged or finished bloom needs to go before it falls. As I was clipping, I had one come off in my hand before the scissors could touch the stem. What? Upon closer inspection I noticed a node in the stem about an inch down from the bloom. On every bloom and bud. It takes very little effort to snap off the end at this natural weak point. Neat. No remembering to bring the scissors, I can just pop off the old buds each day as I walk by.

Hearty Hibiscus spent bloom with arrow pointing to the node.

We are getting less Thrip interrupted buds and more blooms daily. The blooms only last a day, so many opportunities to snap stems at the nodes.

Two blooms!!

Spinning upgrade

I’ve been stalking online spinning groups, reading others’ questions and the answers given. On a post about drive bands on spinning wheels, I read a discussion on cotton versus hemp bands and adjusting the tension, and in that discussion someone causally mentioned stretchy drive bands. Hm? What an intriguing idea. I dug through my stash and found some stretchy cord usually used for jewelry. Only the largest diameter (1.5mm) was still in decent condition, the rest had dry rotted and was brittle. Taking the warning for the long term stability of rubber, I tossed the useless bits and used the thicker cord for my bicycle spinning wheel.

Clear rubber cord used as a drive band

I had been having trouble with the cotton cord drive band slipping, even with a couple coats of beeswax. So I removed it and tried the clear rubber cord with surgeon’s knot. While I was experimenting, I also wrapped a couple tiny rubber bands around the spindle’s hub to give some grip. It took a couple tries to get the tension right, but then everything worked even better! Hurray!

Blooms

Hurray! The hearty hibiscus bloomed!

Hibiscus bloom

We have not won the battle with the Thrips, as I had to cut off several buds that were thrip damaged. If the bud opens, but doesn’t burst forth, I assume thrips are to blame. I cut these damaged buds off and throw them away to disrupt the thrip life cycle (they need some dirt time). The Neem oil, Peppermint oil, and Castor soap solution helps some against the insect invasion, so I’ll continue the regimen. I’m not sure I want to delve into stronger methods at this point.

Suspected Thrip damaged buds