Processing

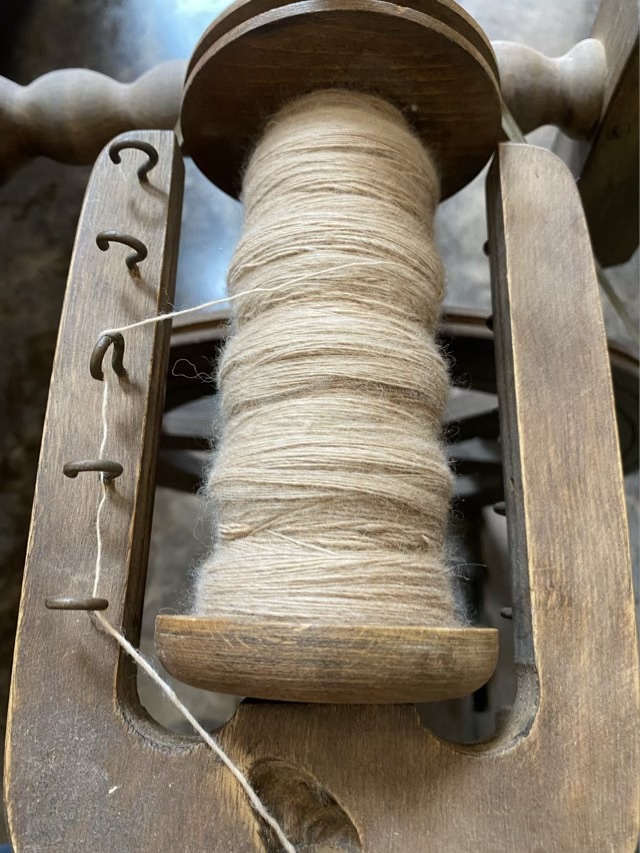
I’m still working on spinning the fawn-colored alpaca wool on my vintage Befra Willy spinning wheel. I’d like to get it finished up so I can give the wheel a good rub down with Howard’s Feed-n-wax, but apparently my fiber basket is bottomless. (Or I get distracted…)

Today’s distraction is an evenly wrapped bobbin. There are all sorts of devices out there designed to achieve a smooth wrap, rather than the bumpy wrap produced by the hooks on the flyer. A smoothly wrapped bobbin makes taking the yarn off the bobbin easier, with less potential for breakage.

I’ve been thinking on this, and noticed that I can turn my hooks and get a slightly different take up angle on the flyer. This helps a little, and if I did this from the beginning I would certainly be closer to that epitome of bobbin wrapping that seems to be so coveted.

Photo description: closeup of a flyer mechanism on a Befra Willy vintage spinning wheel, with light fawn colored alpaca single wrapped around the bobbin and going through the hooks on the flyer. One hook is turned sideways. The yarn wound on the bobbin is thicker near the hooks, resulting in bumps.

Oh, deer!

After getting mostly deer body parts on the trail cam, I adjusted it to look down rather than across and was rewarded with full body deer pictures! How many can you spot in the picture below?

Photo description: night view picture with a winter landscape of twigs and braches and deer, with eyes aglow.

I find four deer, all does as far as I can tell. I do have the advantage of seeing all the pictures before and after this one, but here are all the deer circled.

Photo description: four colored circles on the deer in the same picture.

Even cooler, the deer rest within the camera view, so the trail cam is going to stay in this position for a while.

Photo description: two deer laying down in camera view.

New neckline

Crew neck t-shirt necklines bother me. I don’t like things touching my neck, but I do like the longer short sleeves and longer hem of crew neck shirts. I have found a new way to fix the problem.

Photo description: rainbow tie-dye crew neck t-shirt with “Embrace Differences” in black (my design and available on TeePublic), with the neckband cut off.

Rather than leave the raw edge, which looks OK from a distance but untidy up close, I whipped stitched a tiny hem around the neckline.

Photo description: picking up a single thread from the back side of the fabric with a needle.
Photo description: whip stitch continues through about a 1/4 inch of the raw edge of the hem.
Photo description: inside-out view of the finished neckline hem.

Yes, it is hand-sewing. I did see a tutorial that used a narrow zigzig machine stitch, but I’m not good with knits and machine stitching. I like sewing some things by hand because it gives me more control.

Photo description: three t-shirts with new hand-sewn necklines.

I liked this method so much, I pulled shirts from my closet and redid them as well!

Matts

Long haired cats really need daily brushing. I have not been able to brush Mr Tom daily (yes, he’s my neighbor’s cat, but he lets me brush him, so I do), so over the winter he had matts build up under his legs. When I first noticed them they were tight to the skin, making cutting them out a risky business. As his fur grew, the matts came away from the skin and I was able to slip a small pair of scissors in to clip it off while he was lying on his side. He only allows me to get one off before he lets me know he’s had enough, though, so there is still some work to do. Spring time shedding should help, and will be a good time to get him matt free again.

Photo description: fingers holding a large white matt of cat fur with a brush visible on the ground and a long haired white cat with flame points looking up with blue eyes.

I brush Shadow less, but Shadow keeps himself groomed better than Mr Tom.

Knitting row counter

I saw the idea of using a numbered chain to count knitting rows. A simple sequence of 1-10, with a melody clip to mark the tens, will allow counting up to 110. I did not want to buy plastic beads, but I did have copper circles and chain in my stash.

Photo description: clockwise – metal hole punch, antique ball peen hammer, bent nose pliers, copper circle, copper chain, metal number stamp

I started by punching two holes in the sides of the copper circles, then I stamped a number between the circles and planished the back flat. I connected the number links with links of chain.

Photo description: copper circles linked with oval copper chain surrounded by the tools mentioned above. My “10” link is a 0 because there wasn’t room for a 1.

I made a small melody clip out of 20 gauge copper wire. The size of the copper links means this will only work on knitting needles that are size 2 or smaller, which is perfect for sock making.

Photo description: toes of two socks with the row counter on the needle between stitches. The melody clip is on the first link, and the needle is through the eighth link.

To use the row counter, every time you knit to it, you move it one link. For the start of the sock toes, I’m really just using it to keep track of odds or evens, an increase row or no increase row. This is because I had to rip out these socks already because I forgot the no increase rows. I do like the row counter!