
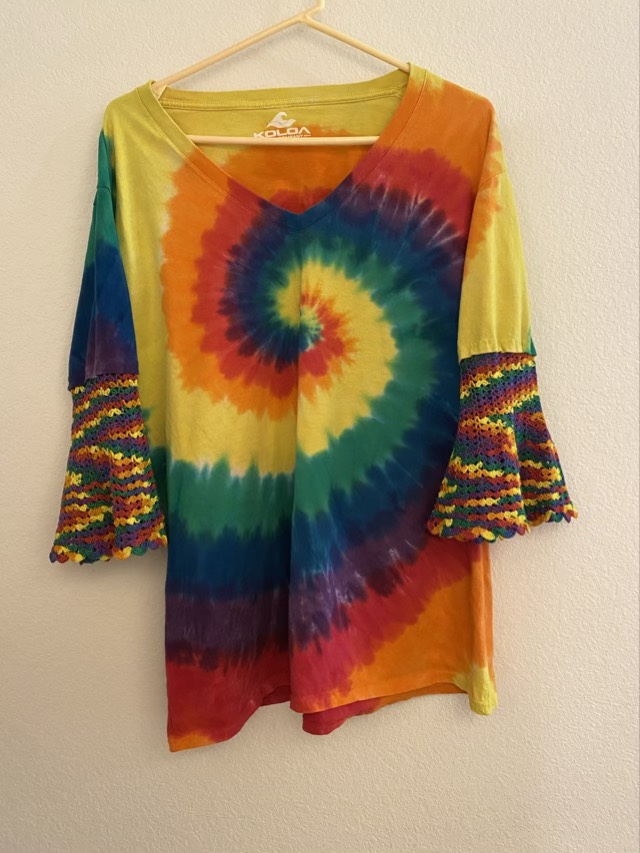
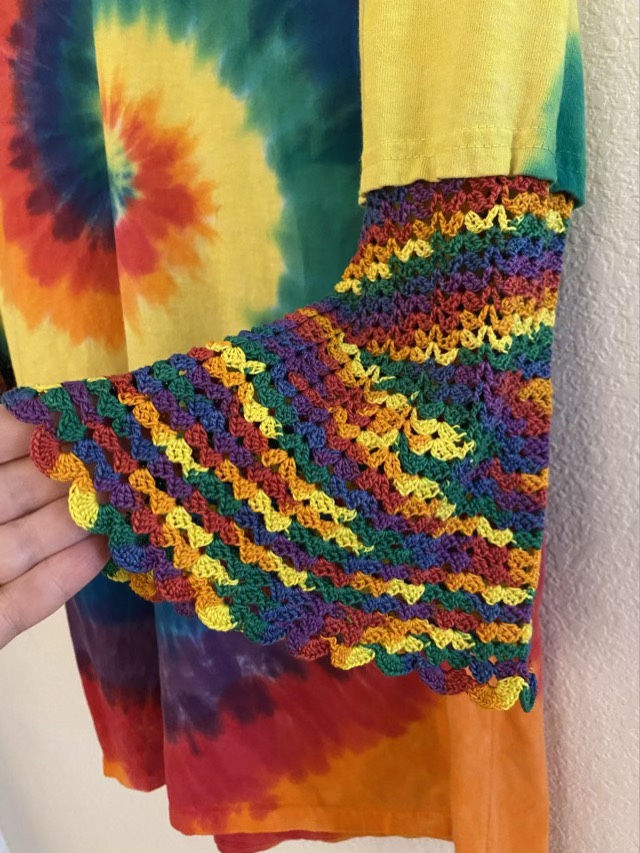
I really wanted bell sleeves on my tie-dyed t-shirt. My first attempt did not please me, so I ripped it out and tried again. I tried some crocheted lace with worsted yarn, but it was too thick and stiff. So I fell back on a crochet standard: number 10 cotton. This cotton is in every craft store, and nearly always comes in at least white, black, and rainbow. It is great for crocheting lace. I sewed a chain stitch to the inside of the sleeve hem, then crocheted in the round a simple alternating shell pattern.

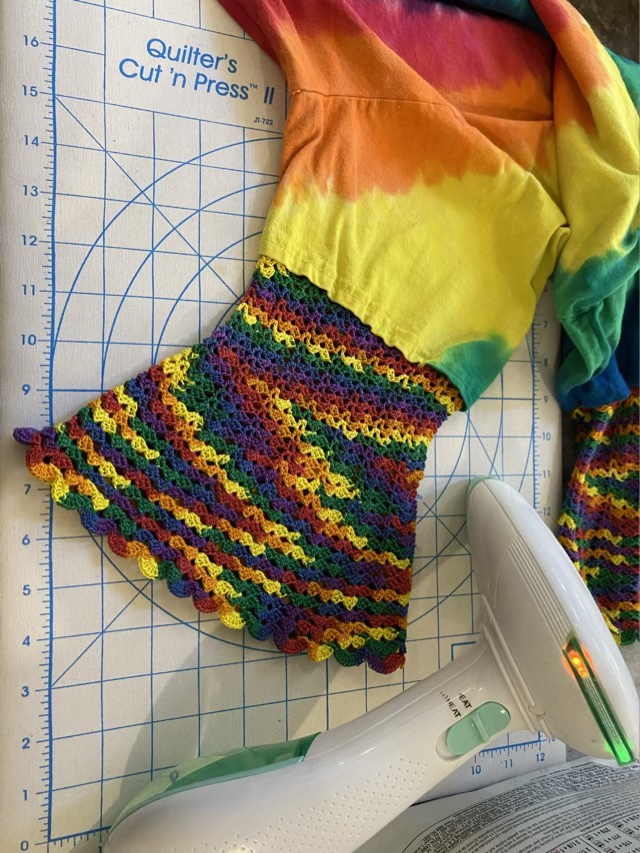
When the sleeves were done, I steamed them, which worked brilliantly to even out the stitches. The rainbow thread made serendipitous color pooling as the stitch pattern changed, which goes along with the tie-dye nicely.
So here comes the crochet pattern and math, for those that are interested.
With needle and crochet thread, make an embroidered chain stitch around the inside hem of the sleeve. The size of the stitches should be slightly larger than a crocheted chain done with a size 0 hook.
Row A: With a size 0 crochet hook (2mm), join the thread to the first chain, chain (ch 3), double crochet (dc) into the same chain, ch 2, 2 dc in same chain. Skip 2 chains, (dc, ch 1, dc) in same chain. *Skip 2 chains, (2dc, ch2, 2dc), skip two chains, (dc, ch1, dc). Repeat from * around. At this point you can tell if the work is bunching up the fabric, or ruffling out, depending on how long the embroidered stitches were. If it is not to your liking, rip out and use a different number of skipped chains. This is the only place it will matter, just note how many shell sequences you make, so you can match it on the second sleeve. For instance, if you have 72 chains and 12 shell sets, each shell set will span 6 chains, so you’ll skip two chains between shells. A shell set consists of a shell stitch and a v-stitch.
Row B: Slip stitch (sl st) into the center of the first shell, (ch3, dc, ch2, 2dc) into same shell, (dc, ch1, dc) in next V-stitch, *(2dc, ch2, 2dc) in next shell, (dc, ch1, dc) in next v-stitch. Repeat from * around.
Repeat row B, 8 more times, or until the straight part of the sleeve is the length you want. Now we will start the bell.
Row C: Sl st into the center of the first shell, (ch3, 2dc, ch2, 3dc) into same shell, (dc, ch1, dc) in next V-stitch, *(3dc, ch2, 3dc) in next shell, (dc, ch1, dc) in next v-stitch. Repeat from * around.
Repeat row C, 4 more times.
Row D: Sl st into the center of the first shell, (ch3, 2dc, ch2, 3dc) into same shell, (2dc, ch2, 2dc) in next V-stitch, *(3dc, ch2, 3dc) in next shell, (2dc, ch2, 2dc) in next v-stitch. Repeat from * around.
Repeat row D, 4 more times.
Row E: Sl st into the center of the first shell, (ch3, 2dc, ch2, 3dc) into same shell, (3dc, ch2, 3dc) in each shell all the way around.
Repeat row E, 4 more times.
Row F: Sl st into the center of the first shell, (ch3, 3dc, ch3, 4dc) into same shell, (4dc, ch3, 4dc) in each shell all the way around.
Row G: Sl st into the center of the first shell, (ch3, 12dc) into same shell, (13dc) in each shell all the way around.
Join first shell, weave in ends, steam.
It writes up much more complicated than it works up.
