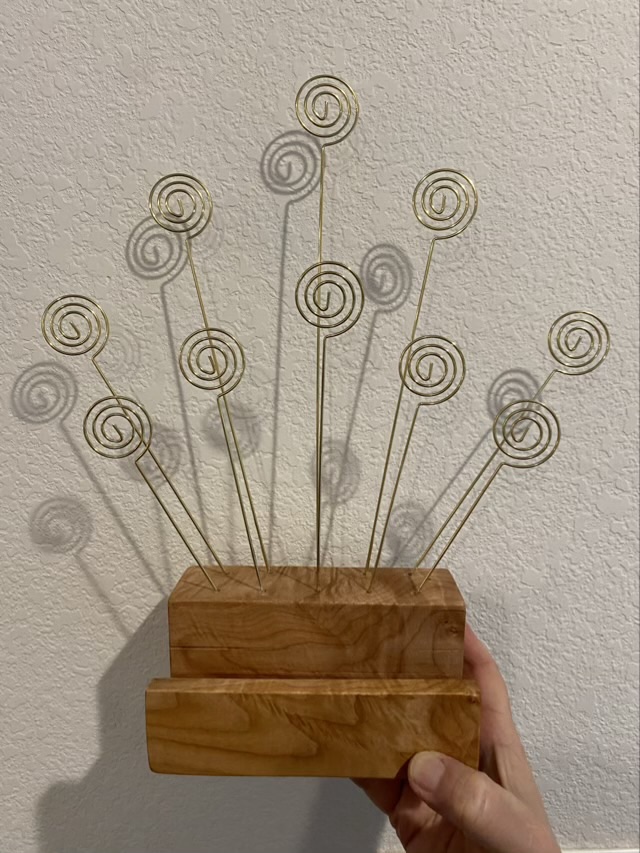
Throwback Thursday: recycled glass

Back in December of 2012 I was into cutting up wine bottles and heating them up to melting in my kiln. I made an ornament from the base of a green bottle, cut a groove in the side with my wet grinder, and wire wrapped it. Using an engraving tool I wrote the first verse from A Visit from St Nicholas by Clement-Clark Moore in a spiral out in tiny lettering.

Photo description: green glass ornament with spiral writing and organza ribbon

As I scroll my photo history, I don’t take every craft project for a throwback post. When I look at a photo, if there aren’t enough words in my head, it doesn’t get picked. There are some projects where I don’t remember what materials I used, or don’t have any in process photos to remind me how I constructed it. So I keep scrolling. Since I’m still picking projects from 13 years ago, I figure I have some leeway.

Throwback Thursday: button necklace

In September 2011 I was experimenting with ways to make jewelry from buttons without destroying the button. One of Grandma’s pet peeves was when buttons had been glued or cut to “upcycle” them (she was a button collector).

I came up with a wire wrap that utilized a four hole button, making it into a link component.

Photo description: first step of a button spiral cluster using two pieces of 20 gauge sterling silver wire threaded though hand made wire coils, then the button holes, then interlocked
Photo description: step 2 begins making each leg of wire into a spiral
Photo description: close up of finished spiral cluster securing a button nondestructively
Photo description: full necklace with identical buttons wire wrapped in silver

I actually took production photos for this necklace, for which I am now very thankful.

New card display

I have had it in my head for a while to make a new card display for the greeting cards I have for sale at my favorite coffee shop. I wanted something artsy that would show off the cards, but also have a spot for a stack of cards and business cards. I decided the take a block of flame maple from my stash and combine it with some spiral wire card holders.

Photo description: hand made card holder with flame maple base with storage slot carved in and embedded wire spirals for also holding cards

I used a two part epoxy to secure the wires in the holes drilled into the wood, then finished the block with Howard Feed-n-Wax. The feed and wax is my kind of product: it applies easily and dries within 24 hours or less, plus it smells nice.

Photo description: card holder with cards for sale at The Full Cup in Weatherford Texas

The bouquet style display brings the cards up off the table and creates an eye catching arrangement.

Throwback Thursday: necklace pins

These necklace pins are from September 2010. I like dual purpose pieces, and these pins that are also a necklace focal are some of the best I’ve made. I crafted the pins from sterling silver wire and Swarovski crystal beads; one represents a Bluebonnet and the other Queen Anne’s Lace wild flowers.

Photo description: hand made broach crafted of sterling silver wire and Swarovski crystal beads depicting a Bluebonnet blossom and leaf
Photo description: hand made broach crafted of sterling silver wire and Swarovski crystal beads depicting a Queen Anne’s Lace bloom
Photo description: Bluebonnet pin on a hand knotted Swarovski pearl necklace with coordinating earrings and bracelet with custom heart clasp
Photo description: Queen Anne’s Lace pin on a crocheted rope of Swarovski crystal beads. The rope has sterling silver wire running through the center to make it hold shape and is crocheted with thin silk cord strung with beads

Hat stand

I’ve needed a hat stand for awhile now, mostly to block hats after I wash them. I decided to make one using a pretty block of spalted tamarind and some hanger wire so I could use it at the craft fair where I was selling all those hats I’ve made.

Photo description: finished spalted tamarind wood block with wire hat form holding a crocheted gray beanie.

I wanted to just have the thick wire so that I could adjust the size based on the hat, but the hat looked a little strange with only vertical support. I added a spiral of aluminum wire, which helps the hat, but looks strange without the hat. Hm. It worked fine at the fair, but I will continue to fiddle with the form.

Photo description: form without the hat showing all the wire