Throwback Thursday: Egyptian Coil Bracelet

Here is a throwback to May 2008 of a work in wire that looks more complicated than it is.

Photo description: Egyptian coil bracelet made from 22 gauge silver wire with handmade toggle clasp

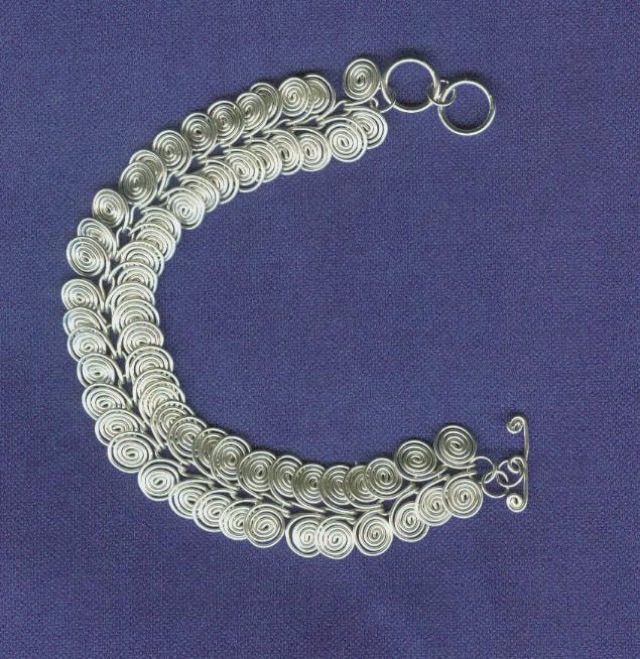
I enjoy items that are made my connecting identical elements to form something new. The Egyptian coil bracelet is made up of lengths of wire spiraled in opposite directions from the ends and folded in the middle. Each link connects through the center fold loop; the spacing between links depends on the length of the loop.

Although I like the look of the bracelet, the darn thing catches on everything. The thin gauge wire is easier to coil into a tight spiral, but when it catches on a thread or pocket, the wire pulls open. It is a good linkage study, though I recommend using 20 gauge wire or thicker.

Throwback Thursday: beaded crochet necklace

In May of 2008 I took a picture of a finished necklace for which I really should have tracked my hours. The main element is a beaded crochet tube that winds around wire wrapped cats-eye cabochons. I would work on the tube while my eldest was in preschool or napping, and I believe I could obtain an inch an hour at my fastest. It is very tiny work done with a very small crochet hook using silk thread and Delica seed beads, which are high quality and more uniform and also very small.

Photo description: Statement necklace with variegated blue beaded crochet rope wound around 17 glass cats-eye cabochons wire wrapped with the center cabochon featuring a wire tree

I still marvel at the amount of work that went into to that beaded rope. I strung the beads on the silk thread, then crocheted the rope, waxing the thread as I went. The finished strand feels very nice, has a nice weight and a pleasant feel, but it is truly a work of passion.

Throwback Thursday: Doodle Fish

Here is a throwback to April 2017 when I used a 3Doodler 2.0 tool to sculpt a fish.

Photo description: “Hooked” fish sculpture created for my Dad for Father’s Day using the 3Doodler 2.0, about 50 sticks of PLA, two plastic safety eyes, and about 12 hours working time.

Dad displayed the fish on a clear acrylic shelf in an upper window. Here is a picture from 2024.

Photo description: same doodled fish seven years later on a hanging shelf with the woods behind the window glass. His lure went A.W.OL. probably cat related.

As much as I loved the idea of the 3Doodler, the entry level extruder pens could not keep up with my desired work flow. I burned out a couple pens experimenting, and they often needed frequent breaks in production, more than I did.

Throwback Thursday: rolling pin

This Throwback Thursday doesn’t go quite so far back, we’re going to December 2021. I made a tapered French style rolling pin for my Mother-in-law and decorated it with painted daisies. I took some in process pictures, but because it was the holidays and I was in a whirlwind, I forgot to take final pictures. My MIL graciously sent me pictures of the rolling pin recently, so now I can share the project on the blog!

Photo description: maple wood tapered end rolling pin fresh off the lathe in 2021
Photo description: recent picture of the rolling pin painted with daisies and finished with a food-safe oil and wax mixture (photo credit to my MIL)
Photo description: closeup picture of the painted daisies, which really do look better close up (photo credit to my MIL)

Throwback Thursday: turquoise necklace

Photo description: Turquoise and silver necklace made in sections connected in an unusual manner, through the sides

I made this necklace in March of 2008, and it was featured in a FireMountain Gems catalog. I always meant to write up detailed instructions on its construction, but didn’t, so I’ll give you a short run down here.

The 13 cylinders are made by doing beaded crochet as a tube with waxed silk thread. I assembled each section with a cylindrical turquoise bead at each end, and ran a 20 gauge wire sterling silver wire down the middle, securing each end with a wire spiral. To connect the sections, I ran the same gauge wire through the sides of the cylinders, making sure that I went through the stitching inside, and made a spiral at each end. The clasp is a custom add-a-bead barrel style clasp, and I did have to ream out the bead hole to get the clasp into the bead.