Custom packaging

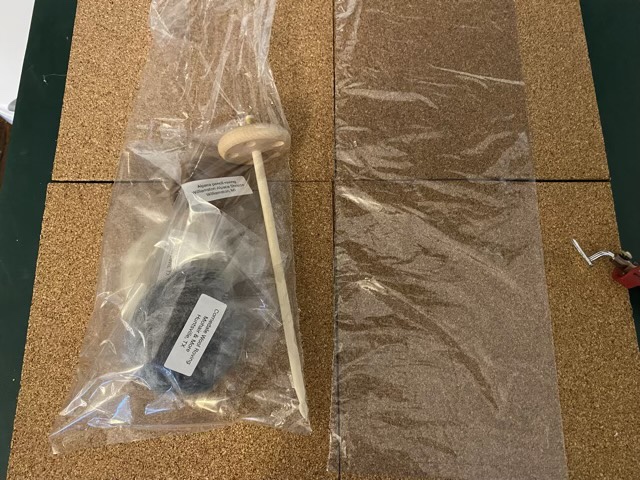
As much as I love cloth bags, sometimes you need packaging you can see through that is inexpensive. For my spinning starter kits I needed a long narrow plastic bag. I have a whole bundle of large clear plastic bags, but they are twice as wide as I needed for this application. I found that if I ran my quilting mini iron, set to high, down the center of the bags, it was enough to melt and separate the bag into two, with a well sealed seam. The iron does come with a blade attachment, but the blade cut the plastic too fast and didn’t heat the plastic up enough to melt it.

Photo description: Cork squares laid down on the table to protect the surface, two newly created long narrow plastic bags, with a mini iron to the side, blade assembly unused.
Photo description: Same table with one bag filled with a spindle and three samples of different animal fibers.
Photo description: Two completed Spinning starter packs, with insert containing instructions and resources.

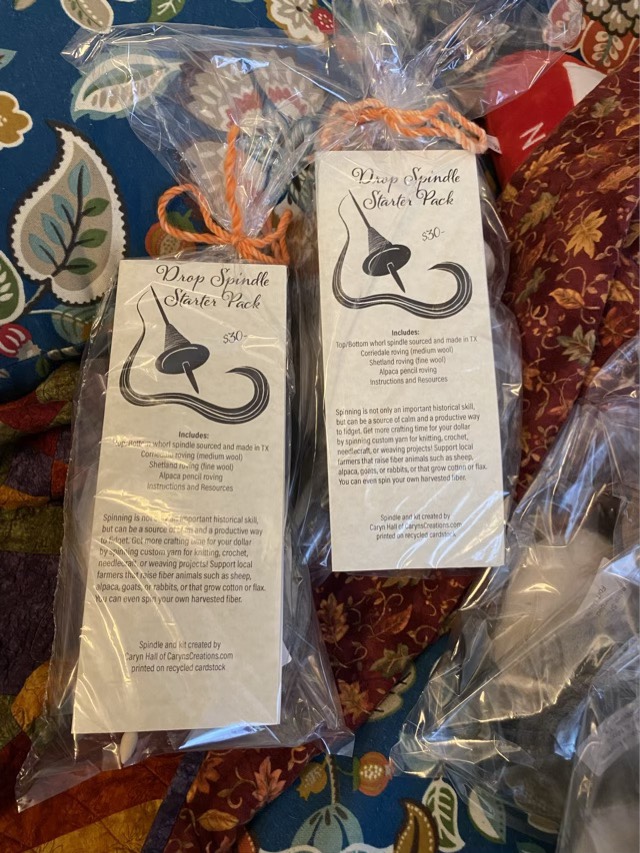
I tied off my bags with some of my old hand-spun yarn oddments. Another good use for left-over yarn!

Corriedale page

I did a fiber sample page for the Corriedale wool I’ve been using for teaching spinning. The woven sample is my best yet; I started the weaving with a pass of twined weft away from the edge of the loom. My weaving then stayed more even and consistent to the end, where I did another twined pass. The twining keeps the weaving in place better too, so I didn’t need to make knots. If I were making a piece that would see more action than laying in a book, I would secure the fringe better, either with more twined passes, or knotted or sewn fringe.

Photo description: clockwise from top left: 3×5 card with “Corriedale obtained from Mohair & More on Etsy, Huntsville, TX, spun on a drop spindle”; single ply on a paper bobbin; two ply on a paper bobbin; crocheted lace round; woven sample with two salvages; knitted sample with garter stitch edge; sample of un-spun fiber

Corriedale is very nice to spin, has a nice feel, but isn’t the softest. The blended dark and light fibers make it easier to see the twist, which is why I like it for learning.

Testing

Photo description: One the left a rosewood ring distaff dressed with blended wool and a handkerchief, on the right a custom 3D printed drop spindle with a small amount of spun yarn.

The test of the new 3D printed spindle went well. I dressed my distaff with a locally obtained wool blend and took my new spindle for a walk. I dropped it twice on the asphalt to no ill effect. Hurray! This is the first time I’ve used this distaff for wool; I figured out how to use it when I needed to control flax roving, and it works just as well for wool. I’ve seen others wrap their wool roving around the distaff, which for me is maddening. As I draft, the fibers pull tight and lock in a spiral. By laying the wool out parallel to the distaff in small sections, and securing it with a handkerchief and cord, the fibers drafted easily off the bottom of the bundle. Nice.

Bamboo page

Photo description: Clockwise from top left: “Bamboo Top” card which reads “Developed in China, plant based, made from the leaves and interior”, single spun yarn on a paper bobbin, 2-ply yarn, swatch woven on a Clover mini loom with 3 selvages, crocheted lace round, knitted rectangle, unspun fiber in a paper box.

Spinning my bamboo sample was very enjoyable. The fiber is soft, and the staple is a nice length. I did have some static issues, but those that were resolved with a spritz of water. I spun the singles on a drop spindle, and I kept the fiber and spindle in my purse to spin during waiting times. I made the two ply yarn from a center-pull ball using the same spindle. The fiber has a beautiful luster.

Photo description: A hand holding a single spun bamboo yarn wrapped nostepinne style on a 3D printed spindle.

First production run

I recently received 3D printed spindles from our first production run! Very exciting. The spindles have passed their drop tests, so the tough resin is holding up well. They aren’t completely indestructible, but it takes a great deal of effort to snap the neck (yes, I should have measured the force, but hindsight is 20/20.) The next step is to sand down the production marks (they take sanding well), and apply some decoration. Then I need to design the packaging. Phew! But I am inching forward!

Photo description: Seven small 3D printed spindles and three large spindles in black tough resin with grooved heads and teardrop holes above a straight shaft and pointed end.

I’m leaning toward calling these “phase” spindles, because they have aspects of other historical designs; the large diameter shaft is similar to a dealgan, it can be used as a supported spindle or a drop spindle, and the weight is adjustable.