Throwback Thursday: chair organizer

In May of 2013 I made this arm chair organizer that has pockets on the side for magazines and notebooks. I’m not sure why I didn’t sew on something to hold it down on the seat cushion, instead relying on butt power, but I am pleased how nicely I trimmed out the pockets using bias tape.

Photo description: floral fabric with a black background sewn with three overlapping pockets trimmed in green and filled with books
Photo description: other side of the organizer with different sized pockets to hold different books, electronics, and magazines
Photo description: over exposed photo of the chair from the front and the organizer stretched across the arms of the chair, no butt anchor

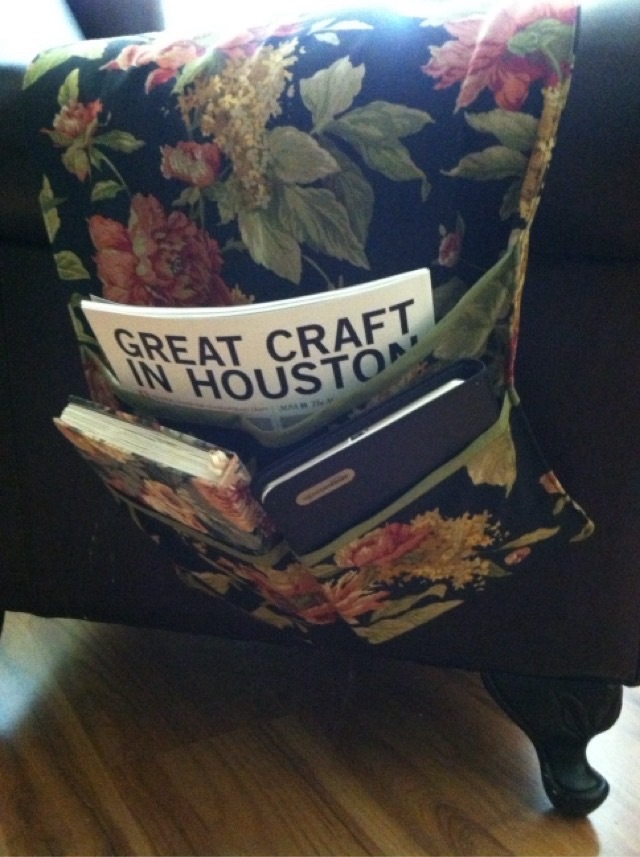
If I were to remake this project, I would add fabric to tuck down on the sides of the cushion, or maybe even go all the way around or under the cushion. Hm. Maybe I didn’t have enough fabric so had to rely on butt power. It would have made more sense to run the center section under the cushion.

Zelda cosplay part 5

The reveal! Here is the full Zonai panel for Zelda from the Tears of the Kingdom game.

Photo description: Cosplay outfit from Zelda Tears of the Kingdom with green under dress, off-white gathered over dress, and newly created front panel made of EVA foam sheet, acrylic paint, and silk

The jewelry panel is pinned to the silk with straight pins, because the EVA foam is easy to pin. The silk panel is safety pinned into the white dress that is a reused element from a previous Halloween. I sewed on the gold chiffon fabric the last time it was worn so that the dress wasn’t strapless. The under dress was my grandmother’s and is the same blue/green silk as the panel, but with a silver thread overlay pattern. I did sew knit side panels on that dress so that it had some breathing space.

Photo description: jewelry panel lifted from the silk panel to show they are different elements and not just painted on

And not so say that I have an impressive craft stash, but I bought very little for this assembly. Everything was reused or repurposed from previous projects. I did need to buy antique copper acrylic paint because I ran out, and as long as I was getting paint, also picked up a metallic dark green, which was a good choice for an under layer of the patina.

Zelda cosplay part 4

The bottom of the Zonai banner for my eldest’s Zelda Cosplay outfit was a challenge. In the images it looks like triangles hanging from the bottom of the panel. My jewelry cable method wouldn’t work because I would need to crisscross the wires, or bend them. I needed a way to attach them as if they were a whole fabric. Hm. Netting to the rescue. I cut the triangles from EVA foam sheet, painted them with pearlescent acrylic paint, then used the same paint to adhere the triangles to gold nylon netting.

Photo description: back of the triangles with the gold netting on top painted to the shapes
Photo description: gold netting trimmed and sewn to the bottom of the silk panel, back view

Tomorrow I will share pictures of the completed panel!

Leather phone case protype

I had the chance to sew some reclaimed leather on my antique Singer 66 treadle sewing machine. This leather is thin and flexible so was easy to sew, I suspect that a modern machine would be able to handle it as well. (There are tales out there that these old machines are great for sewing leather, but the truth is much more complicated.) I did crank the machine by hand rather than risk the speed of the treadle, and I used upholstery thread (and found my purchased bobbins don’t fit, sigh.)

I wanted an envelope style pocket with the flexibility to thread on a belt, or hang from belt loops with carabiners.

Photo description: sewing thin soft leather on a Singer 66 sewing machine
Photo description: pouch turned right-side out
Photo description: pouch with carabiners through the central hole in the belt pass through

The design needs work. I like the hole in the belt loop and the flexibility it gives, but the flap makes it difficult to get the phone in. I ended up clipping the edges of the flap so it still helps the phone stay put, but is easier to get the phone inside. Not ideal, but experiments will continue.

Throwback Thursday: ring frame

In March 2011 I made a shadow box into a ring holder for my sister. I sewed tubes of velvet and inserted foam rods, covered panels of paper board with velvet to line the sides, and bottom, then glued the velvet cushions tightly in place.

Photo description: velvet lined ring box built in a purchased shadow box
Photo description: shadow box with frame reinstalled and two new silver rings added, one spiraled wire, the other made from silver clay

I designed it with the idea that it could hang on a wall and still keep the rings in place. I gave it to my sister with two new rings. I checked in with her and it is still in use over 13 years later!