Grafting

I recently bought a sweater for my youngest and the sleeves were WAY too long. I knew this when I bought it, but figured I’d sew seams like I did for her jacket. Well, when I started investigating the construction, I saw that the sweater wasn’t just knit material sewn with thread, but actually knitted to shape and the seams joined with yarn. Hmm. I’ve seen a bunch of Pinterest pins on grafting, maybe I should try that.

Seam picked out on the arm of a sweater

I attacked the first sleeve by undoing the seam and using that yarn to stitch the cuff where I wanted it, then undid the knitting. Nope. It is functional, but not seamless.

On the second sleeve I removed the seam first again, then clipped the knitting at the top of what needed to go. I carefully (oh so carefully) undid the stitches and picked up the loops on a circular needle as I went. (I tried putting the circular needle in a row first, but kept accidentally switching rows.) I then frogged it (rip it rip it rip it), down to the cuff where I carefully picked up loops again on a circular needle.

Loops kept on a circular needle after removing excess

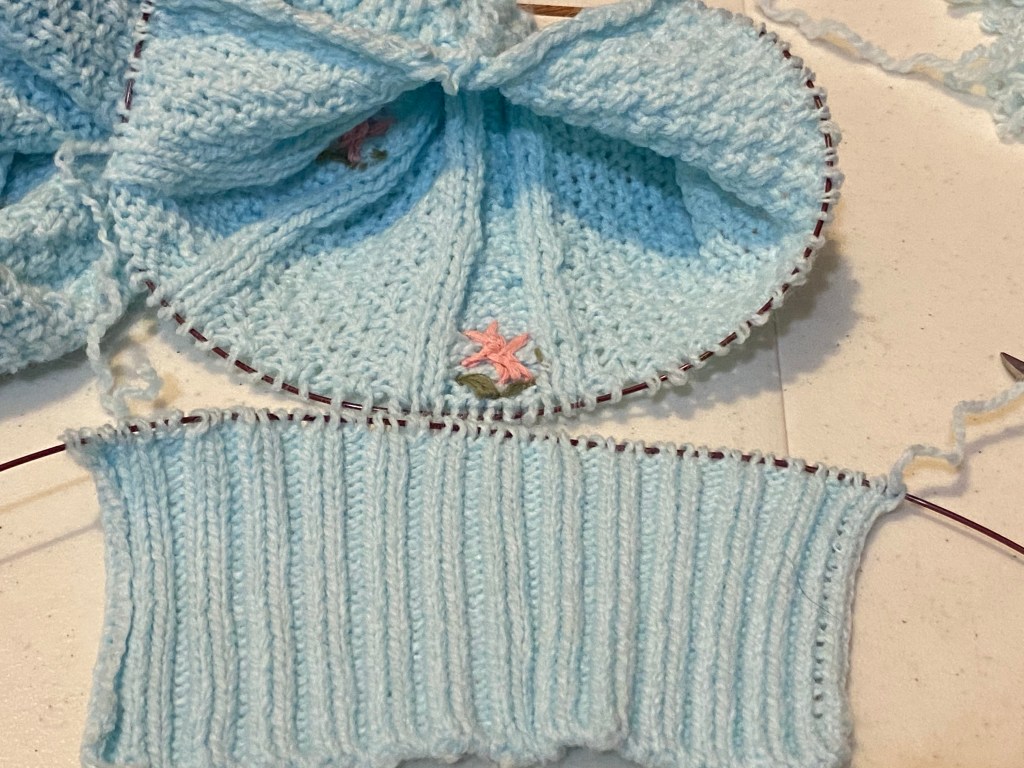
The sleeve had more stitches than the cuff, so I had to center the cuff and use some of the now spare yarn to graft the loops from the two needles together following these directions. Then I sewed the seam and did have to trim some knit fabric off. I did accidentally graft from the inside, but it was a happy accident because the perl side went better with the sweater pattern!

Left side sewn, right side grafted

Knitted swatches

I had some more of my differently plied yarn, so I knit some swatches. I used different needle sizes for each yarn, but used stockinette for each piece. I was reminded how much faster I am with long straight needles than with circular needles, but my knitting is still slower than my crocheting. I like the knitted fabric, but don’t really care to knit. Ah well.

Knitted swatches of hand spun wool which was plied differently

All the knitted swatches had to be blocked because stockinette stitch is curly. The 2- ply was the softest, but the S plied four-strand had the most balanced stitches (the right and left side of each loop have the same number of twists). Most commercial yarn has an S ply.

Plying alpaca

For my next alpaca project I want to try a plied yarn. This means spinning the singles thinner and plying three singles together. I am leaning toward knitting, so I an spinning my singles in a Z twist, and plying in S twist. This seems to work best for knitting (it is the way most yarns are machine made). If I were going to nålbind, I would switch the twist order, especially for the York stitch. It really is fascinating the way the twist effects the final product.

Center pull yarn ball, alpaca three ply, showing plied S twist

Since I am planning to knit, I made up some test swatches with various yarn scraps I had, as well as the new 3-ply alpaca. All the yarn was spindle spun, some with merino wool, some with alpaca, some plied, some singles. I found the the yarn with a Z twist knit up with uneven stitches, resulting in a fabric that doesn’t look balanced. The S twist, however, knits up nicely and the “V” of each stitch is balanced. The US 8 needles were a little small for my chunky 3-ply alpaca, and although the swatch was soft, it was not nearly as sumptuously soft as the swatch knit on US 10 needles. And oh is that last swatch soft; like cuddle on the couch, swatch against the cheek, sucking on your thumb kind of soft. It literally makes people say “oooo” when they hold it.

Merino wool, 3-ply, Z plied, knit on US 8 needles
Merino wool, single ply, Z spun, knit on US 8 needles (the stripe pattern is from the Z twist)
Alpaca (Aimee), single ply, Z spun, knit on US 8 needles
Alpaca (Sugar Plum), 3-ply, S plied, knit on US 8 needles
Alpaca (Sugar Plum), 3-ply, S plied, knit on US 10 needles

Knitted lace scarf

I’m stash busting: going through my yarn stash and using it up (so I can spin more yarn). I had a skein of machine lace in red metallic with a pattern on the label. I thought, hey! this will be a quick project.

Knitting with machine lace

I have crocheted a scarf from machine lace before, and I forgot that I said never again. Which is why the skein was unused in my stash. The idea is that you crochet or knit just the top two strands of lace, and the rest ruffles out. I’m not usually a ruffle person, but it really does make a striking scarf. But oh is that lace fiddly! I decided to pick up 10 stitches and was very careful to pick up the next loop on the lace for each stitch. Wrong. I wasn’t getting any ruffles and it was taking forever. So I took a breath, beat my OCD down with a stick, and stuck my needle in just any ol’ where. (Yes, I exaggerate, I did pick up lace at measured intervals, but because they were not always in the next loop, the ruffle effect happened.) Because I was doing a 10 stitch repeat (and turning the work in the same direction each time), I ended up with a sort of flat spiral. To maximize ruffle, I gave the whole thing a couple of twists and connected the ends to make an infinity scarf. I was much more pleased with the final result than I expected!

Ruffle infinity scarf

How to make knitting needles from common parts

In a pinch, or if you need a bunch of needles for teaching a class, you can make knitting needles from dowels you can find in a hardware store. Making your own needles not only gives you a greater connection to your knitting, it is a much cheaper way to have wood needles, which I find more pleasing than plastic or aluminum when knitting (these are cheaper than those too).

To make these needles I picked up 3/8″ poplar dowels, which are about 68 cents each, at my local hardware store. I also used 120 and 320 grit sand paper. I cut the dowels to 14.5″ (I used a chop saw, but a hand saw would also work). You can use the 120 grit sandpaper to sharpen one end of the dowel. Make a slightly more slanted angle than a sharpened pencil. Blunt the end slightly, so that it is still easy to pick up a stitch, but is harder to split the yarn.

Sharpening the dowel using sandpaper

Sand the whole needle with 320 grit paper so the yarn slides nicely, but isn’t slick. Rub your hands along the needle; the oils from your skin will help the yarn slide on the needle, and the needles with continue to improve with use.

From left to right: 3/8” dowel, cut dowel, shaped end, sanded end

I used wooden beads with a 3/8″ hole to put a stop on the end of my needle. Alternatively you could use a fancier large hole bead, air dry clay, or Sculpy clay on the end to make a stop. A drop of glue will help keep the stop in place.

Wood bead with 3/8“ hole

End stop

If you knit with a tight tension on your yarn, you may break the needle, but you can always make more needles. And learn to ease up the tension without breaking one of the fancy turned needles from the specialty yarn shop (ouch).

Happy knitting! And May the Fourth be with you.