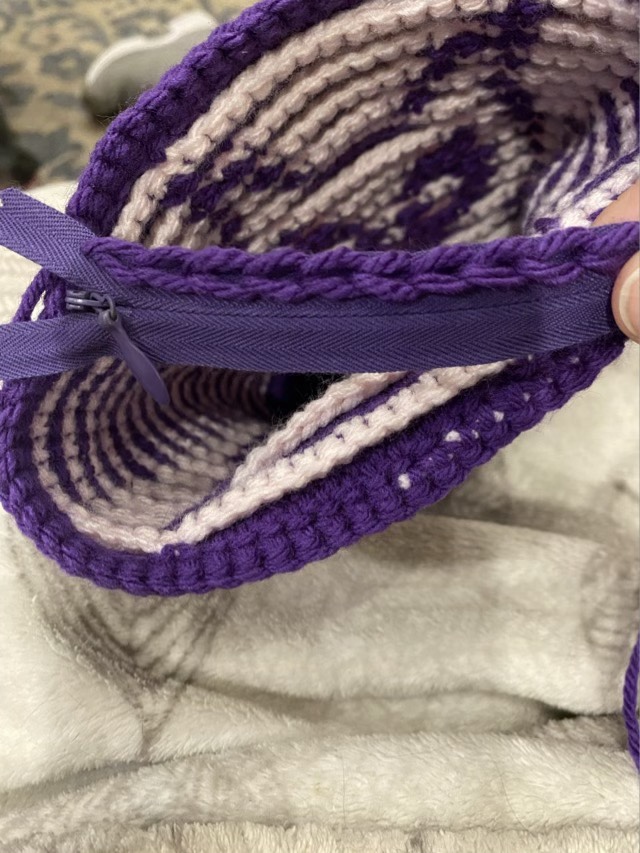
I wanted my owl bag to have a zipper, so I took a zipper from my stash and made a line of chain stitches a yarn needle and matching yarn on each side of the zipper.
Photo description: Purple invisible zipper with one side done with a line of embroidered chain stitch, in front of the bag to be zippered.
I then used a slip stitch to crochet the zipper to the inside of the bag, leaving one row as a lip at the top (mainly to help hide the zipper and stitches.)
Photo description: Finished zipper installation shown from the top of the crocheted bag.
Next for my mosaic crochet experiments is to attempt a chart of an image rather than a repeating pattern. I used the knitting chart app to plot out an owl, with the goal of making a small bag. I used a smaller hook to produce a dense fabric, and made the base as a long oval with increases on the ends in each row.
Photo description: Densely crocheted long oval in the foreground with calico cat and iPad in the background. The oval has been started with a chain, then four rounds added with increases on the ends only.
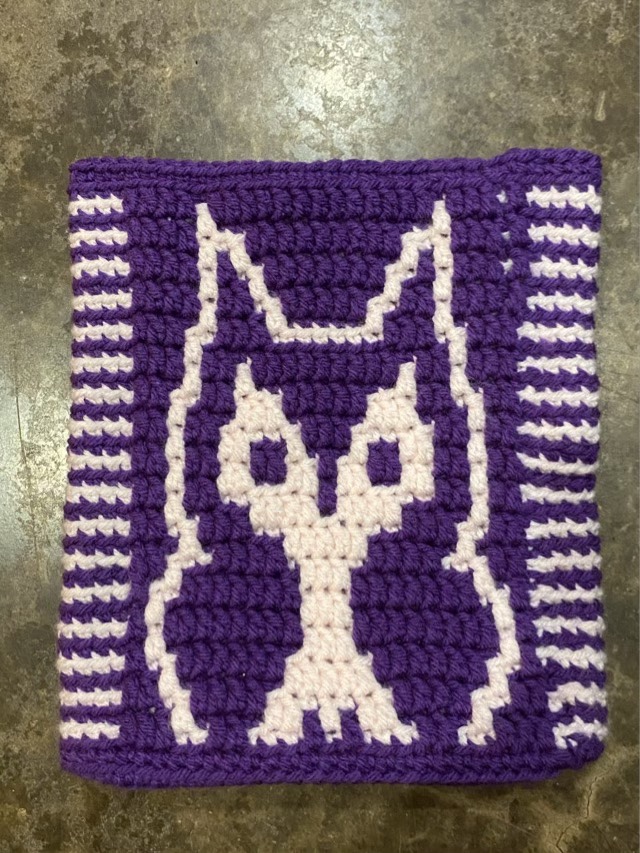
To make the walls of the bag, I worked in rounds of back loop single crochet, alternating colors, and dipping down with double crochet to block out color in the previous row. My original chart was close, but I had to make some adjustments as I went due to technical aspects. Here is the final chart.
Photo description: 25×28 grid with purple and white owl graphic.
And here is one side of the bag.
Photo description: Mosaic crochet bag on its side showing an elongated owl pattern with pink and purple stripes on the side.
It is still recognizable as an owl, but does have a different look since the mosaic crochet does not produce perfectly square color blocks, at least at my current level of understanding. This phenomenon occurs in charted knitting too. I found the reverse side of the crochet intriguing, as it was almost a negative of the front.
Photo description: Inside out bag with the light pink predominant rather than the purple, and the color blocks are split by row.
Since I worked in the round, I didn’t cut my ends, but took them up to the next row as I circled. This way I had less yarn ends to weave in (yay!)
I have worked my way through the entire bag of acrylic scrap yarn. Here is the lineup of hats I was able to put together with the multitude of colors.
Photo description: Six crocheted hats overlapped in an arc with variations of stripes, some with scalloped edges, some without.
This was actually a good color experiment. I combined colors I never would have picked originally, and I think they turned out well. Looking around a pile of yarn and deciding which colors to put together and in which amounts is a good brain exercise as well. Plus it is an excellent stash buster.
I’m still working through the bag of acrylic yarn odds and ends gifted to me by another avid crocheter. I made a couple cat beds, and now I have defaulted to my standard double crochet hats. These work up fast, can have many color changes, and are great to donate to either a cancer center or local charity.
Photo description: Teal, white, and pink crocheted hat with scalloped rim, sitting on my knee in the car.
These start with a magic circle and 10 double crochets. Each row has ten increases until the hat size is reached; hat sizes are typically the diameter, so a 7.5 hat has a 7 1/2” diameter circle. These hats are stretchy and form fitting, so they fit a range of heads, but I still like to make different sizes. Once the initial circle is the right size, the sides are double crocheted around with no increases. I like to use a slip stitch join when I’m not changing color, and an invisible join when I am changing color.
I added a scalloped edge, which on this hat is a double crochet five times separated by a single crochet, all in the same stitch. Skip one loop, slip stitch, skip another loop and go again.
I’ve been working on these while waiting for school pick up.
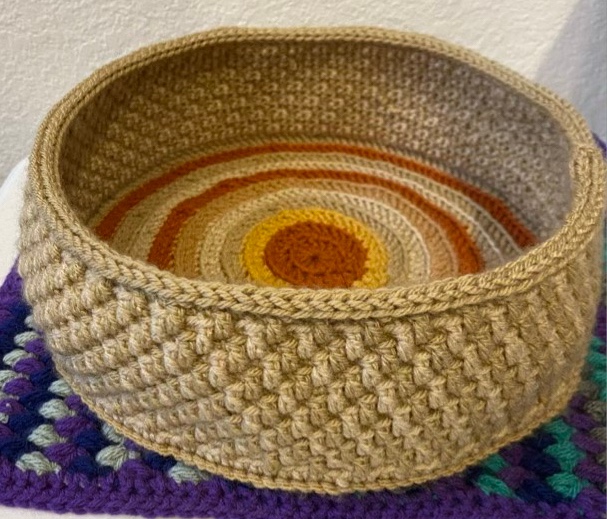
Here is another good yarn stash buster, a tightly crocheted mosaic basket. I combined the mosaic crochet technique of dipping down with color with an amigurumi technique of using a smaller hook to get a dense fabric.
Photo description: Standing round basket with multi-colored base in rounds, and sides with a two-tone basket pattern, rim finished with an i-cord, sitting on a puff stitch cat mat.
I’ve done a series of video shorts on the stitches starting here.
Here are the instructions:
With worsted weight acrylic yarn and a size G hook, double crochet (dc) 10 stitches into a magic ring. Pull the ring tight and finish the round with an invisible join. Weave in end.
Start the round by putting the hook through the back loop (bl), yarn over (yo), pull through, and make two chains (ch). Dc in the same space. 2dc in the back loop around for the first row. 1dc bl then 2dc bl for the second row. Dc bl, dc bl, 2dc bl for the third row, etcetera until you have a base the size you want. Each row should have 10 evenly spaced increases. Finish off each row with a invisible join, weave in end. Offset the increases to keep the circle round and not lumpy. You can change colors for each round.
Row 1: Turn the work, and work in the opposite direction so the basket pattern faces out. Join color 1 by inserting the hook into the bl, yo, pull up loop, ch1. Single crochet (sc) bl in same loop. Sc bl around. Join with slip stitch (sl st) to first sc.
Row 2 and 3: with color 1, ch 1, sc bl in same stitch, sc bl around. Join with slip stitch (sl st) to first sc. Do not cut yarn.
Row 4: With color 2, insert the hook into the bl, yo, pull up loop, ch1. Sc bl in same loop. Sc, dc in front loop (fl) of previous row (pr). * skip sc, sc bl, sc bl, dc fl pr. Repeat * around. Drop color 2, pick up color 1, sl st into first sc. Here is a video.
Row 5: With color 1, ch1, sc in same stitch. In this row make sure the dc fl pr is in the stitch before the previous row’s dc. Each dc is separated by two sc bl. Continue pattern around. Drop color 2, pick up color 1, sl st into first sc.
Row 6: With color 2, ch1, sc in same stitch. In this row make sure the dc fl pr is in the stitch before the previous row’s dc. Each dc is separated by two sc bl. Continue pattern around. Drop color 2, pick up color 1, sl st into first sc.
Repeat Rows 5-6 until desired height is reached.
I like to finish the top with a three loop i-cord, and found that skipping every fifth stitch gave a nice curve to my basket.
Photo description: Adding a three loop i-cord to the top of the basket, shows the basket side texture.Photo description: Calico cat in the crocheted basket, she is laying down, it is a tight fit.
Izzy the calico cat reports that I made this basket just a touch too small. She can’t tuck her head in.