Tension ring

My youngest is showing interest in crochet. One of the hardest parts of crochet (and knitting) is keeping an even tension. To assist, I made a tension ring. Yes, I did model it off of one I saw for sale, but I used 14 gauge aluminum wire from my stash to make it. Aluminum wire is very malleable, so a larger gauge (smaller number) is needed to hold the shape under use, but it is still easy to form toa finger in order to get good skin contact.

Photo description: aluminum ring made of 14 gauge wire with two spirals and two loops

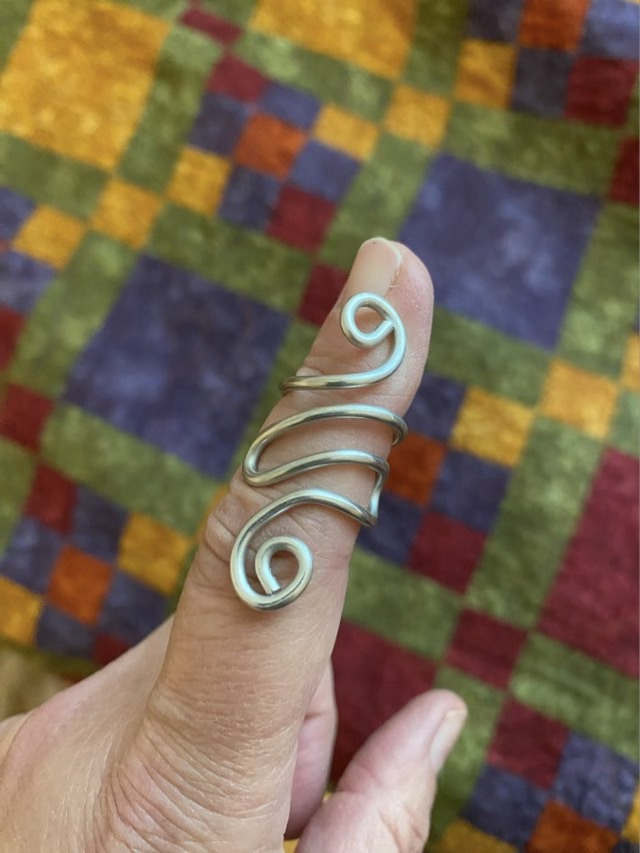
The shape of this ring makes it easy to slide the yarn under either a loop or a spiral, or have multiple points of contact. The more contact, the more drag, the more tension. It was a game changer for my daughter, who went from only being successful with assistance to chaining on her own.

Photo description: my daughter’s hands making her own chain using the ring tensioner and bulky weight pink yarn

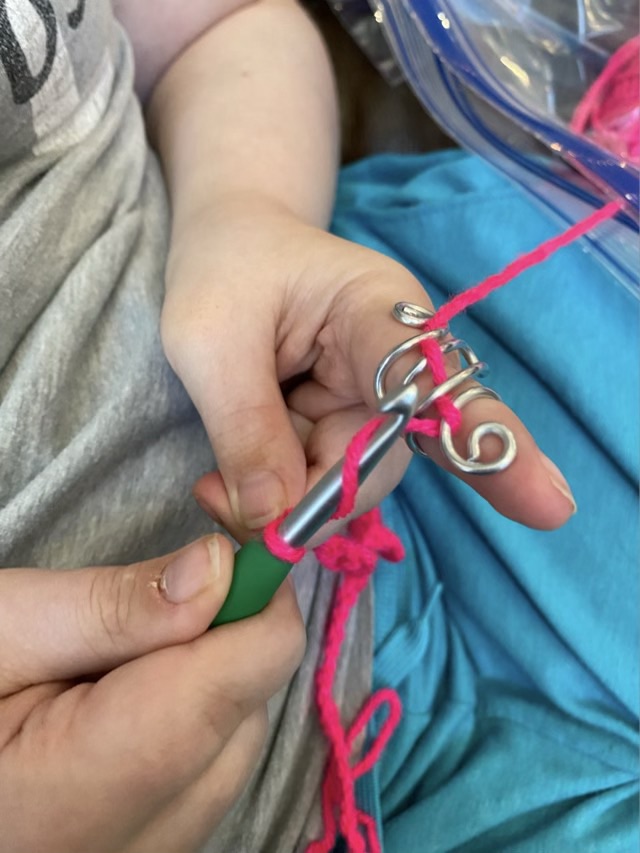
I then made the mistake of introducing the double crochet. Too many steps. When she shows interest again, we’ll try a slip stitch, which only has one more step than a chain (inserting the hook into the work). There are historically created items that are made with only a slip stitch, so she can still feel accomplished. Sometimes baby steps are what works, and breaking tasks down to parts, finding what parts can be delegated or assisted to order to be successful.

Fiber page: Shetland lace

The Baize Shetland wool was the first Livestock Conservancy Shave ‘Em to Save ‘Em fiber I purchased. I bought a 13 oz batt, and have been spinning it at demonstrations and fair booths. I’ve been quite remiss in actually making a fiber page! That is now rectified, and this wonderful fiber has a page in my sampler book.

Photo description: Post card from the breeder (top left), single spun and two ply yarn (top right), unspun wool as purchased scoured and carded (middle left), crochet round (middle right), two Shetland lace knit samples (bottom left), nålbinding (bottom middle), and a woven swatch with combed fringe.
Photo description: same page, but with the samples folded up to show the descriptions

Shetland wool is a joy to spin, and is definitely on my “will purchase again” list.

Crocheted catio hammock

Cat hammocks in a catio have different requirements than an indoor cat hammock. They should be UV resistant, especially if the catio has an open roof. They should also let water pass through, which outdoor fabric doesn’t do. They should be comfy… OK, that one goes for inside beds too. I have cycled through an indoor/outdoor sewn fabric hammock with grommets for a rain drain, and a cotton pillow case, which really absorbs rain water and flies off in the slightest breeze. The newest attempt shows promise: a crocheted polyester mat.

Photo description: crocheted gray polyester mat done with a single crochet center and chain one single crochet edges. Photo bomb by Missy the dog who is obsessed with balls.
Photo description: crocheted mat installed with screws to two wooden supports. Thor the cat earing me in the background.
Photo description: 15 pound cat standing on the installed cat hammock. His idea.

I used polyester craft cord, which is a knitted or braided cord used for macrame or crocheting bags. Polyester is more UV resistent, and the crochet work should allow water to pass through. I recommended swatching, then using the gauge obtained to calculate the stitches and rows needed to fit the space. I found that single crochet worked best for sturdiness and not catching toe-beans. The center is worked in rows of single crochet, and because I did not swatch (the horror) I added a border to extend the length.

I have ideas for more crocheted outdoor hammocks, but am showing unusual restraint, waiting to see if this one gets actually used first. I’ll keep you posted.

Ah

I started the cat hammock using polyester craft cord. Using the hook size recommended on the label (which is smaller than my test swatches), I made a chain the length I needed for the narrow side of the mat. (Don’t do this, chain length is drastically different than the length after a couple rows. I should have swatched (ironic), obtained gauge and done a chain based on the calculations.) I did my first row of single crochet stitches in the back loop of the chain. There are many ways to insert the hook in a chain for crochet, this is my favorite and uses the bump-like loop on the back of the v-like chain. It makes a very symmetric first row.

Photo description: crocheted band of craft cord after the first row of single crochet, a very aesthetically pleasing result with the parallel opposing chains.

Testing crochet stitches

I really like to make swatches, which probably puts me in the minority of crocheters and knitters. I like to see how different stitches, yarn, and needle sizes affect the overall fabric. This test involves polyester cord. I want to make more hammocks in the catio, and polyester is more UV resistant than other man-made fibers and even natural fibers, and is mildew resistant. I have made hammocks using outdoor fabric, but they retain water for quite some time after the rain. I’m hoping a crocheted hammock will let the rain pass through and dry quicker. I had some left over polyester macrame cord and did two test swatches, one with a simple single crochet repeat (American terminology), and one with alternating single crochet, chain one, repeats.

Photo description: two small rectangles of crocheted cloth, on the left a single crochet pattern, on the right a single crochet, chain one pattern. K sized crochet hook above the swatches.

Even though I really like the texture and look of the single crochet and chain one fabric, the holes are a little bigger than I think the cats will like when weight is applied. The holes are about toe bean sized, which seems uncomfortable. I do like that this cord has some shape memory, and retains a curve when stretched.

Next for a full-sized version.