I have worked my way through the entire bag of acrylic scrap yarn. Here is the lineup of hats I was able to put together with the multitude of colors.
Photo description: Six crocheted hats overlapped in an arc with variations of stripes, some with scalloped edges, some without.
This was actually a good color experiment. I combined colors I never would have picked originally, and I think they turned out well. Looking around a pile of yarn and deciding which colors to put together and in which amounts is a good brain exercise as well. Plus it is an excellent stash buster.
I’m still working through the bag of acrylic yarn odds and ends gifted to me by another avid crocheter. I made a couple cat beds, and now I have defaulted to my standard double crochet hats. These work up fast, can have many color changes, and are great to donate to either a cancer center or local charity.
Photo description: Teal, white, and pink crocheted hat with scalloped rim, sitting on my knee in the car.
These start with a magic circle and 10 double crochets. Each row has ten increases until the hat size is reached; hat sizes are typically the diameter, so a 7.5 hat has a 7 1/2” diameter circle. These hats are stretchy and form fitting, so they fit a range of heads, but I still like to make different sizes. Once the initial circle is the right size, the sides are double crocheted around with no increases. I like to use a slip stitch join when I’m not changing color, and an invisible join when I am changing color.
I added a scalloped edge, which on this hat is a double crochet five times separated by a single crochet, all in the same stitch. Skip one loop, slip stitch, skip another loop and go again.
I’ve been working on these while waiting for school pick up.
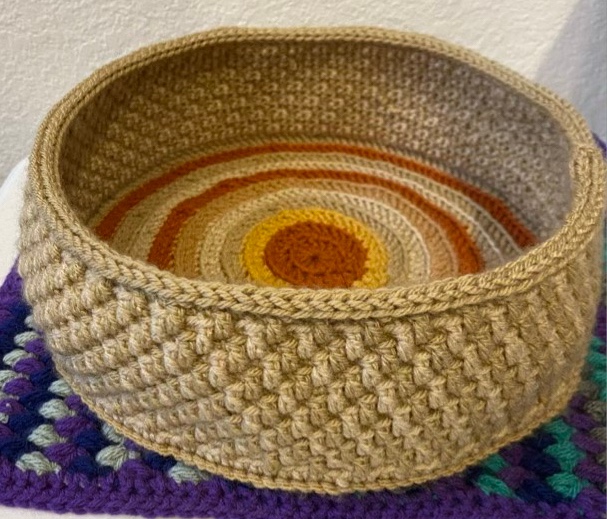
Here is another good yarn stash buster, a tightly crocheted mosaic basket. I combined the mosaic crochet technique of dipping down with color with an amigurumi technique of using a smaller hook to get a dense fabric.
Photo description: Standing round basket with multi-colored base in rounds, and sides with a two-tone basket pattern, rim finished with an i-cord, sitting on a puff stitch cat mat.
I’ve done a series of video shorts on the stitches starting here.
Here are the instructions:
With worsted weight acrylic yarn and a size G hook, double crochet (dc) 10 stitches into a magic ring. Pull the ring tight and finish the round with an invisible join. Weave in end.
Start the round by putting the hook through the back loop (bl), yarn over (yo), pull through, and make two chains (ch). Dc in the same space. 2dc in the back loop around for the first row. 1dc bl then 2dc bl for the second row. Dc bl, dc bl, 2dc bl for the third row, etcetera until you have a base the size you want. Each row should have 10 evenly spaced increases. Finish off each row with a invisible join, weave in end. Offset the increases to keep the circle round and not lumpy. You can change colors for each round.
Row 1: Turn the work, and work in the opposite direction so the basket pattern faces out. Join color 1 by inserting the hook into the bl, yo, pull up loop, ch1. Single crochet (sc) bl in same loop. Sc bl around. Join with slip stitch (sl st) to first sc.
Row 2 and 3: with color 1, ch 1, sc bl in same stitch, sc bl around. Join with slip stitch (sl st) to first sc. Do not cut yarn.
Row 4: With color 2, insert the hook into the bl, yo, pull up loop, ch1. Sc bl in same loop. Sc, dc in front loop (fl) of previous row (pr). * skip sc, sc bl, sc bl, dc fl pr. Repeat * around. Drop color 2, pick up color 1, sl st into first sc. Here is a video.
Row 5: With color 1, ch1, sc in same stitch. In this row make sure the dc fl pr is in the stitch before the previous row’s dc. Each dc is separated by two sc bl. Continue pattern around. Drop color 2, pick up color 1, sl st into first sc.
Row 6: With color 2, ch1, sc in same stitch. In this row make sure the dc fl pr is in the stitch before the previous row’s dc. Each dc is separated by two sc bl. Continue pattern around. Drop color 2, pick up color 1, sl st into first sc.
Repeat Rows 5-6 until desired height is reached.
I like to finish the top with a three loop i-cord, and found that skipping every fifth stitch gave a nice curve to my basket.
Photo description: Adding a three loop i-cord to the top of the basket, shows the basket side texture.Photo description: Calico cat in the crocheted basket, she is laying down, it is a tight fit.
Izzy the calico cat reports that I made this basket just a touch too small. She can’t tuck her head in.
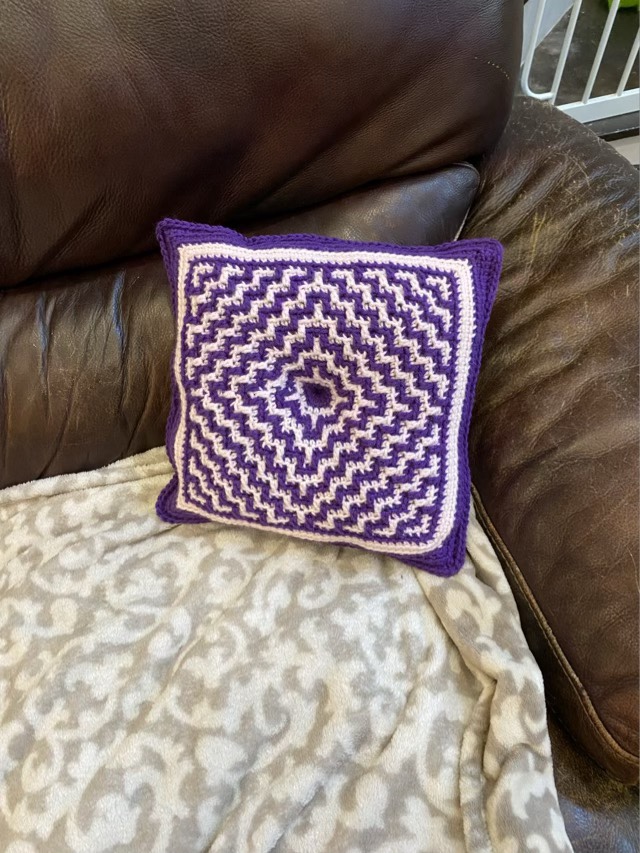
I took my two mosaic crochet experiments and joined them together to make a pillow, because why not? I used a single crochet stitch to join the sides, then stuffed it with poly fill.
Photo description: Crochet hook through two loops of purple, and one loop of white, right before the yarn over and pull through to join the sides which are right side out. Cat in the background.
I put a stitch in the center of the pillow to hold the stuffing in place and give it an even more retro look. It worked well because both sides have a defined center of the pattern.
Photo description: finished pillow with center indent and spiral side showing being held by a calico cat.Photo description: Pillow with the terrazzo side out sitting in the corner of a couch.
Thor the tabby cat is fascinated with all things yarn. We are working on what is appropriate and what is not. The ribbon on the stick is fair game, the ball of yarn leading to my hands is not. He jumped up on my chair to watch some yarn unroll, was being very polite, and fell asleep.
Photo description: Gray tabby cat asleep along my leg, with his paws touching a bundle of tan colored yarn. Calico cat laying on my lap.
I’m experimenting with the overlay mosaic technique, but as a way to introduce texture. By using one color of yarn, and stitching in the round, I produced quite a nice basket weave type structure. I am also using a size G (4.0mm) hook with worsted weight acrylic yarn, which is smaller than recommended to make a stiffer fabric. This pattern uses two single crochets in the back loop then one double crochet in front loop of the previous row. The ruler is to assess the gauge.
Photo description: In the foreground a small swatch of crocheted fabric held against a ruler. In the background a gray tabby yawning next to a calico cat on my lap.
Thor slept through the whole swatching process, and Izzy the calico never noticed he was within an inch of her.