Mosaic crochet

Relatively recently, I discovered the concept of mosaic crochet. Then a few weeks later, actually met someone at a craft fair that does mosaic crochet, and she showed me pictures of the stunning blankets she had made, and explained to me the difference between mosaic and tapestry crochet. Another name for mosaic crochet is overlay crochet, and it consists of alternating rows of color in back loop single crochet, with double crochet stitches that dip down over previous rows to block out color. What fascinated me most? No floats. No loose loops of yarn along the back to catch at fingers and toes. I had to try. (For those interested, tapestry crochet carries threads along the row, hiding them in the stitch until needed. That is a future project.)

Photo description: Gray and cream crochet square with rows of spirals in different orientations and square bullseyes along the center row. There are a couple errors in the execution.

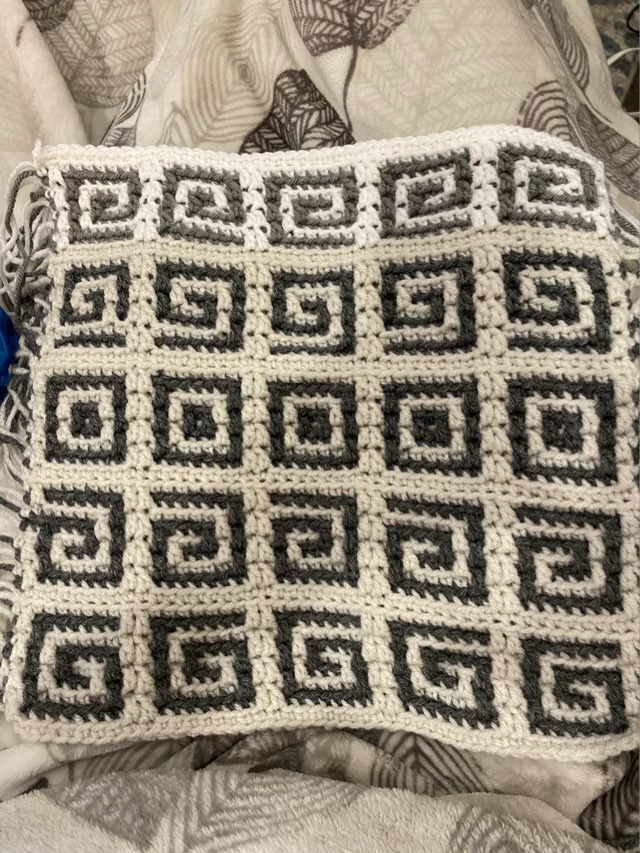
I recently acquired a bag of odds and ends yarn from a fellow crafter. This is the perfect stash to draw from for experimentation! I looked up some basic mosaic crochet instructions, and settled on trying a simple spiral (because I like them). I did the first row of motifs with little problem, so did the next row with a reverse motif. The little problem was a counting and repeat issue, but rather than starting over, I adjusted the pattern to my change. It is an experiment. I left long ends on each side, because I wasn’t sure if I wanted fringe, and it actually made me loose at yarn chicken and I had to slightly switch yarn color for the last row. Ah well. The back of the piece is nearly as exciting as the front, neat lines!

Photo description: Back of same crochet square, showing horizontal lines of alternating color.

One of the other techniques I learned in this project is a standing single crochet. As the mosaic crochet is worked from the front only (I worked from right to left on every row), the first stitch starts with a new strand every time. To make things neat, tidy, and secure, it helps to start each row with a slip knot on the hook, then single crochet into the first space. Very cool technique.

Cat in the bag

Oh, wrapping presents for the holidays is going to be interesting. I got out my bag of bags to get started, and Thor the cat thought that was the neatest thing ever and crawled right in. He stayed there, rustling about, for an hour. Occasionally he would reach a paw out at an unsuspecting passerby, or attack through the fabric. Here is a video clip.

Photo description: Extra-large non-woven gift bag, with Gray Tabby peering out.

A pedestal for Magic

Magic the hen is having her recurring pain flareup. I think it has something to do with a leg joint. She hurts it, then has trouble walking, loses weight, it heals, she puts on weight, then she hurts it again. It is about a six month cycle. She is in the stage where she can’t jump up onto the roost at night, so I built her an elevated nest.

Photo description: Pine shavings built up in the corner of the coop next to the roost and topped with straw. Magic the hen has climbed the pile to investigate.

The other chickens had to check out what I did as well, but Magic was the first.

Photo description: Simple 2×4 wood frame roost with 2×3 removable roost bars. The pine shavings are built up in the corner nearly to the height of the roost, and all six chickens are headed toward Magic who is at the top of the pile.

This is the corner Magic huddles in when she can’t roost. She appreciated the elevation, and I feel better about her not getting bombed by the other hens in the morning.

Photo description: Night view, with five chickens on the roost, and Magic on her slightly diminished pine shavings pile in the corner.

I do have to rebuild the corner in the morning, because the chickens kick away the shavings looking for bugs, but I think this is less stressful for her than when I go in and place her on the roost at night.

Knob fix repeat

Two years ago I fixed a plastic knob that broke. The thin gauge copper wire snapped recently and the epoxy didn’t hold, so I have to fix it again. I’m not messing around this time. I used 18 gauge wire to wrap around the socket, then filled the surround with J-B Weld, which is a two part epoxy.

Photo description: J-B Weld package behind an upturned knob which is filled with gray epoxy, next to the scrap paper where I mixed the epoxy with a toothpick.

It worked. Now I am hoping to get another couple years out of the appliance.

Growing Season #2

We had a cold snap, a welcome drench of rain, and all the flowers think it is spring again. Hello Texas.

Photo description: Gregg’s mist flower in the front flower bed with hundreds of fuzzy purple blooms.
Photo description: Purple oxalis in bloom.

The grape hyacinth and paper whites are also stretching up their green leaves to the Texas sun. I’ve had paper whites bloom in December, but not grape hyacinths. We’ll see what they do. I should have planted more peppers.