Spinning cottonwood

We visited a park recently covered in cottonwood seed fluff; of course I had to try to spin it.

Photo description: the start of twisting cottonwood seed into a singles yarn, with a stick to hold the yarn, and an open seed pod in my hand

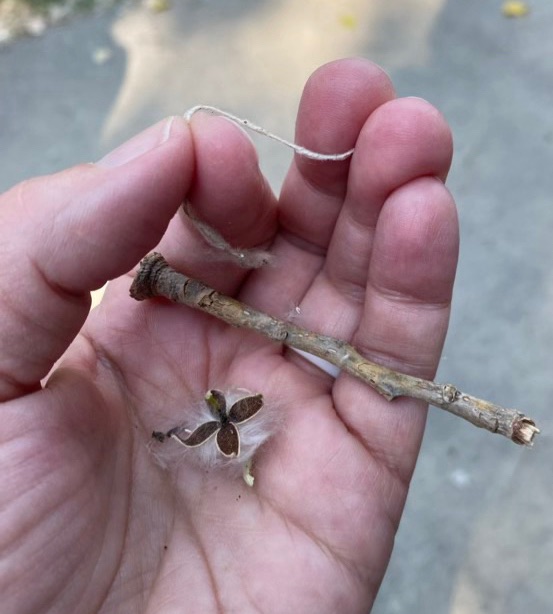
There is good reason the cottonwood tree is named after the plant. The fluffy seeds look similar to the fibrous cotton seeds, but are much smaller. The fibers are short, less than an inch, which made spinning a high twist with a stick a challenge. It would have been better to use a tahkli spindle or chakra, which are designed for short fibers, but it was a walk through the park, so I used what was at hand. I also didn’t prep the material at all, but spun from clumps of seeds, taking out non-fibrous material as I went.

Photo description: small amount of single spun cottonwood yarn on a stick (different smoother stick)

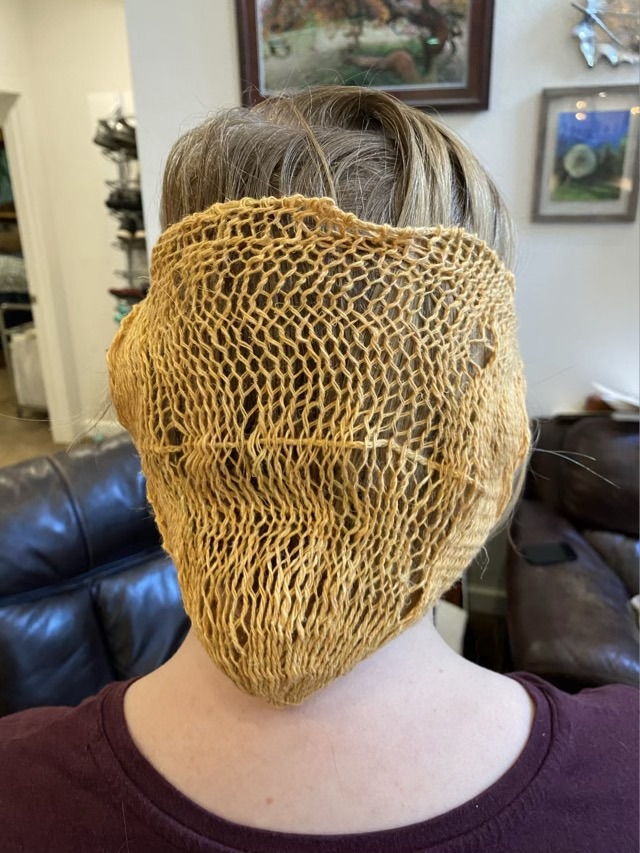
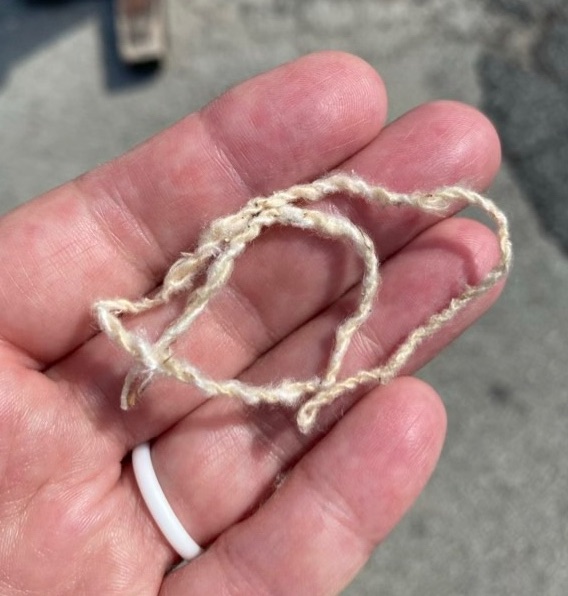
It took me the better part of an hour walking the park to spin a small amount of yarn because I was not getting enough twist in and it kept drifting apart. When we were done at the park, I had my eldest help me fold the single in half, and I added some twist to ply it, just to see what it looked like. It was fluffy and soft with a pretty luster.

Photo description: several inches of two ply cotton wood yarn

Note, I am allergic to cottonwood, but is a nasal allergy, not a contact allergy, so I was quite sniffily by the end. I have spun it now, though, so can stop wondering if it is possible.

Fast food basket

We picked up a fast food dinner and were given a plethora of paper napkins. I had a stash of straws. Could I make a basket? (Because that is the logical thought process with excess disposable paper products, right?)

Photo description: unbleached paper napkins and paper wrapped straws

I unwrapped and split the straws by running a scissors down the length to obtain four plastic strips from each straw. I wove a square base (6×6 straw pieces). I tore the napkins into 1/2” strips and twined them around the straw “staves”.

Photo description: slivers of red plastic straws woven together and secured with paper napkin twine

It took some time to twine up the sides of the basket. The joining method I liked best was to overlap the end of a napkin strip with a new strip, fold the sides to the middle, then secure with a good clockwise twist. The two clockwise twisted strands were then wrapped counterclockwise around each straw, which isn’t as complicated as it sounds. To finish the basket, I trimmed the end of the straws to a blunt point, and used tweezers to thread them back down through the weaving.

Photo description: in process threading of the straw staves back into the twined weave, calico cat as a background

I was quite surprised that the little basket is fairly sturdy. It certainly won’t hold up to water or washing, but it is a cute little basket. I left the end of the napkin twine inside the basket to remember its humble origins.

Photo description: finished basket, top view, happy calico cat as the background
Photo description: finished napkin and straw basket, side view, sitting on a calico cat

Materials are everywhere.

Mossarium: update

The natural moss that I gathered from the back yard for my mossarium all died in a dramatic going-brown-and-crumbling way, except for one small patch. I bought some cultivated moss to replace it (it came in a multi-pack, ooo).

Photo description: four kinds of moss and the plastic container they were shipped in

I tucked the moss in crevices that I formed in my clay terrarium base, and used the sheet moss on the vertical slopes. To keep the sheet moss in place, I used short sections of a broken toothpick as tiny stakes.

Photo description: using a section of a wood toothpick to stake down sheet moss

I left some open areas of dirt, but not many. I quite enjoyed the placing of the moss, although I’m hoping that this round survives.

Photo description: mossarium with new moss applied to the small artificial hill with labradorite steps spiraling to the top and jewel orchid at the crown

I do have extra sphagnum moss and another similar looking moss. I put them back in the container and will keep them moist until I figure out something better.

Sprang: a mistake study

I intended to just trim the grass going to the coop, then, while I was out there, decided to uncover a path that I hadn’t cleared in over a year, then decided to trim some of the branches across the path, then decided to use a branch to make a bigger sprang loom. Logical, right? Once I secured the branch into a loop shape with hemp cord and added life lines, I now had the means to attempt to make an ancient style hair net. I warped the loom with some left over linen yarn that I spun from nettle dyed roving (that was also a lesson learned).

Photo description: Sprang loom made of a cedar elm branch tied with hemp cord and warped with hand spun nettle dyed linen yarn

The number of warp threads on this loom was easily triple what I’ve previously attempted. I intended to do interlinked sprang with some lace holes, and switch twist direction halfway through. Here is where the mistake study starts. I ended up with holes that spanned three or four rows instead of just two, and rows that changed technique midway through. Oops.

Photo description: Sprang hairnet full of weaving errors

I think, to solve the errors, I need to do a check at the end of each row by pulling open the weave and looking at the thread path. The yarn was also loosely plied, which made it difficult to tell what was plied yarn, and what was a single strand. I will add some twist before the next attempt. The happy note on this project is the finishing cord through the middle. This was a much neater way to secure the final twist and also acts as a second tie to secure the hairnet. On one end of the sprang I pulled the cord tight to gather the side together, but I left the middle and other end loose on the cords.

Photo description: Sprang hairnet on my eldest, back view

To wear the hairnet, the top cord ties around the temples, across the front of the forehead. The middle cord comes up at an angle and ties at the hairline. The back of the hair is tucked into the lower gathered section.

I will make another attempt, armed with the data gained from this project.

Throwback Thursday: turquoise necklace

Photo description: Turquoise and silver necklace made in sections connected in an unusual manner, through the sides

I made this necklace in March of 2008, and it was featured in a FireMountain Gems catalog. I always meant to write up detailed instructions on its construction, but didn’t, so I’ll give you a short run down here.

The 13 cylinders are made by doing beaded crochet as a tube with waxed silk thread. I assembled each section with a cylindrical turquoise bead at each end, and ran a 20 gauge wire sterling silver wire down the middle, securing each end with a wire spiral. To connect the sections, I ran the same gauge wire through the sides of the cylinders, making sure that I went through the stitching inside, and made a spiral at each end. The clasp is a custom add-a-bead barrel style clasp, and I did have to ream out the bead hole to get the clasp into the bead.