Leather labels

I wanted to add labels to my handmade items, so used the laser cutter to make some from thin leather. I added pairs of holes to the edges so they could be sewn on, my signature mark, and the primary material used for the item.

Photo description: labels cut from leather with a blue laser cutter, pencil for scale

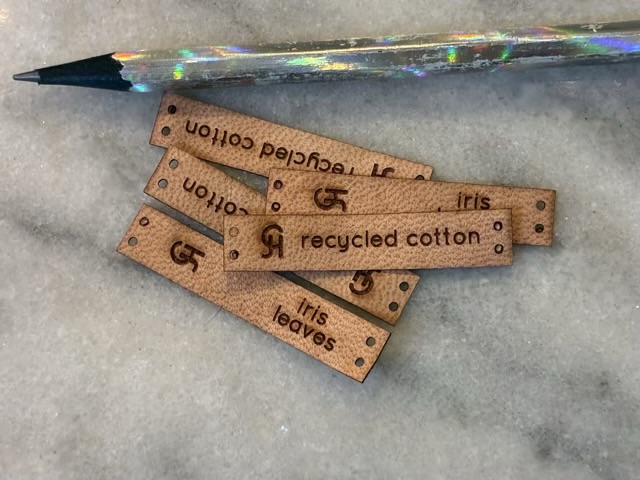
I’m really pleased with how these came out. I’m getting better at estimating laser cutter and engraving settings; I had only one test cut before dialing in to settings that gave me my desired result. For the cut I had a speed and power of 100, and the fill engrave was power 30, speed 100, line density 100. The labels are 1cm by 5cm, which is just about as small as I can go and still sew them into a circle.

Throwback Thursday: silhouettes

In April of 2016 I took pictures of my kids against the strong light of a window to get an image of their silhouettes. I then digitized the outlines and used my Cricut cutter to cut colored cardstock. My favorite result was where I layered the two cut outs on some beautiful hand marbled paper my sister gave me.

Photo description: silhouettes in dark green and light green on a marbled green background in a brass picture frame

I really admire the people with the skills to cut out silhouettes free hand. I leaned heavily on technology for this setup.

Wrinkled leather

In my stash I have some nice thin goat skin leather. Unfortunately, it was wrinkled and was starting to feel a little dry.

Photo description: wrinkled goat skin leather

I used a generous application of Weiman’s leather conditioner to ease the wrinkles and return the suppleness.

Photo description: restored leather and a bottle of Weiman’s leather conditioner

Other leather conditioners, such as mink oil, would have also worked to add oils back into the leather.

Medium deviation

A white cat with gray stripes was next in the order of cats on the Bucilla felt kit for the house cat wreath. Hm. I grabbed a piece of darker gray felt from my stash and substituted parts of the white felt in the instructions to make a gray tabby with white face, chest, and feet.

Photo description: gray tabby felt cat with red bow collar

I used the stamped white felt as templates to cut the gray felt, and appliquéd one on the other. I also changed the eye color to gold, and used up all the silver sequins so the back leg and tail tip have white instead.

Photo description: Bucilla felt wreath in process with four cats complete

You may recognize the model. Thor the gray tabby was the inspiration for the cat color. It amuses me that the felt cat is wearing a bright red collar bow, the real cat removes any collar placed on him by biting through the buckle.

Photo description: Thor the gray tabby with four paws showing while he lays on a carpeted cat tree, with no collar

Small deviation

Cat number three is complete on the Bucilla felt wreath kit.

Photo description: in process Bucilla felt wreath kit with three cats

I changed a couple small things on the brown cat, giving it three stripes of sequins on the forehead to break up the space, and making the eyes green rather than the pattern indicated white.

Photo description: pattern image of the brown cat’s head sewn as per instructions
Photo description: closeup of brown cat’s head as I stitched it, the lighter tan color was what came in my kit, which does have a caveat that the felt colors may differ from the picture

Two more cats to go, and I am feeling particularly rebellious.