Lake weaving

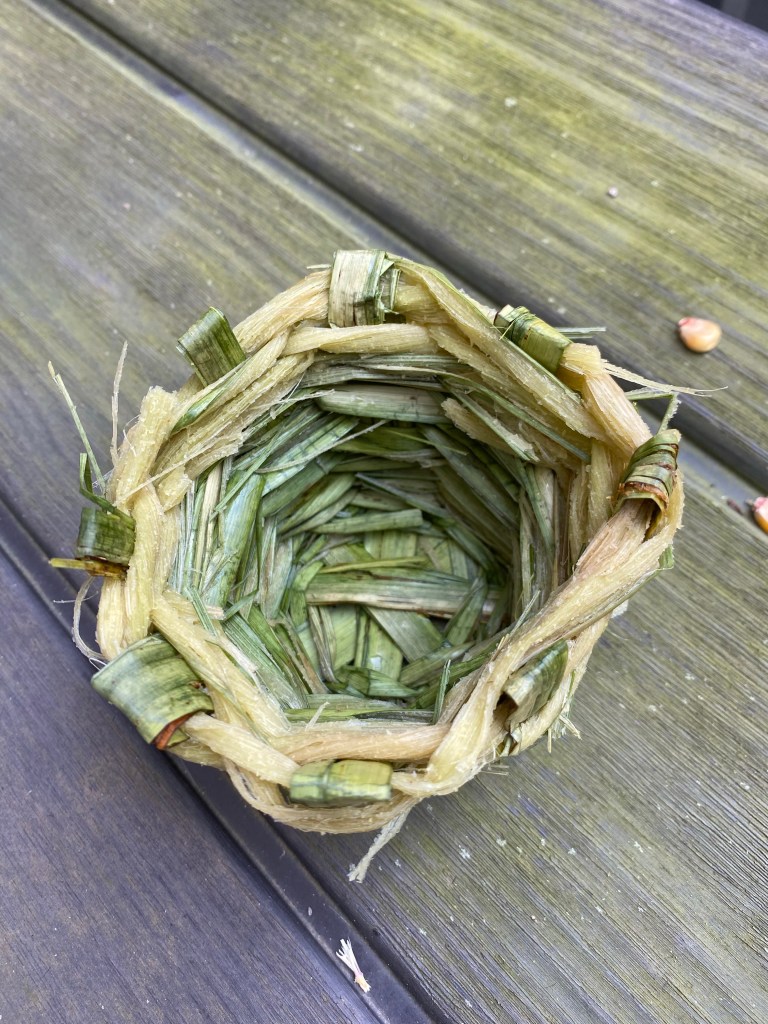
Spent another couple hours out at the lake. I spotted a different variety of grass by the edge and selected a few long strands near the mowed part to see how they behaved when woven. My weaving skills are still very rudimentary, however I’m learning so much about construction in experimentation. The basket started off as I’ve seen in pictures for twined baskets, but then when I started up the sides my spacing narrowed into more of a rough vase than a basket. (I will say that it was laid down many times for the baiting of the youngest’s hook.) I made fair progress and decided to continue the study at home.

Experimental weaving with lake grass

Since the weaving wanted to narrow, I went with it, changing the uprights to weavers, thus narrowing the number of uprights. When I was down to five uprights, I braided them to end the sculpture. (We are going to call it a sculpture since I tucked all the ends inside and it is non-functional as a vessel.) I also don’t speak basket, so my terminology leans to descriptive. (Even when I know the proper terms, though, they don’t always surface appropriately, so there we go.)

Woven lake grass sculpture study

Can I twine?

Now that the rains have passed and we are spending more time outdoors, I have been test twining various materials.

Bulrush (fresh) twine

At the lake, there are thick patches of bulrush. In the time between putting worms on hooks, I selected a stalk, split it into sections, and twined it together.

Twined basket made of bulrush

I took another bulrush stalk home and let it dry out, then rehydrated it and ran it through a pasta maker (because I don’t have a mangle, and this seemed to be the same concept), to flatten out the fibers. I did a small twined basket just to see if I understood the construction concepts. It is very rough, but at least recognizable as a basket.

Dried twine from grass

Weeding the front garden, the long strands of grass caught my attention, so I twined some. Some of the blades were too brittle fresh to take twist, but a different species was more supple and was easy to twine. When it dried out the strands separated (but it is still relatively strong).

Twined iris leaf

The irises in the front yard are starting to fade. I’ve read the wilted leaves make good weaving material, so I pulled some out and twined it. The supplest was easy to twine, but the leaves that had dried out more tended to break. Probably soaking them in water for a bit would bring them back (if I can believe what I’m reading).

Busy, busy grass spider’s web

The grass spiders have been particularly productive this summer and one attempted a web over a planting tray. Yes, I tried to twine it. I peeled up the web sheet (after making sure the spider had vacated), and twisted it up. It is a bit sticky and full of desiccated insect parts, which is quite gross, but I tried it.

Single twist of spider’s web

It is possible to spin spider’s silk, but the effort is Herculean. There is a stunning cape made of spider silk from Madagascar and apparently the crafters collected a million spiders and extracted the silk, rather than gathering webs. The project took over three years and numerous crafters. Here is an article.

Nålbinding Plarn

I finished the plarn bag! Or maybe it is a basket. It can stand on its own, but is still flexible. Hm.

Nålbound bag made from plastic grocery bags

I changed connection stitches mid-bag (we’ll just call it a bag, yes?) because I was aiming for the tight braided look I’ve seen produced with the Finnish 2+2 stitch. I figured out my tension at the 2/3rd mark, and the stitches finally achieved the look I wanted, so I decided to also try some decorative work (since it is an experimental object anyway).

Woven bottom of the nålbound bag

It turned out quite functional and sturdy. The handles with the three rounds are comfortable, and I made it to be large enough to hold my longest spindle. I can tell where I changed connections (from M1 F1 to F2, note to self), and where I achieved even tension, but I’m going to claim them as design choices.

Nålbound bag made of plarn

Whether the finished project is considered a bag or a basket, it is done!

P.S. This took me three weeks to complete, working in bits and pieces. The magic of the blogosphere made it seem like a few days, but it wasn’t!

P.P.S. This bag used the plastic from approximately 43 grocery bags. (And it drives me crazy when I hit “publish” instead of “save as draft” on a post.)

Spinning up scenery

Spinning green roving nearly the color of the trees

I have started a new spinning project for my morning walks. I succumbed to color a few months ago and purchased a hand-dyed Bluefaced Leicester (a type of sheep) and silk blend roving because the colors were amazing. The color way is called “Balsam”. I think if I lived in a coniferous forest full of balsam the colors would be spot on, as it is, I noticed as I spun that it was a fair match to the greenery around me. It is joy to be spinning up essence of the trees. Mostly. I am typically not a fan of dyed fibers, not because I don’t like color, but because I like the color to stay put. I’ve noticed the top of my spindle has taken on a green hue, and when I get home my fingers are tinted. It washes away, but I will have to be very careful in the treatment of the spun yarn and final project so that it doesn’t ever lay next to something light in color. Now the conditions of my spinning are not typical, since I am outside taking exercise and the fibers are exposed to more moisture than I imagine would happen spinning inside on a wheel. The walking and spinning is teaching me to be light with my fiber hand, as pressure, heat, and water together felt wool, and all those factors can be present in the palm of my hand.

Weaving plarn

Back to talking about plarn. Yesterday I posted about how I connect and spin loops of plastic grocery bags as I stitch. I wanted to learn a new nålbinding stitch and using plarn was a perfect way to practice without wasting expensive fiber. The stitch is a Finnish 2+2 stitch as described here (this page also talks about how different connections affect the finished texture, I chose M1 + F1 because it looks more braided). I started my chain, and made it long enough that I could make a beach mat, if I so chose. It is easiest to do nålbinding in the round, so I continued in the round (nålbinding can absolutely be cut and tidied up later). As I progressed, I felt the texture would be better suited for a bag than a mat (it has a rough feel due to the twist). So then the dilemma was how to deal with the base of the bag. I could stitch it straight, as a tote bag, which wouldn’t stand on its own. I could sew an oval piece of hard plastic in, but what plastic, and would it still be recycling? I could nålbind an oval, which is downright tricky. What about weaving? It is an experimental piece anyway, could I weave a base? I found a box that fit snugly in my nålbound tube and connected the first loop by threading it through the edge and looping it back on itself (as you do for connecting loops).

Starting the weaving

I then gave the loop some twist and ran it the long way along the box, out through the edge, then back in through the next stitch. I added loops and twist as I went, making the warp threads for the weaving.

Setting up the warp threads with plarn

When it was time to start the weft, I realized that I didn’t have to break the plarn, I could just turn the box and keep going. I used a plain weave (over, under, over, under), and used a pick up stick to hold one shed, and a longer wooden needle to pick up the alternate threads. My nålbinding needle was best for connecting to the edge because it is smooth and doesn’t abrade the plastic.

Weaving the weft on the bottom

I had to adjust my spacing as I went; I started off putting the weft through every edge stitch, then ended up every third stitch to get the weft to be straight. At the end, I wove in the tail and clipped it on the inside of the bag. (Only one tail to weave in, hurray!)

Woven base for nålbound bag (in progress)

This was a very pleasing experiment. I really like the woven base: it feels nice and is sturdy. I will continue to build up the sides with nålbinding, but that will take awhile. I’ll post an update when it is done!