Stamped pouches

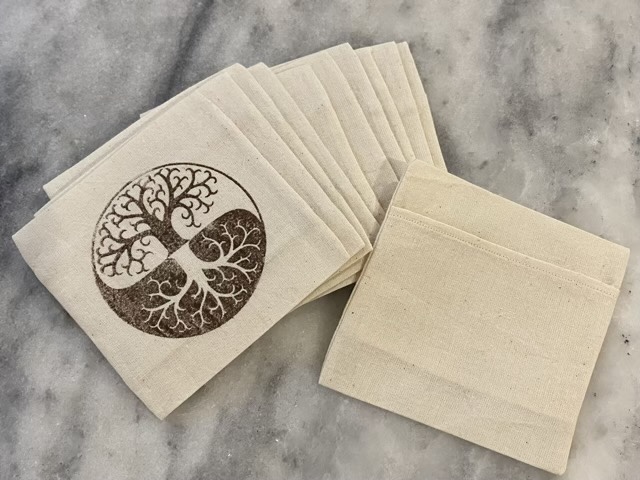
I had an idea for a small pouch that didn’t require a string tie, or button, or zipper. Inspired by couch pillow covers, these have overlapping flaps in the back that do well to keep small rigid items protected.

Stamping muslin

I wanted 4” square pouches, so tore an 11” strip of washed and ironed unbleached cotton muslin, marked 4.5” sections along the strip, and stamped my logo in the center of each section. To stamp, I squirted some fabric paint into a bowl, then loaded a sponge brush with paint to apply the paint to the stamp.

Making a 1/4” hem

I hemmed both long edges of the strip with a 1/4” hem foot on my sewing machine. (Hands down, this is my favorite foot.)

Sewing adjacent sides of the pouches

To form the pouches, I folded the long strip inside out, with about a 2” overlap, then sewed 1/4” on either side of my pencil lines. A cut between the seams, clips of the corners, turned inside out and pressed, and I was able to fairly quickly produce many small product bags!

Finished stamped product pouches

Hope

Hibiscus buds

This is a picture of one stem of our happy Hearty Hibiscus. There are other stems also chock full of buds. I’ve been spraying the leaves weekly with a solution of Neem oil, Peppermint oil, Castor soap, and water with the hope it will be enough to keep the Thrips (tiny bud destroying insects) away. So much hope that the blooming is going to be as spectacular as the buds indicate. Hearty Hibiscus blooms only last for a day or so, but they bloom sequentially, so all those buds shouldn’t burst forth at once, but a couple per branch per day. Which still has the potential to be glorious.

Painting rocks

It has been a long while since we’ve painted rocks, I believe since last summer, but it is a great activity any time of year. My youngest brought up the request, but my kids and I all painted. After washing and drying the rocks, of course.

My attempt at a chocolate candy with a bite out

I don’t usually do “commercial” items, but there was one broken rock, and I’ve seen some rather clever M&M designs utilizing the broken edge (thanks Pinterest). We use acrylic paint and paper plates as our palette. I’ve tried various protective coatings, but the freeze thaw cycle of outdoor life is hard on painted rocks. The designs that stay the best are the ones that are kept inside. Still, we will take and “hide” these around town because the idea of bringing someone a bit of joy with found art is worth it. What the finder chooses to do with the rock is entirely up to them. Some post to social media, some keep, some hide again.

All the artistic endeavors from this round of painted rocks (mine is the green one, the rest are my kids’ work)

For more information on the Kindness Rocks movement, visit https://www.thekindnessrocksproject.com. They have a lovely site and sentiment and project ideas for spreading kindness. There are many other organizations as well, and many local groups that post hides and finds on social media as well as organizing rock painting events.

All is not lost

Of the three passion vines we planted last year, it seemed only one survived the winter’s freeze. Then I noticed a leaf. It wasn’t the same kind of leaf as the surviving passion vine, but it looked vaguely familiar. As we have had many plant volunteers turn out quite well, I am leaving (leafing, haha) this one to see what happens. A few leaves later, and it looks like it may be a passionflower. The three-lobed leaf looks like the other variety we planted, just about two feet from either of the original planting locations. Either one of the seeds took, or the roots are spreaders. I’ll take it!

Passionflower leaves

A few days after I took this photo, I noticed that a tendril had extended at the top of the plant. Another encouraging clue!

Keeping out the rain

Izzy the cat’s favorite litter box is the one in the catio. I’ll admit, we didn’t discover this for years; poor kitty had to do her business inside until we finally placed a box outside. Then the rain came. Scoopable litter is really gross when it gets soaked in rainwater. Even though there is a cover on the box, the lid design is not good for outdoor use. As this is the biggest litter box I’ve found, I decided to fortify it to keep the rain out. On other blogs, they will show you cute little huts they built with coordinating paint and curtains. Here, you get the duct tape version. With an old baking sheet.

Outside litter box protected from rain with an old baking sheet

If you don’t want it to move, use duct tape. This is not an elegant looking solution, but it did the job. During our biggest rain storm this year, the litter stayed dry (at least from the rain).