Here is a throwback from February 2005. I carved a Celtic knot into a leather belt and dyed and finished the leather. I really enjoy leather carving, nearly as much as pyrography. The photo isn’t spectacular, but at least I moved away from the black velvet backdrop.
Photo description: black leather belt with a Celtic knot carved along the length, sitting on a sandy colored composite counter
My experiments with nålbound bracelets continue. I tried para cord, which I did not like at all because the stitch method puts a twist into the cord, and para cord changes visually when twisted.
Photo description: orange and purple para cord nålbound with the Dalby (UOU/OUOO) stitch, showing changes in texture and width as the cord picks up twist
Although untwisting the para cord for every stitch is possible, I don’t like that the white core of the cord shows through on sharp bends or snagged sections. I do like the Dalby stitch as well as the Telemark stitch for flat interesting single row weaves. I tried some stiff finished leather cord as well, which did not work because the leather couldn’t make the bends required to lay flat. I will try it again with unfinished leather cord so I can soak it into submission.
I went back to my favorite satin cord, also called rat tail or mouse tail depending on who is doing the labeling. It is made of solid color nylon, has a nice drape for this work, and melts readily with a thread zapper.
Photo description: purple satin cord bracelet done with the Dalby stitch and finished with a macrame square knot slide and Celtic button knot end stops.
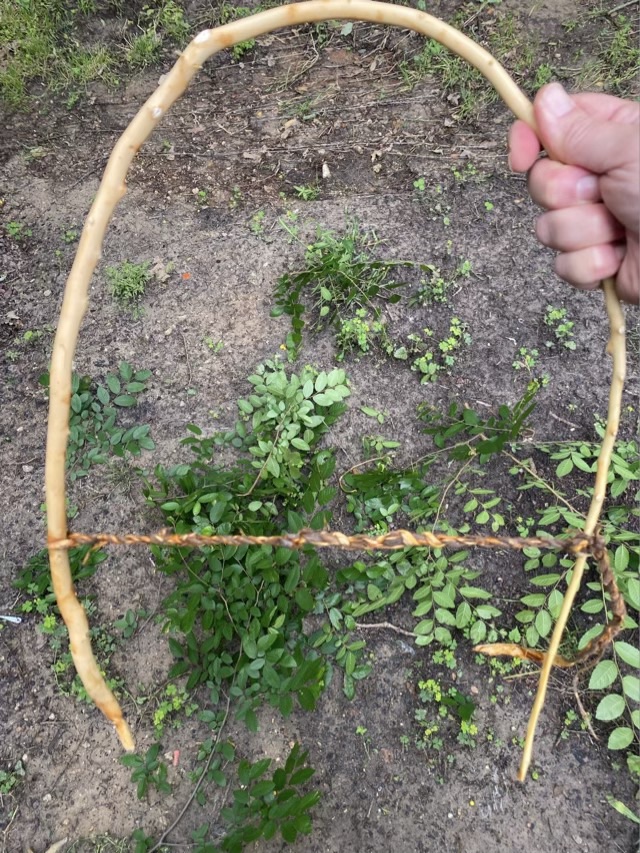
I was trimming the yard, and took down a sapling (iNaturalist identified it as a type of elm) growing near the AC units where it didn’t need to be. I noticed that the diameter was similar to some bent cane weaving frames that have been popping up on my Pinterest feed. Because I am easily distractible, my next task became making my own frame. As I stripped the side branches off, I noticed that the bark peeled off easily, like that of a mandarin orange. The bark was flexible, strong and fibrous, so I roughly split it into thick strands and twined the strands together to make a primitive rope. I used this rope to keep the branch in a nice curved shape while it dries.
Photo description: stripped elm cane bent into a narrow arch and secured with elm bark twine
I think this frame is on the small side for the kind of weaving I want to attempt, but it was a good exercise, and I have an acre of woods to source longer cane.
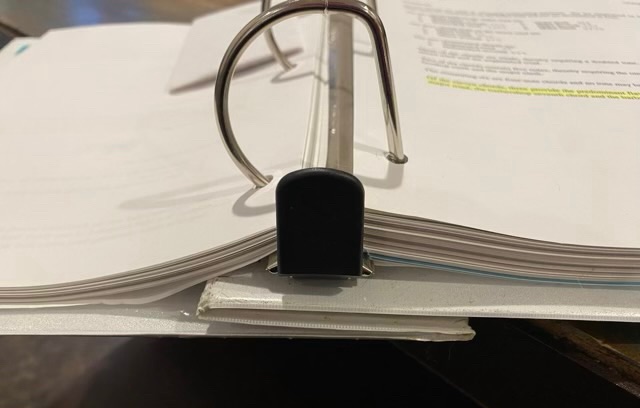
I wrote that title and realized that it could be applied to almost every day. I do love learning, but today’s post is one of those “I was today years old when I learned that…” type posts. I flipped open a large binder to reference a chart, fumbled the cover, and it folded neatly back on itself, creating a smaller footprint. I went to fix it, and realized that it was designed to do that. Huh. It is quite irritating on the large binders to have the cover stick out to the left and extra 4 inches or so, especially when you’ve filled the table with reference books. This would have been handy information when I was studying in school, or later working in the lab. I will take it now, though, and pass it on.
Photo description: white 4 inch binder looking from the bottom where the cover has the spine folded back and over lapping the front and back cover.Photo description: red 4 inch binder opened with the cover folded under and showing a moderate amount of overlap on the sidesPhoto description: same red binder with the cover unfolded and sticking out almost half a page worth to the left
As I was investigating which binders had this miraculous design, I discovered that it is only binders where the rings are attached to the back cover. Smaller binders with rings attached to the spine don’t fold this way. Clever.
Happy Mother’s Day to all those that mother! I did some experimentation with Copic markers and stencils for Mother’s Day cards this year. Fun things, Copic markers. Expensive, but for good reason.
Photo description: two cards with “Happy Mother’s Day” written in blended inks from red to green, Copic markers in the foreground, Cricut cut stencil in the background