Cabled swatch

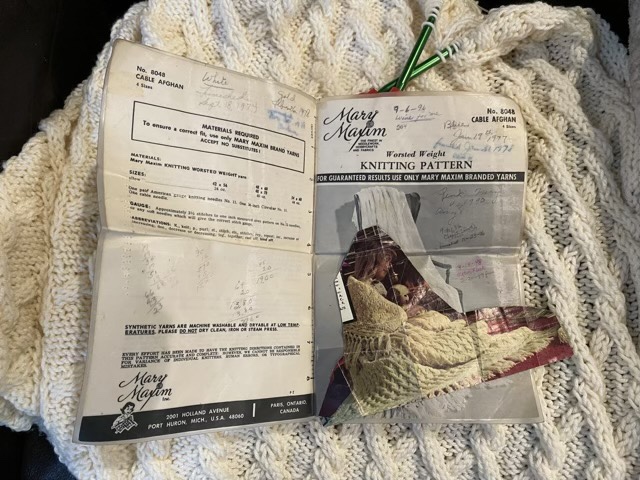
Before I delve into finishing my Grandma’s blanket, I needed to test knit the pattern to make sure I understood all the notations and how it goes together. It took me a couple goes to get the stitch count correct (take the pattern repeat and add the edge stitches, so I remember for next time), but once the number was right, it came together well.

Swatching seems to be a hated or loved knitting activity. I fall on the love side. I would rather see how the pattern or yarn behaves on a small scale before delving into a large project. I used a stocking weight wool yarn, and size 6 circular needle, which is a far cry from the bulky yarn and size 11 needles used for the blanket, but it was the pattern I was investigating.

Izzy the cat is fine with being a backdrop for the cabled swatch if it means she gets more fuzzy lap time

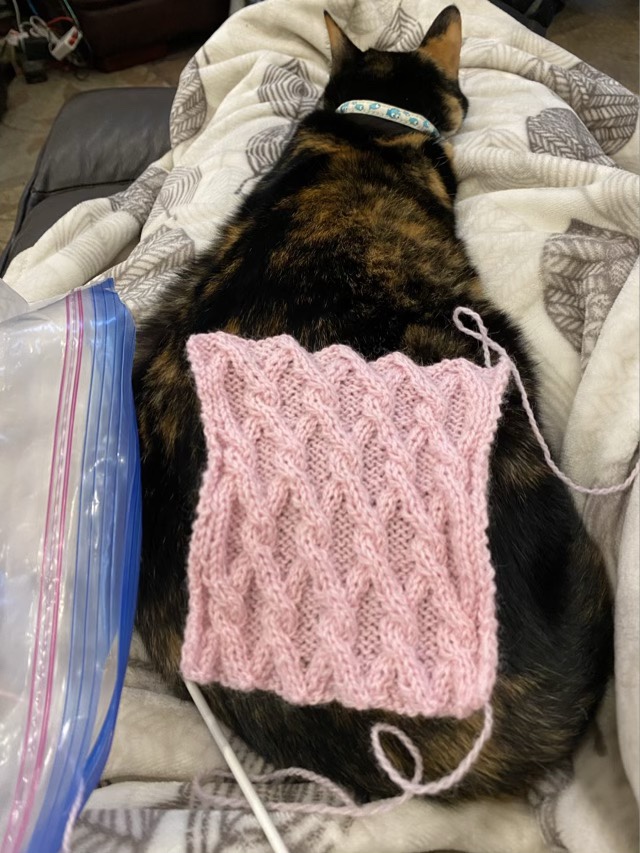
I see why my Grandma liked this pattern, and why she made it so many times. It looks complicated, but it flows well, and it is easy to “read” the prior row of stitches to figure out where you are. Then the back row just follows the previous row’s stitches, and goes in twos or fours predominately, which makes checking for errors easy. The swatch came out OK, and I feel comfortable with the pattern. I do think I will finish off this small piece with a suitable edging, and it can join the doll house blanket army.

Ancestral UFOs

Boy, is that title going to be misinterpreted. UFO in this case is “Unfinished Object”, and refers to my Grandma’s knitting projects. I finished one in 2018 (which was before this blog started). Rather than try to match Grandma’s knitting (or rip out to the point the pattern needed, which was probably why she abandoned the project), I made it a patchwork of knitting and crochet, even using the same brand but different colors of yarn. It came out nice and long and finished!

Conglomerate blanket finished in 2018 using sections of knitting and crochet (Grandma’s section is the third from the bottom)

I have another project, which does not appear to need any ripping. It is the start of a beautiful cabled blanket. Grandma laminated the pattern and took notes each time she made a version. It appears that she used this pattern 10 times before this cream one, the first being made in 1974. If I am reading her notes correctly, it seems that she started this cream version in 2006, but then restarted in April of 2013. She passed in November of that year. She marked each row of the pattern with a minus when she started working on the row, then made it a plus when she finished the row, so she could tell exactly where she was (I know because she stopped mid-row, and it corresponds with the markings).

Grandma’s unfinished blanket with laminated and marked pattern, and cutout magazine photo

Yes, I am going to attempt to finish her project, but there are some preparatory steps I need to take first. I need to make a swatch to get the feel of the pattern under my fingers (and make sure I can), and I need to wrap my head around a project that will take me months to finish. Grandma wrote on her pattern that it took her “35 minutes to do two rows, 10 min back row, 25 min front row”. So only the center section of one of these blankets took her 63 hours to complete. And I am not the knitter she was.

The portion of work my Grandma completed on this cabled blanket

I am glad she left notes on her pattern, not only for her own memory, but so she could share that information with me. It would have been better to sit with her to receive instruction, but I am happy that I am still able to learn from her experience.

DIY yarn bobbins

The apple doesn’t fall far from the tree. I was going through my Grandma’s knitting tools (I have inherited quite a few craft tools from both sides of the family), and found some home made yarn bobbins. My Grandma was an avid knitter and very skilled. It looks like Grandma used the commercially produced bobbin (yellow one on the left in the photo) as a template, and cut the others out of margarine tubs and other thick plastic. Very nicely done.

Three yarn bobbins made by my Grandma probably 30-40 years ago on the right, commercial bobbin (yellow) on the left

Color knitting experiment

After making the baby hats from the rainbow acrylic yarn, I was left with a skein and a half of the stuff. Hm. The yarn has very short sections of color that repeated, could I knit it to make vertical stripes? The answer is: sort of. The color sections were not precise, so as I knitted I decreased or increased on the edges so the teal color lined up with the row before. I could then knit straight across without puckering the center of the fabric (although this might have been an interesting experiment as well). The resulting stripes undulated in interesting ways. Keeping the increases and decreases on the outside made the edges curl and pucker, but not entirely unpleasantly. It does help the edges curl in and hide the strange tan color the manufacturer threw into the mix.

Variegated yarn knit by lining up color

Since I did not have enough to make a long scarf, I opted to join the ends to make an infinity scarf. I used the Kitchener stitch and a section of the rainbow repeat to join. I had to undo the foundation row and slip the loops onto a needle, then use a yarn needle to perform the steps of the stitch. There is a learning curve to the Kitchener stitch, but it is well worth the effort! I can see the join, because the colors don’t match up as well as I hoped, but the fabric is solid and smooth at the join, not a bulky seam. (There are many online tutorials for the Kitchener stitch for those interested, so I won’t repeat them here.)

Rainbow infinity scarf

All in all, an interesting exercise.

UFO

I was looking through my yarn stash for a bit of something and came across a UFO (or UnFinished Project as crafters like to call them). I was truly shocked, as I don’t have many UFOs (although I have many that I call done that never get used, so there you go). Turns out I blogged about them. Two years ago. Hm. I left them with only the ends to be woven in, a process that took about a half-hour to complete. I think I know why I abandoned the project, the heels are very strange and twisted. Laying there, the socks look uncomfortable.

Unfinished socks, just needing the ends woven in

I wove in the ends anyway and tried them on. The wonky heels didn’t make any difference in the fit. Huh. Well cool, now I have a pair of wool socks.

Missy helping me photo my newly finished socks

Hm. These socks are really comfy. I may have to attempt another pair. In a different pattern.