Crochet basket

Here is another good yarn stash buster, a tightly crocheted mosaic basket. I combined the mosaic crochet technique of dipping down with color with an amigurumi technique of using a smaller hook to get a dense fabric.

Photo description: Standing round basket with multi-colored base in rounds, and sides with a two-tone basket pattern, rim finished with an i-cord, sitting on a puff stitch cat mat.

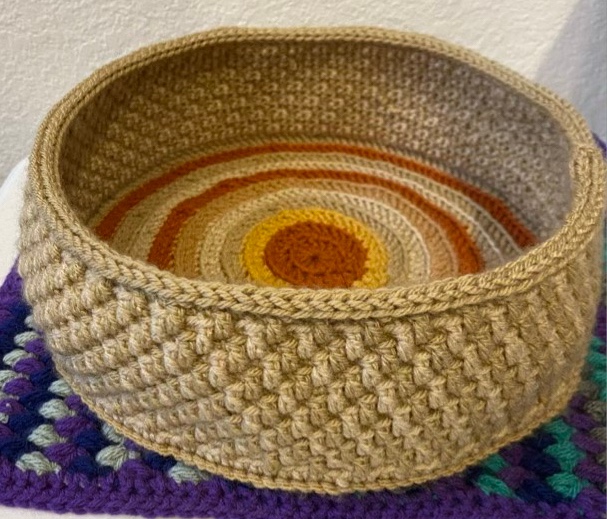
I’ve done a series of video shorts on the stitches starting here.

Here are the instructions:

  • With worsted weight acrylic yarn and a size G hook, double crochet (dc) 10 stitches into a magic ring. Pull the ring tight and finish the round with an invisible join. Weave in end.
  • Start the round by putting the hook through the back loop (bl), yarn over (yo), pull through, and make two chains (ch). Dc in the same space. 2dc in the back loop around for the first row. 1dc bl then 2dc bl for the second row. Dc bl, dc bl, 2dc bl for the third row, etcetera until you have a base the size you want. Each row should have 10 evenly spaced increases. Finish off each row with a invisible join, weave in end. Offset the increases to keep the circle round and not lumpy. You can change colors for each round.
  • Row 1: Turn the work, and work in the opposite direction so the basket pattern faces out. Join color 1 by inserting the hook into the bl, yo, pull up loop, ch1. Single crochet (sc) bl in same loop. Sc bl around. Join with slip stitch (sl st) to first sc.
  • Row 2 and 3: with color 1, ch 1, sc bl in same stitch, sc bl around. Join with slip stitch (sl st) to first sc. Do not cut yarn.
  • Row 4: With color 2, insert the hook into the bl, yo, pull up loop, ch1. Sc bl in same loop. Sc, dc in front loop (fl) of previous row (pr). * skip sc, sc bl, sc bl, dc fl pr. Repeat * around. Drop color 2, pick up color 1, sl st into first sc. Here is a video.
  • Row 5: With color 1, ch1, sc in same stitch. In this row make sure the dc fl pr is in the stitch before the previous row’s dc. Each dc is separated by two sc bl. Continue pattern around. Drop color 2, pick up color 1, sl st into first sc.
  • Row 6: With color 2, ch1, sc in same stitch. In this row make sure the dc fl pr is in the stitch before the previous row’s dc. Each dc is separated by two sc bl. Continue pattern around. Drop color 2, pick up color 1, sl st into first sc.
  • Repeat Rows 5-6 until desired height is reached.
  • I like to finish the top with a three loop i-cord, and found that skipping every fifth stitch gave a nice curve to my basket.
Photo description: Adding a three loop i-cord to the top of the basket, shows the basket side texture.
Photo description: Calico cat in the crocheted basket, she is laying down, it is a tight fit.

Izzy the calico cat reports that I made this basket just a touch too small. She can’t tuck her head in.

Crocheted pillow

I took my two mosaic crochet experiments and joined them together to make a pillow, because why not? I used a single crochet stitch to join the sides, then stuffed it with poly fill.

Photo description: Crochet hook through two loops of purple, and one loop of white, right before the yarn over and pull through to join the sides which are right side out. Cat in the background.

I put a stitch in the center of the pillow to hold the stuffing in place and give it an even more retro look. It worked well because both sides have a defined center of the pattern.

Photo description: finished pillow with center indent and spiral side showing being held by a calico cat.
Photo description: Pillow with the terrazzo side out sitting in the corner of a couch.

He came for the yarn

Thor the tabby cat is fascinated with all things yarn. We are working on what is appropriate and what is not. The ribbon on the stick is fair game, the ball of yarn leading to my hands is not. He jumped up on my chair to watch some yarn unroll, was being very polite, and fell asleep.

Photo description: Gray tabby cat asleep along my leg, with his paws touching a bundle of tan colored yarn. Calico cat laying on my lap.

I’m experimenting with the overlay mosaic technique, but as a way to introduce texture. By using one color of yarn, and stitching in the round, I produced quite a nice basket weave type structure. I am also using a size G (4.0mm) hook with worsted weight acrylic yarn, which is smaller than recommended to make a stiffer fabric. This pattern uses two single crochets in the back loop then one double crochet in front loop of the previous row. The ruler is to assess the gauge.

Photo description: In the foreground a small swatch of crocheted fabric held against a ruler. In the background a gray tabby yawning next to a calico cat on my lap.

Thor slept through the whole swatching process, and Izzy the calico never noticed he was within an inch of her.

Mosaic crochet flat rounds

After experimenting with mosaic crochet in rows, I decided to try a pattern in the “round”. These are built in a similar manner to granny squares, working from the inside out and producing a flat fabric. I followed a terrazzo pattern from a YouTube video.

Photo description: Mosaic crochet square in purple and light pink with diagonal wavy lines and a wide border covering a sleeping Calico cat.

I have to admit that although I really like this pattern, it makes my eyes vibrate. I finished off the square with a solid round of pink, then a wider band of purple to offset the trippy. The neat part of mosaic crochet this way is that you don’t have to cut the ends of the yarn for each round. I switched colors, but didn’t cut, so it worked up without dealing with multiple ends.

Mosaic crochet

Relatively recently, I discovered the concept of mosaic crochet. Then a few weeks later, actually met someone at a craft fair that does mosaic crochet, and she showed me pictures of the stunning blankets she had made, and explained to me the difference between mosaic and tapestry crochet. Another name for mosaic crochet is overlay crochet, and it consists of alternating rows of color in back loop single crochet, with double crochet stitches that dip down over previous rows to block out color. What fascinated me most? No floats. No loose loops of yarn along the back to catch at fingers and toes. I had to try. (For those interested, tapestry crochet carries threads along the row, hiding them in the stitch until needed. That is a future project.)

Photo description: Gray and cream crochet square with rows of spirals in different orientations and square bullseyes along the center row. There are a couple errors in the execution.

I recently acquired a bag of odds and ends yarn from a fellow crafter. This is the perfect stash to draw from for experimentation! I looked up some basic mosaic crochet instructions, and settled on trying a simple spiral (because I like them). I did the first row of motifs with little problem, so did the next row with a reverse motif. The little problem was a counting and repeat issue, but rather than starting over, I adjusted the pattern to my change. It is an experiment. I left long ends on each side, because I wasn’t sure if I wanted fringe, and it actually made me loose at yarn chicken and I had to slightly switch yarn color for the last row. Ah well. The back of the piece is nearly as exciting as the front, neat lines!

Photo description: Back of same crochet square, showing horizontal lines of alternating color.

One of the other techniques I learned in this project is a standing single crochet. As the mosaic crochet is worked from the front only (I worked from right to left on every row), the first stitch starts with a new strand every time. To make things neat, tidy, and secure, it helps to start each row with a slip knot on the hook, then single crochet into the first space. Very cool technique.