Looks like a muppet

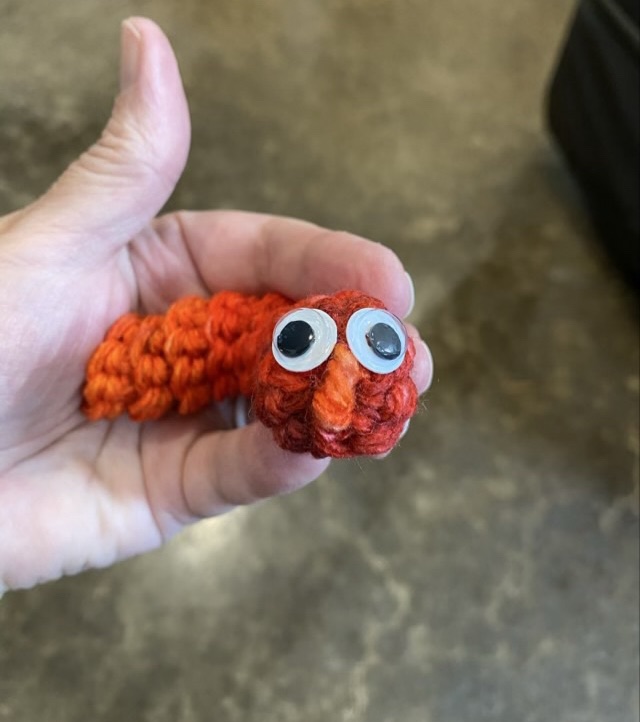
I’ve come up with a worry worm pattern I prefer. I don’t really care for the flat head version, so I put the eyes on the end of the spiral, rather than making a separate head. I’ll share the pattern at the bottom, but I had to show you the familiar muppet face that serendipitously showed up on one worm.

Photo description: red crocheted worm with an orange nose and large googly eyes

I really like making these with a variegated yarn that has a medium length color change, because then the worm comes out in two, maybe three colors. Shorter color changes are OK, but not as dramatic. I have been filling waiting time making worry worms as a fundraiser for my chorus, as a gift for donations.

Photo description: box of crocheted worry worms in many colors with a poem, Lone Star Chorus logo and a QR code with the words “Thank you for donating to Lone Star Chorus, please take a worry worm!”

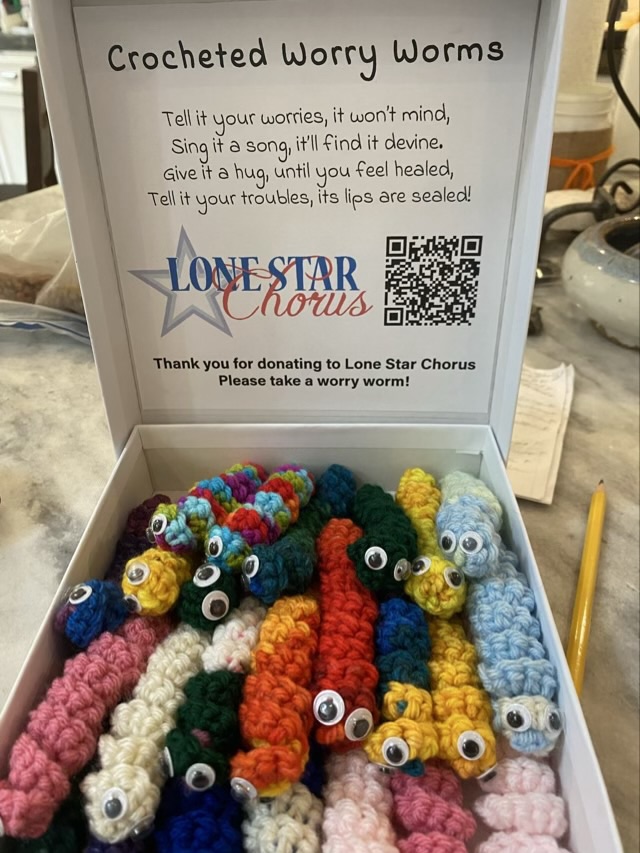
I came up with the poem, there are many varieties out there on the web, but I wanted one with singing. The poem is:

Tell it your worries, it won’t mind,

Sing it a song, it’ll find it devine.

Give it a hug, until you feel healed,

Tell it your troubles, its lips are sealed!

To make them, I use worsted weight yarn scraps or variegated yarn. Acrylic is best for this to avoid any natural fiber allergies. I use a size J hook, but different hook sizes will still make a worm, just in different sizes and densities.

I start with a crochet chain, and weave in the tail as I chain. Before you make a chain stitch, flip the tail between the hook and the working yarn, this will catch the end in the next chain stitch. The end will become the nose. Chain 30.

In the second chain from the hook, make 3 single crochets (or half double crochets if you want a thicker worm). Make three stitches in each chain stitch all the way along. The worm will naturally spiral on its own, but can be encouraged by twisting.

Cut the yarn about 8 inches from the end and pull the last loop out. Thread it on a yarn needle and run the needle under three stitches to form the head. Add a sew-on googly eye, run the needle through three more stitches and add a second eye. Weave in the end.

Worm achieved.

Softening

I washed a load of crocheted hats with fabric softener and then dried them with a dryer sheet to get the inexpensive acrylic to soften up some. The technique works and the hats just need some labels and they’ll be ready for the chorus craft sale.

Photo description: washer tub full of crocheted hats in a variety of colors and shapes

Current hat count: 35. I’m almost through all the acrylic yarn.

Lace beret pattern

So I wrote up a pattern for my lace beret, and even tested the pattern with a second beret.

Materials: worsted weight yarn, size I hook, yarn needle

Terms:

ch – chain

sl st – slip stitch

sc – single crochet

scbl – single crochet in the back loop

sc2tog – sc two stitches together

dc – double crochet

CDCS – Chainless Double Crochet Start (I like Moogly’s method)

  • Row 1: ch 2, 20 dc in magic circle, sl st to first DC
  • Row 2: CDCS, dc, ch 2, *dc, dc, ch 2* repeat ** 9 more times, sl st to start (10 ch 2 spaces)
  • Row 3: Sl st to ch2 space, CDCS, dc, ch 2, 2 dc, *in next space 2 dc, ch 2, 2 dc* repeat ** 9 more times, sl st to start
  • Row 4: CDCS, *in next space (2dc, ch 2, 2dc), skip 2 dc, dc in next dc* repeat ** 8 more times, in next space (2dc, ch 2, 2dc), sl st to start
  • Row 5: CDCS, dc in same st, *in next space (2dc, ch 2, 2dc), skip 2 dc, 2 dc in next dc* repeat ** 8 more times, in next space (2dc, ch 2, 2dc), sl st to start
  • Row 6: CDCS, ch 1, dc in next st, *in next space (2dc, ch 2, 2dc), skip 2 dc, dc in next dc, ch 1, dc in next dc* repeat ** 8 more times, in next space (2dc, ch 2, 2dc), sl st to start
  • Row 7: sl st to 1 ch space, CDCS, ch 1, dc in same space, *in next space (3dc, ch 2, 3dc), in next ch 1 space, (dc, ch 1, dc)* repeat ** 8 more times, in next space (3dc, ch 2, 3dc), sl st to start
  • Row 8: sl st to 1 ch space, CDCS, dc, ch 1, 2dc in same space, *in next space (3 dc, ch 2, 3 dc), in next ch 1 space, (2dc, ch 1, 2dc)* repeat ** 8 more times, in next space (3 dc, ch 2, 3 dc), sl st to start
  • Row 9: sl st to 1 ch space, CDCS, dc, ch 1, 2 dc in same space, *in next space (2dc, ch 2, 2dc), in next ch 1 space, (2dc, ch 1, 2dc)* repeat ** 8 more times, in next space (2dc, ch 2, 2dc), sl st to start
  • Row 10: sl st to 1 ch space, CDCS, ch 1, dc in same space, *in next space (2dc, ch 2, 2dc), in next ch 1 space, (dc, ch 1, dc)* repeat ** 8 more times, in next space (2dc, ch 2, 2dc), sl st to start
  • Row 11: sl st to 1 ch space, CDCS, ch 1, dc in same space, *in next space (dc, ch 2, dc), in next ch 1 space, (dc, ch 1, dc)* repeat ** 8 more times, in next space (dc, ch 2, dc), sl st to start
  • Band: ch 8, turn. 7 sc, sc2tog, turn. *7 scbl, ch 1, turn. 7 scbl, sc2tog, turn.* repeat ** until beginning is reached. Stitch sides of band together, weave in ends.
Photo description: light pink lace beret top showing straight lines of holes radiating from the center
Photo description: same hat, showing the opposite side of the beret with the band laying flat
Photo description: another lace beret in light green

Swirled beret attempt

I can spiral two and three colors, how about four? Well, this might take some development. The angles of the spiral arms change even more than in the three spiral version, and I quickly slid into beret territory, but then didn’t make the increases evenly somehow and ended up a little wonky.

Photo description: four color spiral beret which is an imperfect circle

Making the beret band was a fun experiment. I tapered the final stitches on the last round and the single crochet ribbed band went on nicely.

Photo description: same beret, other side showing the four color band, which is frankly the best part of the hat

I don’t think I’ve talked about the subtle difference between beanies and berets. After a beanie’s circle is made the sides are straight with no increases or decreases, the circle should be the circumference of the head size to get a nice fitting beanie. A beret circle goes far beyond the head circumference, then the sides use decrease rows to come back to the right circle size before adding on a band.

Three color spiral beanie

There are several ways to crochet a striped hat, but my favorite is with spirals. Can I spiral three colors together? Yes!

Photo description: close up of the top of a crocheted three-color spiral hat in green, light pink, and dark pink

To start the spiral, each color has a single crochet, half double crochet, and two double crochets into a magic circle. This gives a slight taper to the start of each color. The increases for the crown are worked in each color and there are no ends to the rows, the stitches are worked continuously around in double crochet alternating colors. To end, I reversed the taper with a half double crochet, single crochet, then a slip stitch before weaving in the ends.

Photo description: side of the same hat showing stripes on the side and the decrease at the brim for the dark pink color.
Photo description: same hat folded to show the spiraled crown