Ukulele strap part 1

I decided my ukulele needed a strap. Maybe it was mostly an excuse to design a new card woven pattern, maybe it was to use up cotton crochet thread, most likely I decided to make it myself because I don’t have enough works in progress.

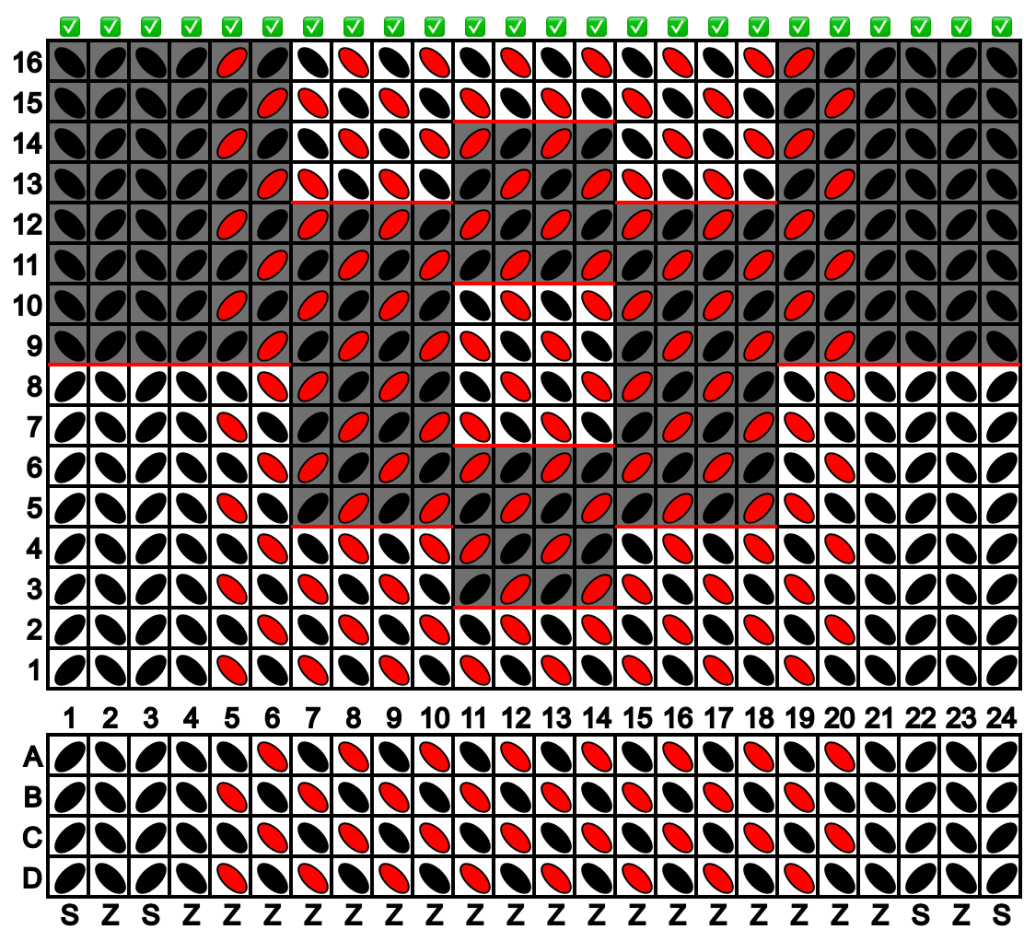
I used this tablet weaving designer, and came up with this pattern.

Photo description: Tablet weaving pattern diagram generated in Tablet Weaving Draft Designer v1.5.0. Diagram shows how to setup the cards in the tablet, and which way to turn each card for each pass of the weft thread.

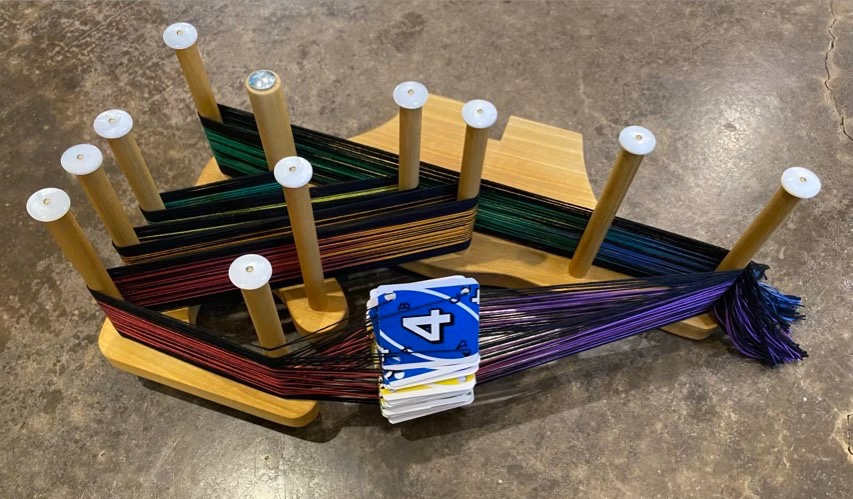
I warped my loom with #10 cotton crochet thread in black and rainbow. The rainbow warps I aligned by color. It was quite serendipitous that a color repeat in the thread was just a little longer than my warp length, so I could have all the colors, and very little waste.

Photo description: Handmade Inkle loom warped with black and rainbow thread with weaving cards made from an Uno deck.

I used the black thread as the weft, and started with a few passes held straight with lengths of 18 gauge wire, then doubled the weft back on itself for several rows. To end, I used a loop method to draw the weft back on itself to help lock the weaving in place.

Photo description: Weaving in progress showing a wavy green and black pattern with solid black edges and rainbow colored loops along the weft pass to use to draw the weft backwards.

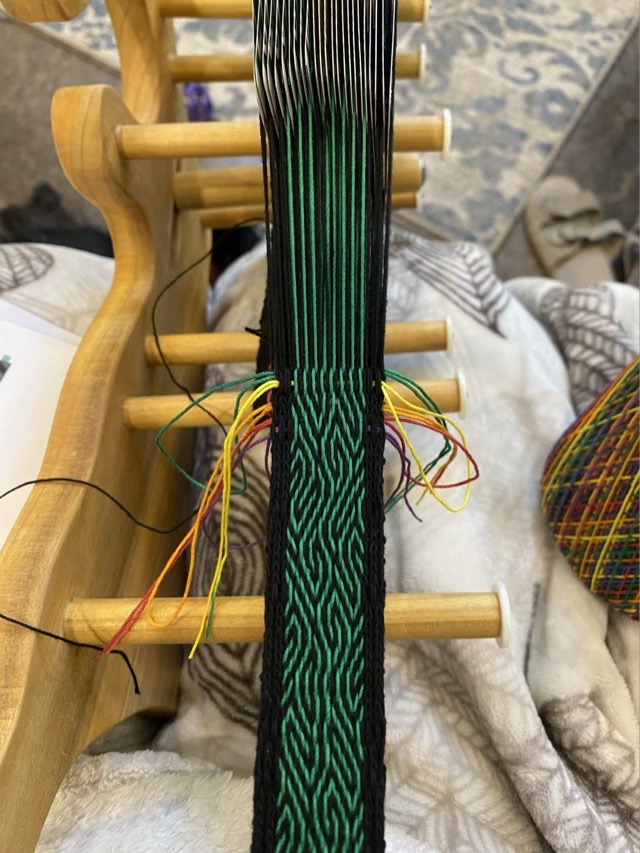
I love this pattern. It is balanced so the twist does not build up in the warp, except when I make a mistake. Even when I miss a turn or double a turn, it still looks cool, and it is double sided! Win! I love the middle, but the edges vex me because they are not even (an artifact of the balanced weave). I may try a plain woven edge next time around (my youngest has requested one for her uke.)

Photo description: Finished woven band with color changes along the spectrum in the same wavy pattern.

Now to make it useful in addition to decorative.

Puff stitch cat mat

Crocheting cat mats is a great stash busting activity. Pairing worsted weight acrylic yarn with a puff stitch results in a cushy mat that seriously dips into the bag of leftovers.

Photo description: Multicolored mat made with crocheted puff stitches in rows of alternating color.

To make the mat use a size G hook with worsted or medium weight yarn in three or more colors.

Chain 43, or multiples of 2 +1 to get the desired size.

Row 1: Starting in the second chain from the hook, single crochet (sc) across.

Row 2: turn, chain (ch) 2, *yarn over, skip first sc and insert hook in the second sc, yarn over, pull up loop to match the height of 2 ch. 3 loops on the hook. In the same sc, yarn over, insert hook, yarn needle over, pull up loop. 5 loops on the hook. Repeat to get 7 loops on the hook. Yarn over and pull through all seven loops. Ch 1. Repeat from * across.

Row 3: Change color. Leave the other color attached if doing a three row repeat. Ch 2, *yarn over, insert hook in the first ch space, yarn over, pull up loop to match the height of 2 ch. 3 loops on the hook. In the same space, yarn over, insert hook, yarn needle over, pull up loop. 5 loops on the hook. Repeat to get 7 loops on the hook. Yarn over and pull through all seven loops. Ch 1. Repeat from * across.

Row 4: Repeat Row 3.

Row 5: Pick up the first color, which should be at the starting side. Continue with puff stitch pattern picking up the yarn color that was left off two rows down. If you want to change color every row and not have a three row repeat, or you run out of yarn, weave in the ends, or crochet over the ends as you go.

Continue making rows of puff stitches until you reach the desired length.

To finish the edge, single crochet along the top and sides for two rows. Pull yarn through last loop. Weave in ends.

Put mat where the cat can find it.

Photo description: Calico cat with a pleased expression sitting on a crocheted mat.

Distaff experiments part 2

I have spun all my fiber blended by Anniewhere. I searched my fiber stash and didn’t find any more, so it is time to ply. I have six balls of singles, all slightly different colors. To even out the tone I decided to ply two balls together, so sorted the balls by weight.

Photo description: six nostepinne style wound balls of blended fiber, paired by size.

To control the balls while I plied, I decided to stretch the use of my rosewood distaff. The shaft of the distaff fits through the center of the yarn balls, so I put two on, and to keep the yarn from flying off, placed a spherical pencil eraser on top.

Photo description: On the left a rosewood ring distaff with two balls of yarn and a bright yellow heart-eyed emoji eraser on top. On the right my hand made drop spindle with wooden top whorl and metal hook.

This setup works great. I was able to complete my walk and complete the plying without tangling issues, which is huge for a spinner.

Photo description: Same distaff, same spindle, but now there is only one small ball on the distaff and a large cop of two ply yarn on the spindle.

Now to the other four!

Distaff experiments part 1

I’ve been trying different ways to dress my distaff. A distaff is a way to hold fiber in preparation for spinning, and placing the fiber on the shaft is called “dressing” because it is very much like placing clothes on a doll.

My first method involved laying out parallel tufts of fiber on a handkerchief, making sure the ends went the same direction and stuck out the bottom. I would then roll up the fiber and fabric on the distaff and tie it loosely with a cord. This worked OK until the fiber was mostly gone, then it preferred to stick to the cloth instead of itself, which made drafting difficult.

The second method I tried didn’t use the handkerchief, rather just the fiber parallel to the distaff shaft, tied round with cord. As I drafted the fibers off, the cord slipped down and became a restricting collar at the base of the shaft, also making it hard to draft.

My third method involved rolling the fiber parallel to the shaft, then adding the handkerchief around the fibers in a layer, and tying the cord so that it was tightest at the top. This top secured trick is the key. It was much easier to draft the fibers off the distaff, the dressing behaved itself to the near end when I had enough fiber to hold in my hand without tangling.

Photo description: Rosewood ring distaff dressed with a blended carded fiber, handkerchief, and cord in a inverted cone shape (left). 3D printed Tough resin spindle with single spun yarn wound nostepinne style (right).

Growing

The weather is finally cooling somewhat (we’re still going to see some highs in the 90s, but mostly we’re in the 70s and 80s) and in a fit of optimism I setup the dog crates with the winter gear: fleece pad covers and soft fuzzy blankets. Thor the seven-month-old kitten decided this was done for his benefit and has claimed Missy’s crate. Poor Missy. I do kick the cat out whenever I find him in there.

Photo description: Gray Tabby cat laying in a blue dog crate, filling most of the 2×3 foot pad.

I did weigh him this week and he is 12.2 pounds. Big kitten.