Oh my delicate parts

My youngest’s Nintendo Switch lite broke. The left joystick actually flopped around, not just drifted. She received a new to her full size Switch for her birthday, so the old one was a wash. Since it didn’t hurt anything to try, I bought an under $20 joystick repair kit and found directions. The directions had 28 steps just to get the joystick out, then the same 28 steps were retraced to put it back together. The kit came with two joysticks, which looked identical, except for part numbers on the back. There was no indication anywhere which was left, and which was right. I picked one. The disassembly didn’t go too bad for the left joystick, although I did break the left speaker connection because I didn’t realize that the plug was a teeny tiny white part in a slightly larger tiny white socket.

Feeling brave, and while the device was open anyway, I decided to replace the right joystick as well, after all, I had the part. Oh dear. The right joystick is a whole different set of steps, and involves removing a motherboard. I didn’t break the right speaker, and I had to replace the motherboard three times before all the cables were in the right spots, I thought. I missed the fan cable, and when I tried to retrieve it through the motherboard, it tore. Nuts.

Photo description: motherboard removed from a Nintendo Switch lite, all the removed parts placed on a sheet of cardstock and labeled
Photo description: broken end of a fan cable

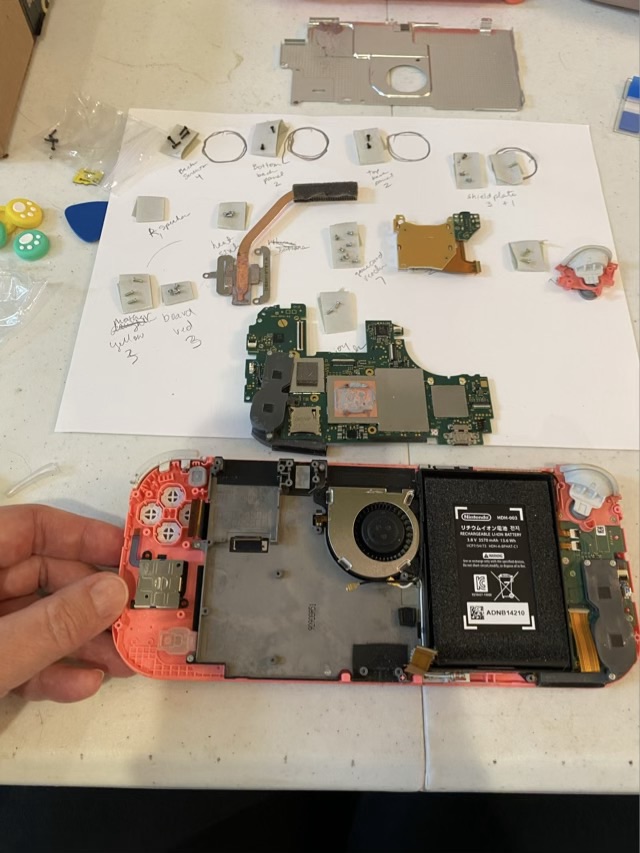
Things I learned in this process: don’t force it (honestly I really should have known this, this is not my first rodeo). The engineering and durability of these devices is amazing. If I hadn’t been ham-handed, this is a doable repair. Inverted washi tape rings make great holders for tiny screws. Label everything. I saw my eldest set up for a deconstruction this way with wells embossed into card stock and it is brilliant.

The number one thing I was forcefully reminded of in this project: stop when you’re ahead.

The pieces and parts are now marked for a trip to tech recycling.

Leg repair

One of my neighbors put out an upholstered stool on the side of the road. It had elegant curved legs, but one of them was broken. I picked it up and glued the leg back on.

Photo description: clamp holding together the broken portion of the leg

There was still a large gap in the leg after I fit it together.

Photo description: closeup of the wooden leg showing a deep hole and ragged gash.

I bought some Apoxy sculpt modeling compound, which is a two-part epoxy clay that hardens without baking. I bought the color called “bronze” because I was inspired by the Japanese method of Kintsugi, or making a visible gold repair. The “bronze” was not metallic at all and actually was a fair match to the stained wood. Huh.

Photo description: same wood leg, but upright on a blue and gray rug, showing the filled hole, which is slightly lighter and more gray in color. I treated the whole base with Howard’s Feed and Wax (I love this stuff).

I removed the water stained upholstered top and found something interesting.

Photo description: top of the stool with the upholstery removed.

This little piece of furniture has been many things. At one point it had a rattan top that had been cut out. I’m guessing the rattan was original and this was intended to be a side table. Then there is a round of staple or tack marks around the old rattan groove, which I assume was the second and maybe even third life of the piece. When I picked it up, it had green velvet fabric stapled to a plywood board, that was then screwed in place from underneath.

I have no doubt that those legs would break again if someone sat on it. So what to do with elegant legs that can’t take much weight? Oh, I came up with something, and it is probably the silliest thing I’ve ever made. I’ll share the results tomorrow.

Tinier stitches

I thought the Singer model 66 was set at the tiniest stitch, so I’ve been gradually turning the stitch length knob, pictured below and marked with an arrow, to the left. This knob on both my machines was quite difficult to turn and needed extra sewing machine oil, and a wrench with the jaws wrapped in leather, so as not to damage the knob.

Photo description: Balance wheel side of a Singer model 66 sewing machine, with an arrow pointing to a large silver round knob which controls the stitch length.

My assumption was wrong. Turning the knob to the left makes the stitches even tinier!

Photo description: Light colored fabric with concentric rectangular stitches. The outer stitches were done after turning the knob to the left. The inner stitches were after turning the knob almost all the way right.

So now it makes sense that I have seen these knobs all the way screwed in, the longest stitch works well for sewing the most common fabrics. There wouldn’t have been much call for changing the stitch length, so more time for the knob threads to seize up.

I also figured out a way to “reverse” stitch on the treadle machine that absolutely does not have a reverse capability: I turn the fabric around. I sew a few stitches, bury the needle, lift the pressure foot, turn the fabric 180 degrees, lower the pressure foot, sew a few stitches back to the beginning, then turn again and continue with my seam. Here is a video. These stitches are so small I probably don’t need the extra reinforcement, but it makes me feel better.

Mystery hook

In one of the drawers of the Singer model 66 cabinet, there was a metal wire hook. Very strange.

Photo description: Inside of a wood drawer from a Singer treadle cabinet, with a wire hook attached to the screw for the wood knob.

I asked on a couple FaceBook groups what the purpose of this hook was, and had many guesses, but no firm knowledge. I also signed up for the email list for TreadleOn.net, which talks exclusively about people powered sewing machines. It took a few days, but then a couple people chimed in with their informed guesses. From what I can piece together, this was intended to hold bobbins, and was an original Singer part 56267, as pictured in an illustrated plate (shown below) from MillardSewing.com.

Photo description: Illustrated plate of Singer sewing machine parts.

From what we could gather, this part was only produced for a short time. Users found it annoying and often removed it. Many people answered my question with better solutions for bobbin storage.

My hypothesis, as a long time crafter and person who sews, is that the hook was intended for bobbins, but not for storage. It is mentioned in the Singer manuals, frequently and with urgency, that bobbins should not be wound with additional thread. The old thread should be removed before winding on a new color. I have personally seen evidence that the sewing machine users blithely ignored this advice, because ALL (yes, all) of the bobbins from my model 27 and model 66 had multiple colors of thread. I believe the Singer engineers fashioned this hook to make unwinding the bobbin easier. I tested with this in mind, and it works beautifully for that purpose. A single bobbin can be threaded on to the hook, it holds the bobbin securely while letting it spin, and while unwinding the thread, the bobbin does not jump across the room and hide under the dresser, as happens every time I have unwound a bobbin previously. Maybe users found the need to not waste thread more urgent than the smooth operation of the machine. I don’t know. The modern solution is to have a plethora of bobbins, minimizing the need to unwind. I will be keeping the wire as is, and will use it for unwinding. I do appreciate good engineering.

She lives!

I think I mentioned that the family Singer model 66 was seized? It turned out that the bobbin case and hook area was packed with lint. I watched several videos on how to disassemble the hook and bobbin case, including Bob Fowler’s videos, then took my machine apart, cleaning each piece as I went, carefully labeling each bag, and taking pictures often.

Photo description: Mid-cleaning of a Singer Model 66 showing the bobbin case and alignment removed, the hook still in place, and some of the oil soaked lint removed from the area.

Reassembly included putting in a new felt wick for the hook race (I found excellent instructions here), and timing the hook from a Bob Fowler video. Shockingly, I got the timing in one go, which shows that it was quality instruction. I finished up giving the ornamental covers some TLC before putting them back on, found a new needle from the drawers, installed the machine back into the cabinet, and installed the new leather belt drive. And she worked.

I wound a bobbin, read how to thread the machine (thread goes from the left to the right on the needle), did a minimal adjustment on the upper tension, and started sewing some scrap fabric. Joy! My treadle timing and speed skills are still developing (you have to make sure the balance wheel turns toward you, and absolutely not away), but she sews! Here is a video! It makes tiny stitches, so I’m working on loosening up the stitch length regulator knob.

Photo description: Cleaned up and revitalized Singer model 66 treadle sewing machine from 1918.

Getting this machine up and running did not take as long as I thought it would, because it was well looked after. Yes, lint collects in machines, but all the parts were there and no one had forced the machine and broken or bent anything not replaceable. I’m going to regularly use this machine so she keeps working, and hope she is around for another hundred years and can go on to another family member.