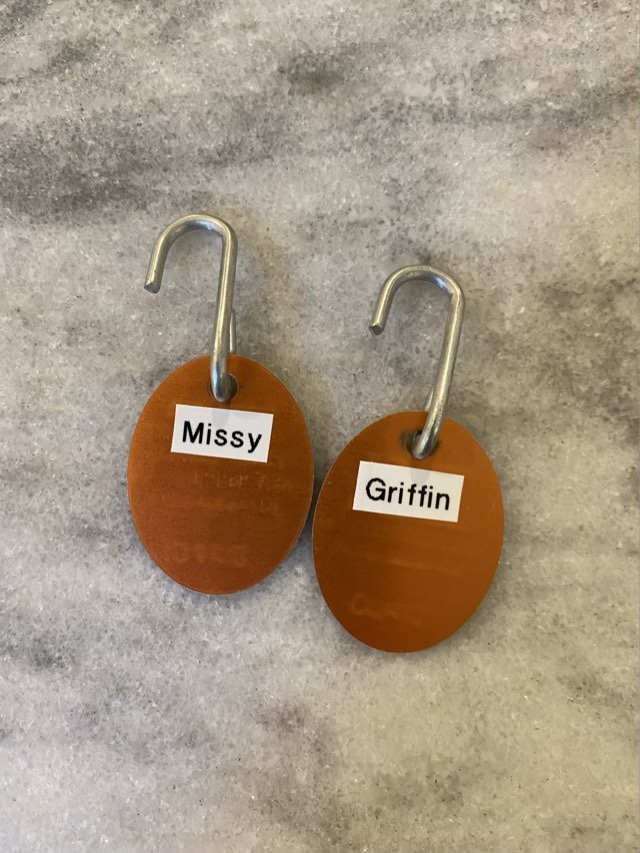
Super glue hack

It is inevitable that my cyanoacrylate glue plugs up after the first couple uses, no matter how well I wipe the tip, or how fast I get the lid back on. When the time comes to use it next, I have to go hunt down a pin to break through the dried plug. What would be better? Tucking the pin in the folded section of the glue tube! Now the pin is right at hand when I need it. Yay.

Stick pin attached to the glue bottle

This is Loctite 454, which is my favorite instant glue, and yes, I store it in the refrigerator.

Another wrapping option

As the pull skein of yarn sat wrapped up in my Grandma’s blanket, waiting for me to finish the edges, it became quite untidy. Since it will be awhile before I am ready to get back to knitting on this piece, and I will have it laid out and put away several times to measure edges, I decided to rewrap the yarn to keep it neat. A cut and folded paper towel roll works well as a center, and if you run the yarn down the fold, it stays out of the way during wrapping.

Folded paper towel roll cut in half
Rewrapped yarn with working side on the inside of the ball

Here is the link to my short video on wrapping a center-pull ball of yarn, if you need it.

So many peaches

Freshly washed Parker County Peaches (about 1/4 of my whole haul)

I recently went to the local Farmer’s Market in town and loaded up on local peaches. I think I had nearly 10 pounds! At home, I put them in a large paper bag to finish ripening. We did eat some right away, and some the next day, and the next, but we still weren’t able to get through them all when they hit peak ripeness. So I decided to freeze them. Ripe peaches are fiddly things to cut! I tried several methods, but found these steps listed below worked well for me.

First two longitudinal cuts allow one section to be removed
Cut one slice at a time and use a slight twisting motion to release the slice from the pit
Skins remove easily by sliding the knife between the flesh and skin

My slices aren’t beautiful, but they froze well and go great in smoothies. The skins I popped into the food processor, then froze as a block to give to the chickens later. (It is rather hot here, frozen treats are favorite.)

Keeping out the rain

Izzy the cat’s favorite litter box is the one in the catio. I’ll admit, we didn’t discover this for years; poor kitty had to do her business inside until we finally placed a box outside. Then the rain came. Scoopable litter is really gross when it gets soaked in rainwater. Even though there is a cover on the box, the lid design is not good for outdoor use. As this is the biggest litter box I’ve found, I decided to fortify it to keep the rain out. On other blogs, they will show you cute little huts they built with coordinating paint and curtains. Here, you get the duct tape version. With an old baking sheet.

Outside litter box protected from rain with an old baking sheet

If you don’t want it to move, use duct tape. This is not an elegant looking solution, but it did the job. During our biggest rain storm this year, the litter stayed dry (at least from the rain).

Organizing and protecting

So now that I’m back to posting things for sale on Etsy, I needed a way to organize and protect my inventory. In the past I would tuck boxes into a cupboard, but then have to rummage through the boxes when something sold. This time I bought a file box with hanging folders, and am tucking the cards and wood work into the folders and labeling.

Labeled hanging folders to organize Etsy stock
A look down into the hanging folders

This should keep my inventory safe and dry (rather than on a table or counter where anything could happen), and I know where everything is!