Tulip fiber experiment

We went to a tulip festival where you could pick your own tulips. We were instructed to grasp the stem at the bottom and pull straight up. We often came away with the whole plant! At home I put the stems and flowers in a vase, and had a whole pile of tulip leaves. Was there fiber there I could harvest? I tried different ways of taking the leaf apart, and found translucent fibrous material on the back of the leaf that I could peel away from the fleshy section. (Many plant fibers are harvested after retting, a process that rots away the non-fibrous material, I wasn’t ready to go that far with these tulips.)

Photo description: from left to right: partially peeled tulip leaf, fibers from leaves on a paper towel to dry, rewetted and twined tulip leaf fiber

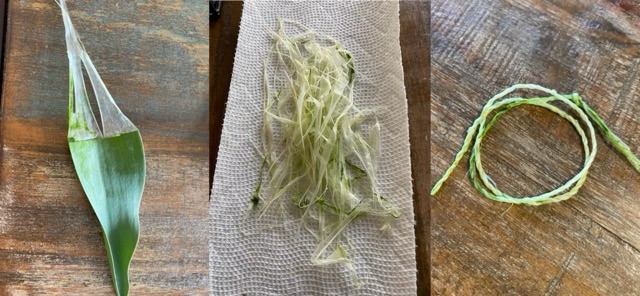
I left the fibers to dry for a couple days, then rewetted them one at a time before twining them together. The resulting twine was not very strong, even after drying.

Tulip blooms don’t last long, and I noticed that the stems were starting to curl up at the cut ends. Would the fiber in the stems be stronger? I peeled the outer layer of the stems and let them dry to find out.

Photo description: from left to right: spent tulip with a portion of the stem peeled away, pile of fibers from tulip stems, twined tulip stem fiber.

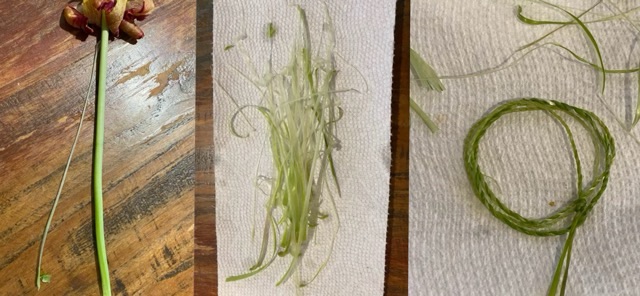
The fiber from the tulip stems is stronger than the leaf fiber, at least with the method I used to harvest. I can’t imagine a survival situation where I was stranded in a field of tulips and needed rope, but if I were, I’d use the stem fiber, and hope that it didn’t need to bear much weight because it still isn’t that strong. When dry, I can break it with my hands with some pressure. Harvesting the fiber is also tedious and time consuming for small gains, but was an interesting experiment.

Knitting row counter

Here is a different version of a row counter for knitting. I used flat round wood beads and copper wire to make a chain with larger loops to accommodate larger needles. I then used a wood burner to number each bead; it is actually easier to wood burn the assembled chain rather than individual beads. To mark the tens, I used a copper lobster claw clasp with a copper clay leaf (that I made many, many years ago and has been waiting for a project). I find the lobster claw easier to deal with than a melody clip.

Photo description: handmade row counter in the center with handmade copper leaves on the right, then going counter clockwise: purchased copper lobster clasps, bead reamer, pliers, a pile of row counters waiting for their dangle, and a spool of 22 gauge copper wire.

Clear origami crane

Many years ago I learned how to fold paper cranes. It is my go-to fidget when I’m waiting and there is paper available, mostly a situation I encounter in restaurants. My cranes have become smaller and smaller as my kids grew and the paper available diminished. I went from coloring sheets to sugar packets. My favorite so far has been a minuscule crane folded out of clear plastic.

Photo description: clear origami crane folded out of a plastic wrapper. Penny for scale. Sitting on the surface of an iPad.

Soybean fiber

I’ve finished spinning the singles for my soybean fiber. It has quite the halo. I think if I had used water to wet it as I spun, as is done with flax, it might have less fly away fibers. I’ll mark that as a future experiment.

Photo description: Soybean fiber before spinning, the fibers really like to expand and float.
Photo description: Soybean fiber after spinning, wrapped nostepinne style around a prototype Phase Spindle. Many fuzzy ends visible along the edges of the yarn cop.

Soybean fiber was developed by Henry Ford around 1937 in his push to promote soybeans in the marketplace. He also developed a soybean plastic and produced a limited number of soybean cars, with plastic body parts and soybean fabric door panels. The fiber is now gaining in popularity and obtaining soybean combed top for spinning is easy. It is also referred to as vegetable cashmere, which fits with that soft fuzzy halo I obtained with my yarn.

More 3-hook i-cord makers

I ordered replacement hooks for a knitting machine, which are essentially latch hooks without a handle. I made handles from flame maple and deer antler horn and mounted three hooks in each handle using epoxy in holes I drilled with a drill press.

Photo description: four 3-hook cord makers, the far left and middle right handles are made of deer antler, the far right and middle left are made of flame maple.

I sealed the flame maple with Howard’s Feed and Wax (I think I’ve mentioned before how much I love this stuff!)

They work! I spread the tines a little more on these, which gives a more flexible i-cord than my first i-cord maker.