Möbius crochet tessellation

In the pursuit of a möbius scarf that has a center line that stretches with the fabric, I have twisted my brain inside out, backwards, and forwards. I finally sat down and drew what I wanted.

Tessellated parallelograms

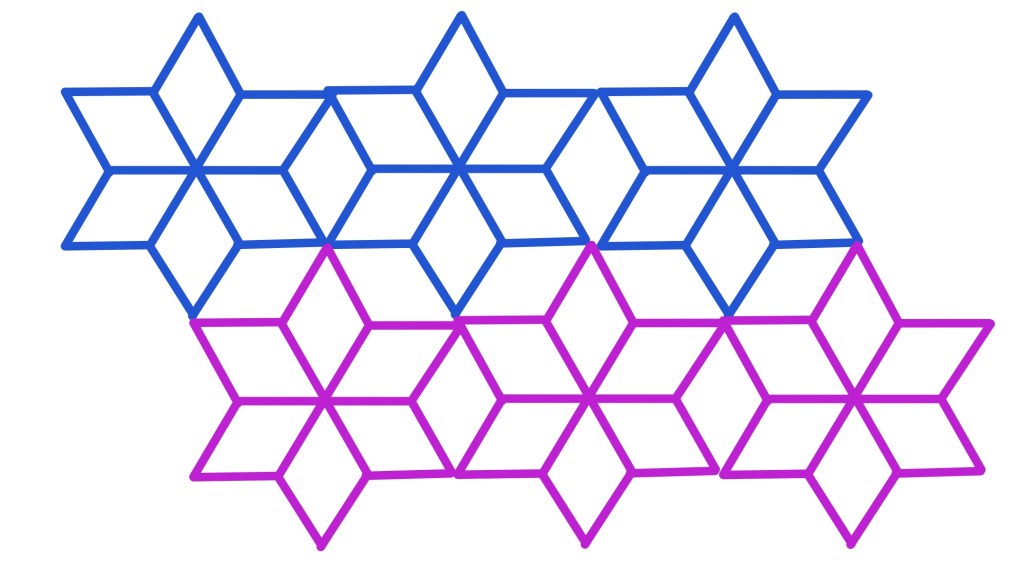
I used different colored lines to trace how the crochet stitches should go.

Breaking up the tessellation into crochet-able lines

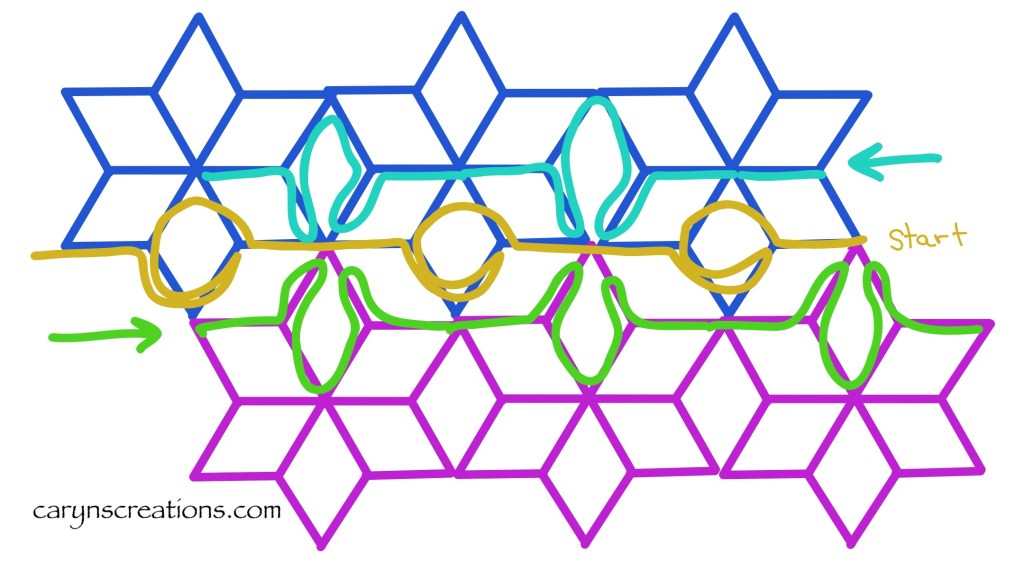
With a little experiment to verify my thought process, I then used crochet symbols over the sketch to solidify the plan.

Capturing the essence of the pattern with crochet symbols

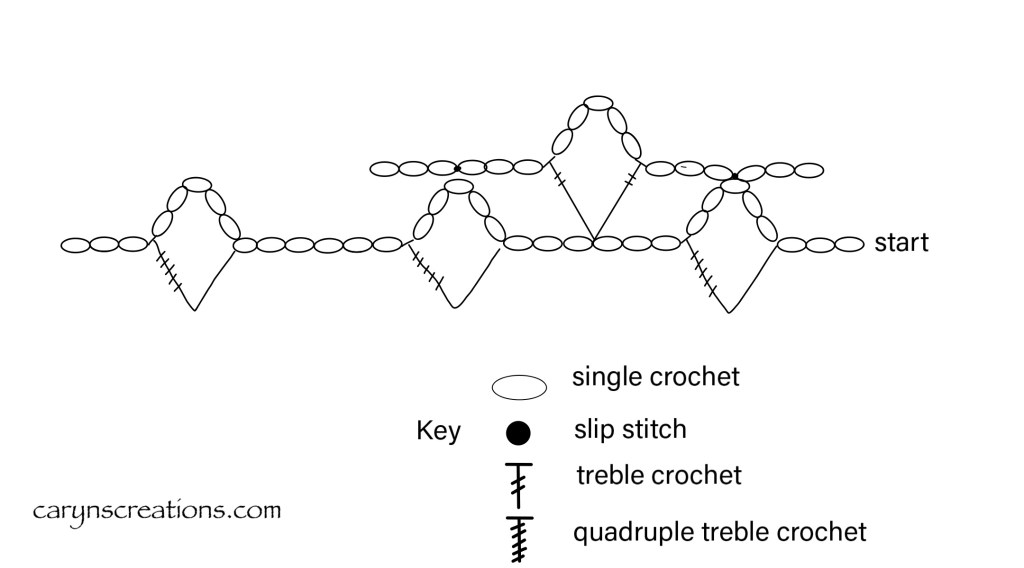
The foundation chain is not strictly a chain, but a connected series of loops. Most crochet patterns start with “chain x number”, but not this one. I only illustrated a single repeat for the subsequent rows, as that is all you need. Each row is offset from the previous row. I’m not going to give a specific pattern for a specific size or number of rows, but I will attempt to put into words what my drawing shows, for those that may need it.

quadruple double crochet (qdc): yarn over 5 times, insert hook into work, (yarn over, pull through two loops) six times

Treble crochet (tr): yarn over 2 times, insert hook into work, (yarn over, pull through two loops) three times

Foundation chain (row 1): chain 8, *quadruple double crochet (qdc) into the fifth stitch from the hook, chain 11, repeat from * to desired length, qdc, chain 3, join with a slip stitch to beginning chain.

Row 2 (and all subsequent rows): chain 6, mark third chain, slip stich in 5 chain loop, * chain 3, tr into middle of six chain length, chain 5, tr into same stitch, ch 3, repeat from *. Chain 3, tr, chain 5, join with slip stitch at mark, 3 slip stitches to get to next starting point.

To make this Möbius, when you come round to the mark, give the foundation chain a slight twist and crochet on the opposite side. Each round will go on both sides of the work (the magic of Möbius).

Wrist-sized test piece
Wrist sized test piece showing the twist

Now to make an actual scarf!

It makes me happy anyway

I’ve started to spin the Shetland wool batt on my walks. I gently separated narrow strips from the large batt, and loaded my arm bag with what I thought was enough to last me one or two walks. Five walks later, and I am still on the initial load of fiber. Granted, I am spinning it finer than I spin alpaca, but wow. Even though it is slow going, I really, really enjoy watching the twist move into the fiber, and the pleasant way the wool drafts out. The plan is still to make a two ply lace weight yarn. I’ll have to test the wraps per inch (wpi) after I ply to see just how fine (or not) I’m spinning. Lace weight measures at 30-40 wpi, while sock or fingering weight measures at 18-30 wpi. I suspect I will have a fingering weight when I ply, just looking at the singles on my spindle.

Spinning Shetland wool with a drop spindle

I could probably spin even finer, but I would probably have to use a supported spindle, which I have not figured out how to do while walking.

I’m calling it done.

The tapestry loom experiment provided valuable data: mostly that I don’t like to sit still and weave. After taking up space on my kitchen counter for many, many months, I finally decided to take it off the loom. It is a shame that I couldn’t bear making it into a scarf size; the fabric drapes beautifully and has a nice feel, but I truly could not face the project any longer. The killer was the loose stripes. My concept for the weaving was “identity crisis” and to show that I had two striped color schemes warring across the field of fabric. I intended to have several “loose” stripes instead of just two, but those two slowed my production to a near standstill. Once I decided to move on, the remaining stripes went fairly quickly. I removed it from the loom and let it rest for a couple weeks. Then I finished the edges by braiding the warp threads, weaving in the loose weft threads, and machine sewing a hem on the top and bottom.

“Identity Crisis” weaving cotton and acrylic

I do like the “war” between the color schemes, and I may cut down the very large (to me) tapestry frame to a lap size, but for now there are many, many portable projects to pursue.

Shetland wool

I found some more Texas grown spinning fiber! I was connected to another spinner through our local coffee shop, and she sent me many resources, including the name of a Texas rancher that raises Shetland Sheep (https://baizeshetlands.weebly.com/). Shetland sheep were developed in Scotland to be competition for Italian Merino wool. These sheep are also thriving in the Davis mountains of Texas! I ordered a prepared batt, since I wanted to see how the fiber is supposed to handle before I delve into the raw fleece. In the box with the wool was a passport stamp for the Shave ‘Em to Save ‘Em initiative by the Livestock conservancy. So of course I ordered a passport for my new sticker. There are many breeds of endangered sheep in the passport, and so many opportunities to learn about different wool!

Shetland wool batt from Baize Shetland Sheep with my new wool passport

The Shetland knitters are known for “wedding ring” shawls; large lacy knitted fabric that is so fine, it can be passed through a wedding ring. I am awed by their skill. I read more and found out that the lace uses only knit stitches, no purl stitches so it is double sided. I am not fond of purl stitches, so this might be a way for me to enjoy knitting. I don’t intend on embarking on a wedding ring shawl, but maybe trying some of this lace on a small project. It seems only fitting to try Shetland knitting with Shetland wool. Oh, and knitters in Scotland historically used a knitting belt, which allowed them to walk and knit. I have my work cut out for me.

The rivet worked

Riveting the head of my drop spindle worked. It took a dozen drops, but I eventually dropped the spindle on its head and cracked it again. The rivet held. I was able to continue spinning for the rest of my walk, then when I was home, I put a little glue in the crack and tightened up the rivet with a few careful hammer taps. In mitigation, I was pushing the amount of yarn I could load on the spindle, so it was heavy and starting to get unwieldy, so my lesson is to keep the cop of yarn smaller so I reduce the chance of another drop to the head.

Crack barely visible on the neck of the spindle
Yarn cop that is too big for this spindle

Missy would really like for me to stop taking pictures and kick her ball already.