Adventures with a mini loom

I recently used points to get a Clover mini loom. I have been using scraps of cardboard to weave samples of my spun fibers to go in my fiber journal, so this was an upgrade!

First finished linen swatch, forgot to take progress photos, warped for fringe on the bottom only, came out a weft-faced weave

I started by following directions, amazingly, but the spacing of the tines were very wide and gave me a weft-faced weave, where the warp threads are completely covered by the weft yarn. This is the technique used for tapestry weaving, but not what I was looking for.

Linen warp doubled up and wrapped completely around the loom, starting with a twined row to space the threads

The next attempt I doubled the yarn in each slot by wrapping the warp yarn completely around the loom. This gave me fringe on top and bottom when it was finished, but the weave came out with both the warp and weft showing.

Linen woven swatch with knotted fringe

I moved on to my hemp yarn, and of course I forgot to take progress photos, but I doubled up the warp thread by making loops around the tines, resulting in a fringeless swatch. I found I didn’t need the twined first row to space the threads. It came out a bit wonky, but I am seeing process improvement.

Four-selvage hemp yarn woven swatch

Corriedale spinning

I ordered a blend of white and gray Corriedale wool from Mohair and More for my spinning class. Corriedale is an easier fiber to spin, and the mix of natural colors makes it easier to see the twist, which makes it a great fiber for learning. This is my first time spinning Corriedale as well (I started with difficult fibers, because I didn’t know), so I spun up my own ounce of fiber for my fiber book. I used some passenger time on the road to get it finished up on one of my new student spindles.

Corriedale singles spun on a top whorl spindle with the road stretching ahead

Wood crochet hooks

I have discovered a new method for making wood crochet hooks that I quite like. I flatten the middle of a dowel using a spindle sander, and flatten the end perpendicular to the middle with a band sander. This sets up the grip and the head of the hook at a comfortable angle. I then thin the neck to the size hook I need, and shape the head.

Stages of crochet hook shaping

The bulk of the work goes into hand sanding the final shape. I use sandpaper rolled into tight tubes to access the inside of the hook, and flat sandpaper to smooth the outside shapes. I then use several grades of sandpaper until I’m down to 600 grit.

Hand-sanded crochet hook (left), raw shape (right)

I’m teaching an amigurumi class that uses blanket yarn to make marshmallow animals. The blanket yarn calls for a larger hook than is in most hook sets, so I’m making the hooks the students will use. The next step is to finish and make them nice and shiny so they slide through the yarn loops.

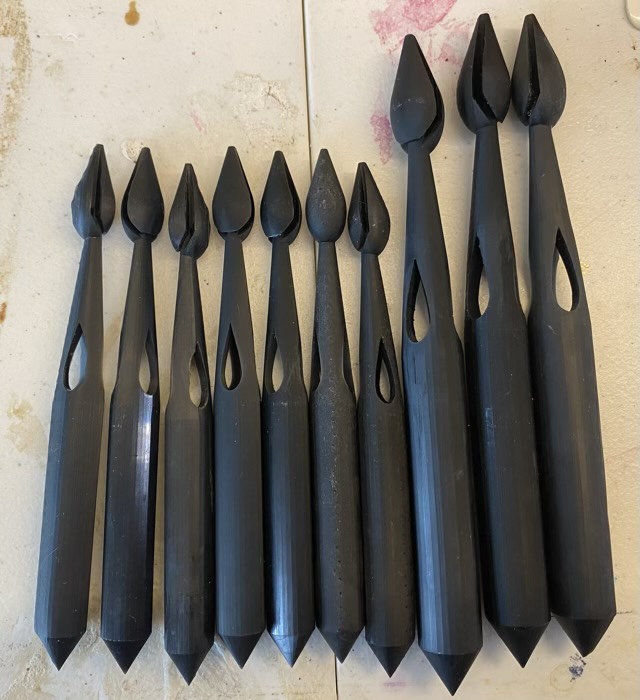
Ten hand sanded crochet hooks, unfinished

Tough Resin

I have been collaborating with a local 3D printer, X of All Trades, to design a spindle that can be used as a supported spindle or a drop spindle, adjustable weight, and a body which acts like a nostepinne to make center pull balls as you spin. The challenge has been the narrow neck breaking, so we have been experimenting different materials. The last round of prints using bottle plastic looked promising, but the filament printing isn’t precise, and tended to bubble and create rough edges. Then they found Tough Resin. 3D printed resin can make much more precise and smooth objects, but tends to be brittle, as I found out on our first printed rounds. Tough Resin fixes the brittleness and with some tweaking of the head and neck of my model, X of All Trades has printed a lovely tool that so far has not shattered when dropped.

Rough filament printed spindles (left) Smooth tough resin printed spindles (right)

I couldn’t wait long to test the spindle. I was pleased that it still spins well with the head changes, and I really like the black resin, which has a prismatic effect along the print lines.

Spinning with the new 3D printed spindle

I have put in an order for a small production run, which is quite exciting.

Potential

Freshly painted, mostly empty room

With our great room switch this summer, I have decided to move my crafting hoard into the spare bedroom. The kids’ rooms have been painted and moved into, with just a few extra projects to be done, and now I can get started on this last room. We fixed the holes in the walls, painted, touched up the ceiling, and painted the trim. It is a very long room, the picture above only shows about half the space, but the other half is where I shoved the painting paraphernalia so I could take the potential picture. Now is also the daunting part: going through my craft supplies and figuring out new ways and places to store things. I will have a couple tables out all the time, rather than just as needed, which is exciting. My husband is looking forward to having a master bedroom closet again, rather than just a corner of the closet (in my defense, the “closet” is 10’x10’).