Crochet flower garland

I’ve had this as a purse project for a couple weeks. I wanted to make a flower garland, and I wanted to use crochet (which is still my top choice for an easy-to-pick-up, easy-to-set-down project). I chose pearlized cotton from my stash. I was sad, but not surprised, that all the green is gone, but the multicolored blue did a fine job for the leaves.

Crochet flower garland in process at my favorite coffee shop

I started by making the flowers with white thread. These are made with five petals crocheted into a magic circle, each petal is a chain 2, double crochet into the circle, chain 1, slip stitch into the top of the double crochet, chain 2, slip stitch into the circle. I made subsequent flowers along the thread because I didn’t want loose bits floating around my purse. When it came time to crochet the vine and leaves, I would clip off a flower and add between leaves (which are similarly constructed to the flower). I neatened up the white threads ends later by weaving them in and clipping.

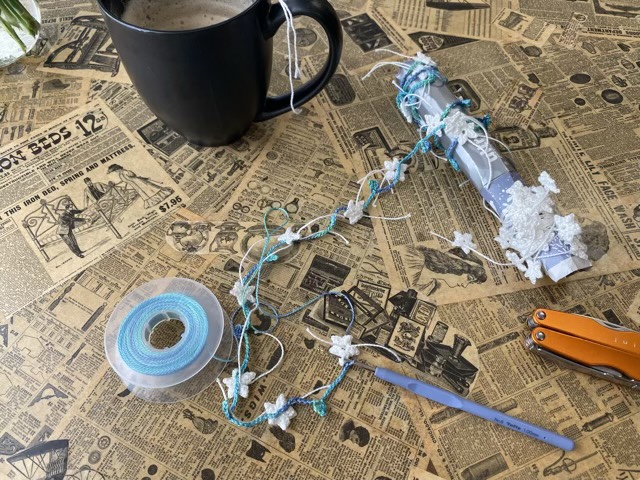
Long strands with flower bobs enjoy getting tangled. I didn’t have an extra bobbin, so I tore off a side of a tissue box, rolled it into a tube and tucked in the ends. This allowed me to wrap the ornery lengths around it to keep them neat, and the tube served as a holder for the 1.00 mm crochet hook I was using. Not pretty, but effective.

Finished garland

For the final flower, I joined in the start of the chain to make a continuous loop. Now the garland can be doubled and used as a head band, or looped and worn as a necklace.

Designing a tablet weave

My inkle loom calls out again, and I have a stash of pearlized cotton that needs to be used. My craft supplies are very demanding. I measured the warp space on my loom and did some calculations to see how many warps I could make with one skein.

Length calculations

It turns out there are several websites that have apps for designing tablet weave patterns. Neat. I tried the first one on the list, found it intuitive, and designed a pattern that I could make using what was in my stash.

Screen shot of “Tablet Weaving Draft Designer” app
Printed pattern with skein colors

Warping the loom takes a couple hours, but taking time in this step is well worth the effort. The diagram I printed was easy to follow to set up my cards.

Warp completed

I cut a strip of card stock with two long slits that fit over my pattern so I could keep track of my rows. I’m all ready to start weaving! Except, where is my shuttle? No seriously, I can’t find it. I probably put it somewhere safe again. Hm.

Inkle loom with string heddles

My inkle loom cried out for a new project as soon as I released the first project from tension. I complied, this time using it as designed by making string heddles and doing a plain weave.

Warp setup with string heddles

String heddles are loops of thread that hold a single warp yarn. Applied to every other warp, it makes it easier to change the shed (which set of alternate warp yarns are on top). This makes weaving to faster, since the alternative is to pick up every other strand on every pass. Here is a video showing the changing of the shed on this loom setup.

Getting started weaving with toothpicks

I started this weaving by laying toothpicks in the shed. I wanted to maximize the woven length, but still get an even start. The tooth picks were brittle, so I may look for a different thin starting material next time. I also wrapped the weft thread in a different manner, crisscrossing around one long edge, rather than wrapping in the middle. I see why people choose this: the profile of the wrapped yarn is thinner, and it frees up one edge to more effectively beat down the warp.

Finished weaving

I used pearlized cotton for this weaving and it didn’t need to be pressed after it came off the loom. Weaving went much faster than my tablet weaving, but the band is thinner. It is still sturdy, and quite attractive both visually and in texture.

Start (left) and finished (right) ends

I’m still working on my tension. This time my tension was tighter at the beginning than the end. Oh dear, I’ll have to start another project and keep weaving to practice. Twist my arm.

I steeked!

Steeking is preparing and cutting a piece of knitting. Yes, with actual scissors. Yes, through hand-knit work. (I know, the horror, right?) I recently took a class with Alissa (The Knitting Fairy), who is a fantastic teacher. In her class she taught us three ways to steek. My knit tube is now in three pieces!

Hand spun, hand knit, steeked swatches, one with a partial knit band

Armed with the knowledge from class, I am no longer afraid of planning cuts to knitted items, and it opens up a whole new toolbox for altering knit clothing. Alissa is also teaching at the upcoming DFW Fiber Fest in September. I highly recommend her, she is a fountain of fascinating information. I hear her classes fill up fast (for good reason), so I hope to claim a spot. Choosing is going to be the hardest part.

Tablet woven band

I finished my second tablet woven band, and the first one where I used an inkle loom as a support. The finished weaving is 51” without fringe, and 3/4” wide. It was made with 56 warp threads. I locked in the end by running the weft back through the weaving utilizing loops of thread (I found this advice on several blog sites).

Loops of scrap thread laid in the shed

This second band is an improvement from the first, but still shows a change in skill from the beginning to the end.

Start of weave (left) and end of weave (right)

When I took the band off the loom it had a definite ripple, so I ironed it. I don’t care for the double wide area that happens at the change of direction in the pattern. More study is needed regarding this phenomenon.

Woven band fresh off the loom
Woven band after ironing

This is still weaving that I enjoy, so continuing to build my skills will not be a chore!