Tree moss

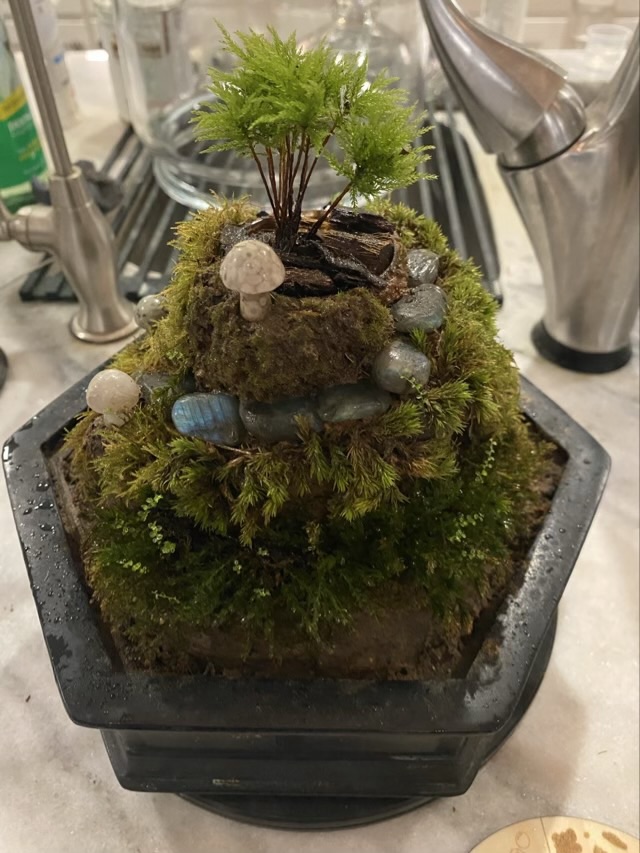
My little jewel orchid was not thriving in the terrarium; I don’t think it had enough light. The moss I purchased was thriving though, so I went looking for something relatively tall (1-2 inches) to crown my miniature hill. I found Climacium Tree Moss (Dendroides / Americanum). This moss grows a kind of trunk and looks like a miniature copse of trees. Adorable and perfect.

Photo description: mossarium without the glass cover showing the new tree moss on top and new growth on the moss near the base, stone “steps” of polished labradorite, and carved stone mushrooms

The jewel orchid lost its roots (probably too wet in the terrarium), so I put it in a jar with some living moss near a north facing window (no direct sunlight, but plenty of indirect). I’ll post an update on it as it recovers. I’ve read that an orchid can regrow roots from healthy stem and leaf, so I’m hoping.

Twisted brim

I’ve seen a twisted brim made of two twined sections of needle work in nålbinding, and wanted to try it in crochet (because I still have acrylic yarn that I’m trying to get through).

Photo description: finished crocheted hat with twisted brim made with red and white yarn

Pattern (American notation)

  • Row 1: in Magic Circle double crochet (dc) 12. Slip stitch (sl st) to first dc.
  • Row 2: CDCS, dc in same stitch, increase (inc) by making two dc in each row 1 dc. Slip stitch (sl st) to CDCS. (24 stitches)
  • Row 3: CDCS, dc in same stitch, *dc next stitch, inc next stitch*, repeat * around. Slip stitch (sl st) to CDCS. (36 stitches)
  • Row 4: CDCS, dc in same stitch, *dc next 2 stitches, inc next stitch*, repeat * around. Slip stitch (sl st) to CDCS. (48 stitches)
  • Row 5: CDCS, dc in same stitch, *dc next 3 stitches, inc next stitch*, repeat * around. Slip stitch (sl st) to CDCS. (60 stitches)
  • Rows 6–12: CDCS, dc in each stitch around. Slip stitch (sl st) to CDCS. (60 stitches)
  • Twisted brim
    • CDCS in red, dc in next two stitches. Make bridge: yarn over (yo), insert hook in same stitch, yo pull through, chain (ch) 1, yo pull through two loops twice. Yo, insert hook into both loops of ch st, ch 1, yo pull through two loops twice. Make four more, for a total of six bridge stitches in red.
    • CDCS in white in next stitch of hat, dc in next two stitches. Make bridge: yarn over (yo), insert hook in same stitch, yo pull through, chain (ch) 1, yo pull through two loops twice. Yo, insert hook into both loops of ch st, ch 1, yo pull through two loops twice. Make four more, for a total of six bridge stitches in white.
    • In red, yo, go behind the white bridge, insert hook in ch st then into next hat st, yo pull through hat and ch st, yo pull through two loops twice. Dc in next two stitches. Make six bridge stitches.
    • In white, yo, go behind the red bridge, insert hook in ch st then into next hat st, yo pull through hat and ch st, yo pull through two loops twice. Dc in next two stitches. Make six bridge stitches.
    • Continue the last two steps to make twined loops of red and white around the brim of the hat. For the last round only make five bridge stitches and join the beginning of the color. Weave in ends.
Photo description: start of the twisted brim with two bridges made, one in white, one in red

Here is a video showing the sequence for the bridge in white.

Molt

Wing Ding the Black Star hen doesn’t mess around with her molt. When I took a peek at the coop through the web cam, I thought a predator had broken into the coop and taken out a chicken. I went out and all four hens were fine, Wing Ding was just molting.

Photo description: pile of black feathers on flakes of pine shavings in the back corner of the roost
Photo description: Black Star hen in molt, looking quite bedraggled and spots with no feathers, with the new pin feathers coming in

This is one of the characteristics of a good layer. They molt quickly and get back to laying. My Faverolles are not good layers and take months to molt. They are all over five years old, though, so we might have seen the last of their eggs.

Worry worm

Here is a cute project for yarn scraps: worry worms. This is my first worry worm, but if you plug in “crochet worry worm” into your preferred search engine, you’ll get a whole host of the springy creatures in many interpretations.

Photo description: pink crocheted worry worm with sewn on googly eyes, two black dogs in the background

The crocheted spiral has been around. It was very popular in the 70s especially. It is dead easy: chain 30 then do three stitches in each chain. It coils up on its own. For this worry worm I used single crochet for the body, then did 12 double crochets in the same stitch to make the head. I’m not sure I care for the flat head look, I’ll try something different next time.

The worry worms have a super power, they can listen without judgement. The idea is that here is a little pal that you can tell all your worries, and not worry about it going farther. Many crafters put a little poem on the card with the worry worm and put them for people to find or give them away.

It is a philanthropic use of yarn scraps, and the googly eyes cinch it. They make a nice fidget too.

I wonder how many I can make before the election results.

Monarch migration

The Monarchs are migrating through Texas. Our Gregg’s mist flower in the front flower bed usually just has Queen butterflies, which look similar to Monarch butterflies. I’ve been spotting more actual Monarchs landing on the purple flower puffs in recent days.

Photo description: Monarch butterfly on a light purple fuzzy bloom of a Gregg’s mist flower (identity confirmed on iNaturalist)

A Texas native, Gregg’s mist flower is a butterfly magnet. When the weather is warm in spring and fall, we have had over a dozen butterflies rise up off the flowers as we walk past. Better than a butterfly pavilion!