Dishwasher magnet

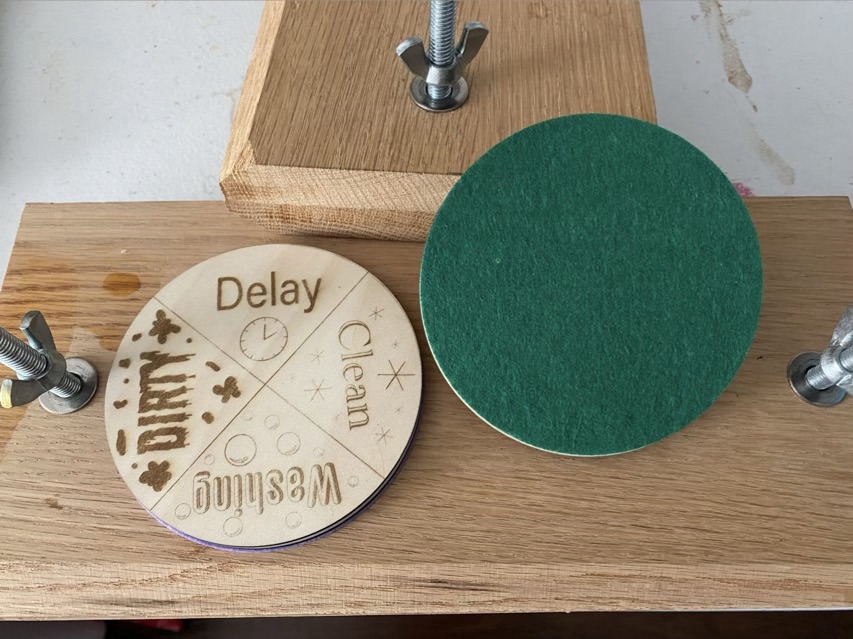
The problem with multiple parallel projects is sometimes bits get buried and I forget I have a work in progress. That happened with the dishwasher signs that I made with my folks’ laser cutter. I brought the parts home then got distracted. It happens. I found the parts again, realized I had everything I needed to complete it, I just had to make the magnet hole a little larger.

Photo description: laser cut wood disc with roll of sandpaper. The center hole was slightly too small for the magnet, so it had to be sanded until the magnet could be pressed in.

After fixing the magnet to the middle of the center layer, I could then glue all three layers together: the sign, the magnet layer, and the laser cut felt. To make sure everything set tight, after brushing on the wood glue and assembling, I wrapped the magnet in wax paper and clamped it in a book press to dry.

Photo caption: two dishwasher magnets, one sign up, one felt up, sitting on two book presses

To finish and protect the wood, I used Howard’s Feed-n-Wax.

Photo description: dishwasher magnet in use with four labels on a rotating circle: Dirty, Delay, Washing, and Clean

Throwback Thursday: silver clay

In April of 2009 I made one of my favorite metal clay jewelry sets. Metal clay is fine particles of silver suspended in a medium to make it workable like clay. It is then fired in a kiln to burn off the organics leaving nearly pure silver in the slightly smaller shaped form, all without forging or soldering.

Photo description: silver clay pieces ready for the kiln. The cork supports burn away in the high temperatures.
Photo description: after firing the pieces need to be cleaned with a brass brush
Photo description: fired metal pieces polished to a mirror finish by tumbling with polishing media
Photo description: custom metal clay links and clasps combined with sterling silver production elements and Swarovski crystal to make a necklace, bracelet, and earring set

The metal clay does give options for designs that are difficult to achieve with traditional gold smithing tools, but requires its own set of specialty tools like the kiln.

Caking yarn

Because of the bulk and quantity of yarn I produced on the Ashford Traveller spinning wheel, I decided to let time set the twist rather than do a wet block. Setting the twist in freshly spun yarn gives a more balanced yarn which doesn’t kink up when slack, making it easier to work with be it knitting, crochet, or weaving. A quick way to set to twist is to get the yarn wet and let it dry (there are many variations, but it boils down to this). Time will also set the twist; sitting under tension for a while lets the fibers relax and accept their formation.

Photo description: three-ply bulky alpaca merino blended yarn wrapped on a niddy noddy
Photo description: very thick skein of bulky yarn

I did not have to transfer the yarn to a niddy noddy, I could have wound it directly to a cake, but I wanted to see it in skein form. It was an overfull skein, though, so wasn’t as pretty, but I wasn’t willing to cut the yarn, or make a bigger skein. Oh well. I wound it all into cakes using a Royal New Wool Winder.

Photo description: four cakes of bulky yarn

I have many projects that need completing before I can get to this yarn, so it has some time to sit and settle. It is all queued up though, with the needles and the knitting plan in the bag with the yarn cakes.

Blocking the swatch

My small swatch of hand-spun merino/alpaca dyed yarn experienced a small amount of shrinkage after I rinsed it and let it dry.

Photo description: moss stitch swatch straight off the needles measuring 7 inches
Photo description: same swatch after blocking measuring 6.75 inches, but looking more tidy

The good news is that there was no visible bleed when I blocked the swatch. I was concerned that the beautiful dark red would bleed.

Dividing the last

I spun up nearly a whole bag of alpaca/merino roving, filled up six small bobbins of singles, and two large bobbins of three ply yarn. The roving that remained was not enough to fill three more small bobbins, so I weighed it and divided by three.

Photo description: “rose hip” dyed alpaca and merino roving divided up into three roughly equal parts and put back in the bag, separated by clips. Ashford Traveller spinning wheel in the background with left over single spun yarn on the bobbins.

Dividing the roving worked well, but I still had one bobbin run out of single spun before the other two when I was plying. To use up all the singles, I chain plied the last bits. Since chain plying creates a slightly different yarn than plying from three bobbins (there are U bends in the yarn, but it is still three ply), I knit up my swatch with this last bit of yarn. So I didn’t loose track of which part was chain plied, I knit straight off the spinning wheel. The yarn was nicely balanced, so this wasn’t difficult.

Photo description: knitting a moss stitch swatch straight off the spinning wheel

My spinning and plying created a “bulky” yarn, about 8 wraps per inch (wpi), so I knit with size 11 needles by Prym.