I checked my cameras in the chicken coop and was shocked to see all five hens in the coop! The new Black Star chickens have both finally accepted the roost. They took the prime corner spot, which sent Seashell off to the nest box, but she isn’t broody, so I’m not concerned.
Photo description: inside of my coop at night, two Black Star hens on the roost at the left, two Faverolle hens on the roost at the right, and the tail feathers of the third Faverolle hen in the top right of the nest boxes at the far right, mouths open because the high was over 100 degrees Fahrenheit that day
Molting has begun, and egg laying has stopped. They are all older hens as well, so we may have seen the last of the eggs until Spring (maybe).
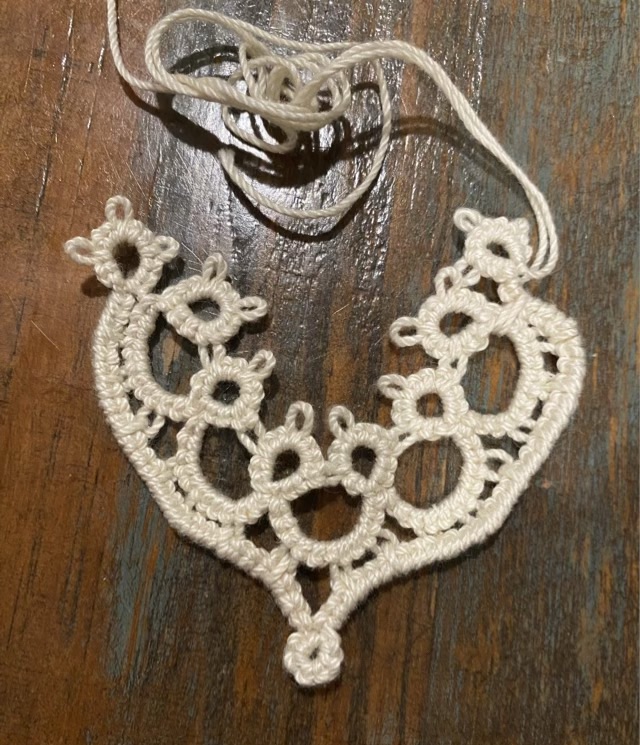
I’ve been carrying around tatting supplies in my purse and using them when I have a few minutes of waiting. Rather than bother with the bulk and hassle of a pattern, I’ve been exploring how the forms of tatting go together. Such experimentation is very useful to develop my skills and also results in some learning opportunities. In tatting, motifs are connected using picots, or loops in the work. This requires preplanning or an abundance of loops on a useable side of the work. I was attempting a triangular piece, and merrily made a line of knots with no loops. Oops.
Photo description: experimental bit of tatting, with the bottom edge solid without picots
Although the line of the piece shows promise, I can’t add onto the smooth edge with my current level of knowledge (there may be a technique out there that gets around this conundrum).
As an added learning bonus, it seems tatting also has some play with tension. How tight you pull the center thread determines the motif radius, so even when following a pattern, if the arcs and loops differ from the author’s, the piece might not lay flat. Irish crochet had a similar artistic feel.
I have a new favorite alcoholic beverage. It came from experimentation with some cupboard favorites, and we couldn’t find an existing name for it, so my husband came up with a great name: Major Chord. The recipe has three ingredients and they go together very well.
Photo description: soft yellow liquid in a tall glass with ice sitting on a tatted coaster
Major chord:
2 ounces Deep Eddy Peach Vodka
1 ounce lemon juice
1/2 can Goslings Diet Ginger beer
Ice
I stir the mixture with a bar spoon.
I could even take the analogy further and compare it to a barbershop quartet where the ginger beer is the bass, giving a depth of flavor; the peach vodka is the lead, giving the bright melody; the lemon juice is the baritone, giving it zing; and the ice is the tenor, floating on top and adding sparkle.
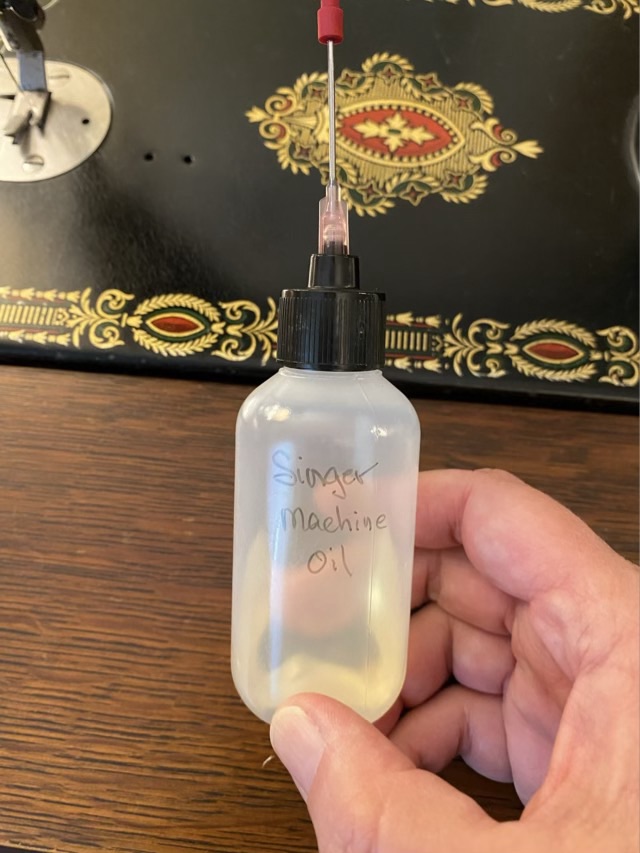
If you start following treadle sewing machine groups, you’ll see frequent use of the acronym SMO, which stands for Sewing Machine Oil. This lubricant is vital, especially for older machines. Of course Singer recommends using Singer SMO, but I find the applicator to be clunky, so I took the advice of several treadle machine bloggers and purchased squeeze bottles with a stainless steel tube to facilitate precise oil placement.
Photo description: 2 ounce plastic squeeze bottle with 1.5” stainless applicator, filled with Singer Machine Oil
I purchased my bottles on Amazon, and it was a little tricky because the name is awkward: plastic squeeze bottle with stainless applicator. Accurate, but hard to search without all the words. Any how, I found them, filled one with SMO, and love how much easier it is to apply the oil without overshooting. I did worry about light getting through the bottle and degrading my oil, but after researching, it is better to be able to see the oil to check for changes (darker, cloudy). I might still keep the bottle in the dark, because some things are deeply ingrained.
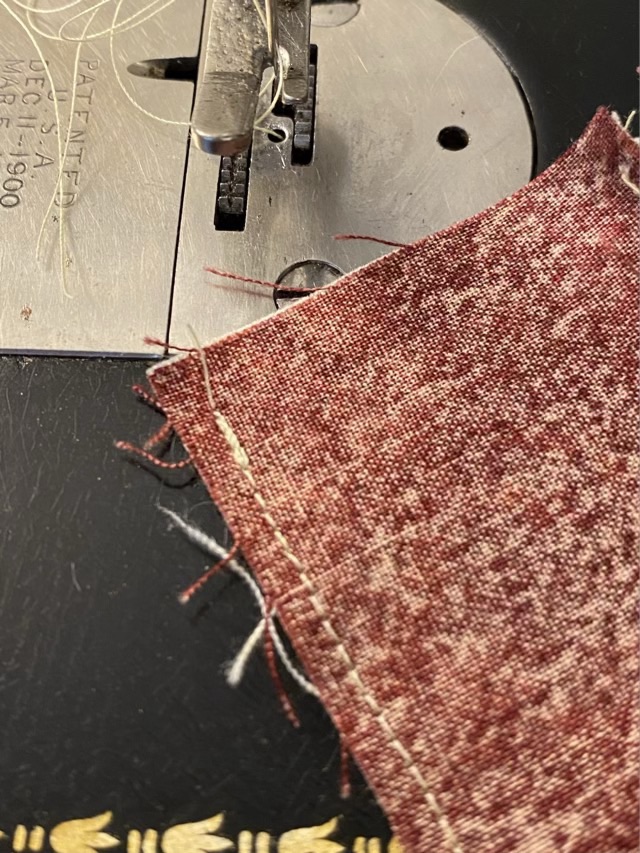
I recently learned another method for securing the start and end of a seam on a treadle sewing machine with no reverse. With this method, you make a few stitches, lift the foot, move the material to the beginning, and stitch over the first stitches.
Photo description: sewing machine foot moved back to the beginning of a seam after a few stitchesPhoto description: seam sewn on a Singer model 66 treadle machine using the lift and restitch method to secure the start of the seam
This trick joins my bag with two other methods. There is the turn-the-whole-fabric way, where you turn the fabric 180 degrees around the needle in the down position, put the foot down, sew a few stitches, then plant the needle, lift the foot and turn the fabric back to the original position, lower the foot and keep sewing. Also there is the tiny stitch method, where the stitch length is set to near zero to start and end a seam, but lengthened in the middle. All three methods work well to make it harder for the stitches to pull out.
On more modern machines there is a reverse button that allows the sewing machine to stitch backwards. Treadling an antique machine backwards will at best break the thread, or worse, make a tangled mess of your bobbin.