Status update: flock

We now have a flock of chickens instead of two separate flocks.

Photo description: two Black Star hens and four Faverolle hens in the coop breezeway, one hen in the tire dust bath

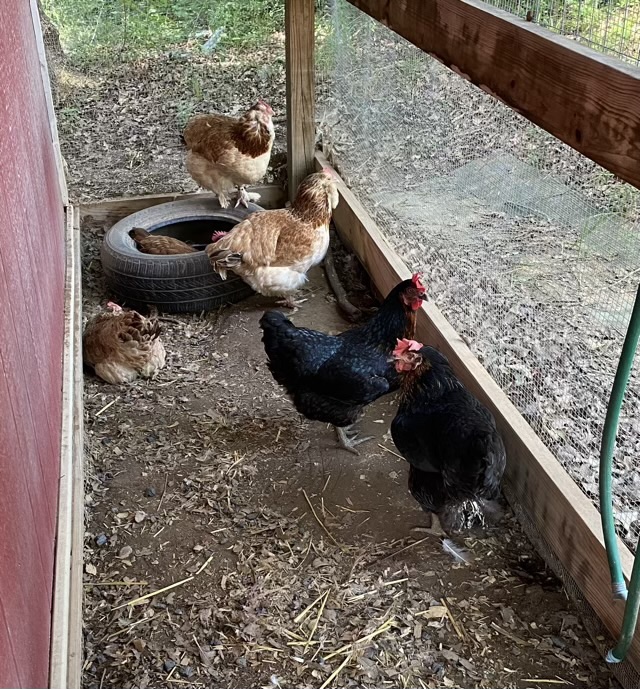
We’ve been keeping the new hens separate from the existing flock, with just a short periods of supervised time together. After three weeks, we opened up all the inside gates and let them mingle. It was already established that the Black Star hens would be dominant, and the Faverolles would run away if she even looked at them, so there was no reason for her to do anything more aggressive than look. We watched in person for a while, then monitored the cameras for the rest of the day. I took the picture above in the afternoon. The breezeway is the coolest part of the run; it is in deep shade and there is almost always a breeze from the shade of the back woods. The best place for all the chickens with summer coming in. Interestingly, they all went to bed in their separate areas. I was hoping the new chickens would find a place in the large coop (there is plenty of room), but they seem to like the little hen house.

Mossarium: attempt two

After boiling and baking my gnarled wood that I wanted to use in my terrarium, and washing the base and all the stones, I tried setting it up again. I visited a local vintage store and picked up some interesting stones, including tiny crystal mushrooms. Mushrooms!

Photo description: wood hardscape in a terrarium base with pebbles underneath and festooned with stone mushroom and frog carvings, tumbled stone, and crystal shards.

I kept the moisture to a minimum, setting the base with dry decorative rocks and glass pebbles, and using glue dots to adhere the carvings and stones. The only moisture came from the sphagnum moss that I tucked into the two hollows in the wood where I wanted to keep plants. I even braved the shipping and ordered a jewel orchid (I used points, so am not counting the cost of that towards the project). I let the moss sit for a few days to test for mold growth. My orchid arrived earlier than expected, and when I went to mount it, I discovered mold in the hollows. Dang it.

Photo description: close up of a hollow in the wood line with white mold.

I disassembled the terrarium, again, and set the wood out to dry. It is a neat chunk of wood, but clearly not suitable for terrarium life. (I’ve read that a dilute solution of bleach could sanitize wood, but I don’t keep bleach in the house because of our aerobic treatment system.) I washed everything, again, and set it out to dry.

I can’t give up on the terrarium idea, I now have a tiny baby plant that needs nurturing. Ah, but don’t worry, I have another idea. We’ll see if the third time works.

Crocheted catio hammock

Cat hammocks in a catio have different requirements than an indoor cat hammock. They should be UV resistant, especially if the catio has an open roof. They should also let water pass through, which outdoor fabric doesn’t do. They should be comfy… OK, that one goes for inside beds too. I have cycled through an indoor/outdoor sewn fabric hammock with grommets for a rain drain, and a cotton pillow case, which really absorbs rain water and flies off in the slightest breeze. The newest attempt shows promise: a crocheted polyester mat.

Photo description: crocheted gray polyester mat done with a single crochet center and chain one single crochet edges. Photo bomb by Missy the dog who is obsessed with balls.
Photo description: crocheted mat installed with screws to two wooden supports. Thor the cat earing me in the background.
Photo description: 15 pound cat standing on the installed cat hammock. His idea.

I used polyester craft cord, which is a knitted or braided cord used for macrame or crocheting bags. Polyester is more UV resistent, and the crochet work should allow water to pass through. I recommended swatching, then using the gauge obtained to calculate the stitches and rows needed to fit the space. I found that single crochet worked best for sturdiness and not catching toe-beans. The center is worked in rows of single crochet, and because I did not swatch (the horror) I added a border to extend the length.

I have ideas for more crocheted outdoor hammocks, but am showing unusual restraint, waiting to see if this one gets actually used first. I’ll keep you posted.

Turkish turtle

I finished spinning my pineapple fiber sample singles with a 3D printed Turkish spindle. I attempted to use the turtle of yarn to make a two ply yarn.

Photo description: Turkish style drop spindle with two ply yarn coming from both ends of a single ply turtle of yarn sitting on a table decorated with old newspapers and sitting next to a cup of chai at my favorite coffee place.

I had an unpleasant revelation. As the yarn comes off the top of the turtle a whole layer of wraps pops off, making a tangled mess. So I stopped trying to go directly from the yarn turtle, and instead made a nostepinne style winding ball with two strands.

Photo description: yarn turtle unraveled from the top showing how a layer lifts off. The yarn is being wound onto a card stock tube into a center pull ball.

After my yarn was neatly arranged, I was able to ply it without dealing with heavy tangles. There are spinners who consistently make plying balls, and I can now see the appeal.

I finished plying and my Turkish spindle wrapping technique is improving. Since I’m going to work directly from the center of the yarn turtle for the next step, I don’t need to rewind. The Turkish spindle turtle does very well as a center pull ball.

Photo description: top of the yarn turtle on a Turkish style drop spindle showing fairly neat wraps.
Photo description: bottom of the yarn turtle showing overlapping layers. Dog and ball in the background because she thinks I should be kicking her ball all the time.

Fruit fly trap

Here is my favorite fruit fly trap. Why do we need a trap? Well this is a story. Griffin, our dog, has started getting into the trash in his old age. All the trash, even the small containers by chairs that usually only collect tissues and orange peels. So we replaced the open bin with a trash can with an attached lid. The dog can’t get in, but the orange peels and closed environment make a lovely breeding ground for fruit flies. I found some lovely large golden nugget mandarins at the farmer’s market, which came with extra passengers. The extra passengers loved the orange peel offerings and the safe breeding environment. We started noticing a few pesky fliers, which is unusual because our house spiders usually do a good job keeping the gnat population down. I put out this trap, which is a mason jar with apple cider vinegar in the bottom, and a cone made of card stock attached with washi tape on the top. It is easy for the flies to crawl down into the cone and through the small hole, but it is very difficult for them to fly out.

Photo description: fruit fly trap made of a mason jar, card stock, washi tape, and apple cider vinegar, showing a dozen flies trapped inside

I’ll leave this trap out until all the flies inside have died. We did take care of the fly nursery by cleaning it out and lining the can. Funny how one factor can tip the scales out of balance. My house spiders are probably stuffed.