Mossarium: what not to do

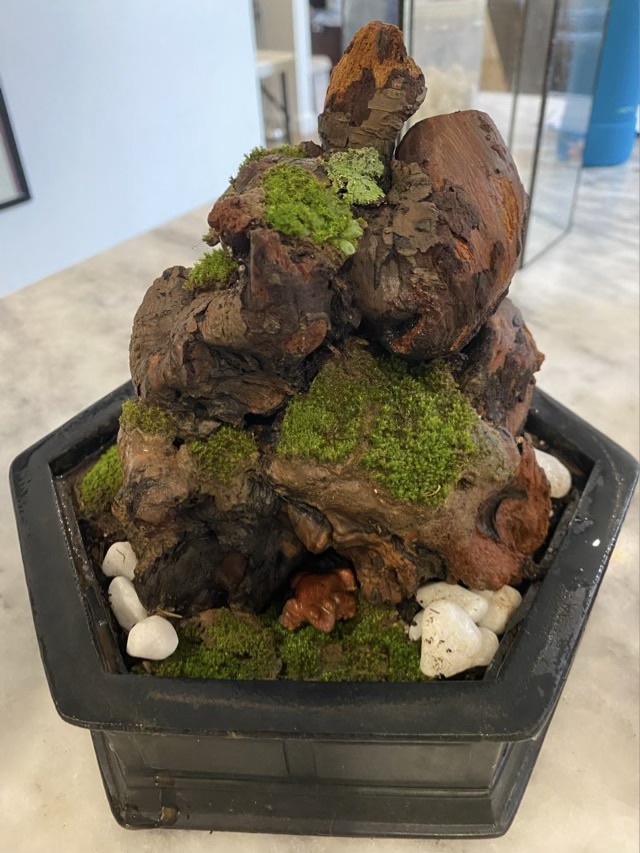
I have a beautiful terrarium with a lift off lid that I originally intended for growing mushrooms. Well, it wasn’t quite big enough for that, so I put some plants I was rooting out inside. The plants grew and bumped into the top and looked crowded, so I started thinking about what else I could do with the container, a mossarium maybe? Mossariums are terrariums with a variety of mosses as the focal feature of the arrangement. Some have a few plants as well, but it is mostly moss. I have a fantastically gnarled root ball that I thought would make a fantastic hardscape for the moss. I soaked it in RO water, gathered moss from the back yard, and made a pretty cool looking arrangement.

Photo description: black base of the terrarium filled with dirt, rocks, a large twisted and soaked piece of wood with layers of moss and dirt

Turns out soaking the wood was the wrong idea. In that very moist enclosed atmosphere, the mold spores had a heyday.

Photo description: same mossarium setup, now covered with spiderweb-like mold spores

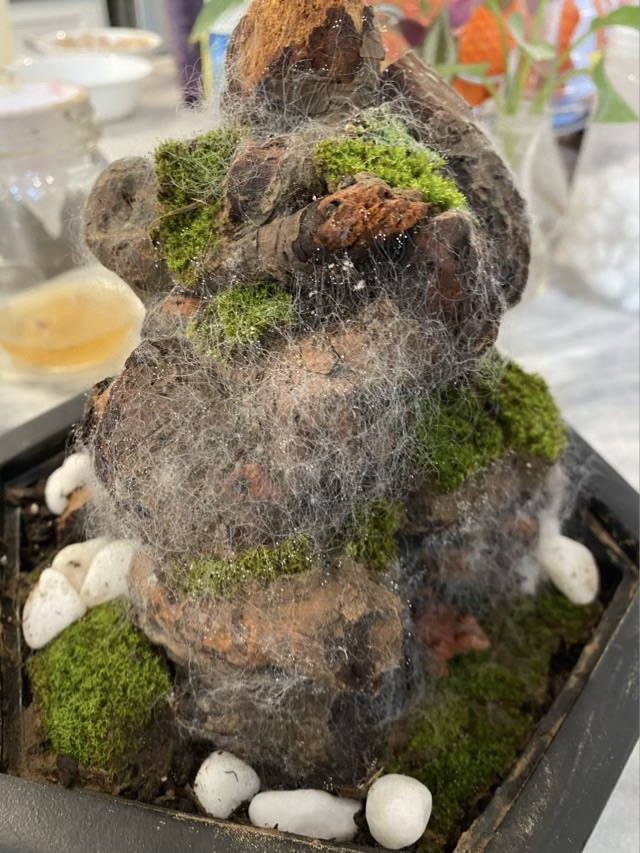
I tried cleaning off the strands of mold, but each day they renewed. Then I read that it helps if the soil and hardscapes in a terrarium are sanitized before assembly. Hm.

I disassembled my mossarium, cleaned the container and wood, then boiled the wood for an hour. To get it to dry out, I put it in the oven at 225 for an hour, then let it cool. It took three hours-long cycles in the oven to get the majority of the moisture out. I washed all the stones with soap and hot water and set them to dry. I’ll try a slightly different, dryer setup next time.

Throwback Thursday: play mat

Now we are getting into the children years for Throwback Thursday, at least digitally. Maybe someday I will flip through my pre-digital era, but for now now, we’ll just move forward. In January of 2006 my first child had started to crawl, so I attempted a large play mat with animals, tracks, and habitats.

Photo description: large cotton sheet with drawings of a bear, beaver, deer, duck, rabbit, and squirrel on the left, and corresponding tracks leading to drawings and f habitats on the right

I took some unbleached cotton fabric and made iron-on images with my printer. The idea was cute, but the thin cotton didn’t hold up well to a new crawler, and all of the images washed out when I laundered it. I still have the fabric, it became a drop cloth for art projects.

As an interesting note, my eldest is now in college with a major in wildlife. Hm.

Microkits Theremin

I love musical instruments, and have a collection of sound makers. Newest to the collection is a tiny DIY Theremin.

Photo description: the unboxed parts from Microkits to make a Theremin

The kit was very well assembled and the directions were easy to follow. Within a half hour I had a small working theremin and could change pitch within an octave and control the volume with a motion of my hand.

Photo description: finished Theremin with the wire sensors and exposed breadboard

I have a few ideas for a case, to add to the sound quality and aesthetics, as well as contain all the parts.

Ah

I started the cat hammock using polyester craft cord. Using the hook size recommended on the label (which is smaller than my test swatches), I made a chain the length I needed for the narrow side of the mat. (Don’t do this, chain length is drastically different than the length after a couple rows. I should have swatched (ironic), obtained gauge and done a chain based on the calculations.) I did my first row of single crochet stitches in the back loop of the chain. There are many ways to insert the hook in a chain for crochet, this is my favorite and uses the bump-like loop on the back of the v-like chain. It makes a very symmetric first row.

Photo description: crocheted band of craft cord after the first row of single crochet, a very aesthetically pleasing result with the parallel opposing chains.

Testing crochet stitches

I really like to make swatches, which probably puts me in the minority of crocheters and knitters. I like to see how different stitches, yarn, and needle sizes affect the overall fabric. This test involves polyester cord. I want to make more hammocks in the catio, and polyester is more UV resistant than other man-made fibers and even natural fibers, and is mildew resistant. I have made hammocks using outdoor fabric, but they retain water for quite some time after the rain. I’m hoping a crocheted hammock will let the rain pass through and dry quicker. I had some left over polyester macrame cord and did two test swatches, one with a simple single crochet repeat (American terminology), and one with alternating single crochet, chain one, repeats.

Photo description: two small rectangles of crocheted cloth, on the left a single crochet pattern, on the right a single crochet, chain one pattern. K sized crochet hook above the swatches.

Even though I really like the texture and look of the single crochet and chain one fabric, the holes are a little bigger than I think the cats will like when weight is applied. The holes are about toe bean sized, which seems uncomfortable. I do like that this cord has some shape memory, and retains a curve when stretched.

Next for a full-sized version.