Electronic ghosts

I used to record voice overs, both professionally and as a volunteer for a radio reading service. I enjoy the work, and even invested in a decent microphone and amp. Then life happened with kids and pets and noisy house environments and technical software difficulties. It has been awhile but I decided I want to try again, and the downstairs coat closet had already been cleaned out for an office during the pandemic, so I moved my stuff in.

Photo description: Coat closet converted to a recording studio with curtains hung on the walls and ceiling, chair, computer (the computer on the floor is being used as an external hard drive), microphone stand, and microphone.

I’m pretty proud of myself in outfitting the room. The carpet was already there to keep the floor from being too cold for feral cats in cages, the curtains were all left by the previous owner, the curtain rods were all repurposed from other locations in time and space. The fairy lights were from a failed experiment in my kid’s room (they are too bright for her). The shelves were already there, I just rearranged them. The chair is from a set that migrates around the house and is good for recording because it doesn’t roll, creak, or make other unwanted noises. The only thing I purchased was a pop filter and a mouse pad (neither pictured). I used to have a pop filter, but I have no idea where it got off to. My optical mouse really doesn’t like the white surface on the shelves, and we have no spare mouse pads.

I did some initial tests, including a musical Zoom call (kid’s guitar lesson), and things seemed to all work OK.

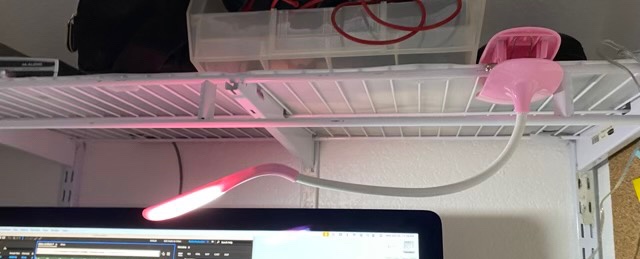
I sat down on a quiet morning (everyone else was off to work and school) and started experimenting with the software. I’m using Adobe Audition because it is bundled with my graphic software package. I walked through the tutorials, which was a great refresher because I’ve already used this software to remix tracks for my chorus, and I learned some shortcuts that I didn’t know, and discovered spectral view (wowza). And a terrible, terrible buzz. I chased the source of the buzz for an hour, trying different settings, different microphones, different headphones. I had finally given up, thinking that the next step was to move everything back, went to turn off the desk lamp, and heard a pitch change. What? I had dug an old led clip light out of a drawer, and plugged it in for more light. I unplugged it, tried recording again, and the ambient noise level was undetectable. Of all the irritating things. Recording testing can now continue, and I don’t have to repurpose the room, again. For now.

Photo description: The culprit: a pink clip-on LED lamp, shown unplugged, attached to an overhead shelf, and the source an an hour of electronic noise woe.

Happy Halloween, may your electronics be shielded.

Cat’s in the cradle

Ok, not a baby cradle, but the cat is definitely interested in what is going on when my spindle is in the makeshift cradle formed by an upside down side table. I put my spindle there because it makes it easier to wind the yarn onto my niddy noddy. As I unwind the yarn, the spindle skips and jumps and makes interesting scritchy noises against the metal.

Photo description: Wooden drop spindle set into the curved legs of an upside down metal side table. Gray tabby sniffing the end of the spindle with one claw caught in the yarn.

Despite the extra “assistance,” I did manage to get all the yarn onto my niddy noddy. This is the multi-fiber blend from Anniewhere. I’ve wet down the fibers and set them to dry out of the cat’s reach.

Photo description: Several bundles of 2-ply yarn wrapped onto a PVC niddy noddy.

Cats and fiber arts really don’t mix, but it is remarkable how often they do anyway.

Ukulele strap part 2

My ukulele did not come with strap buttons, so I found some elliptical ones from D’Addario and drilled pilot holes at the base (there is a block of wood inside to support the screw), and the back of the neck.

Photo description: Elliptical strap button installed on the bottom of a tenor ukulele
Photo description: Elliptical strap button installed on the base of the neck of a tenor ukulele

I trimmed the ends of my woven band (see yesterday’s post), and treated them with white glue to make them stable.

Photo description: Both ends of a tablet woven strap treated with white glue (shown on a post-it note) using a brush (shown).

I found two metal slide buckles at the craft store and used one as intended, sewing on end of the strap to the middle bar and threading the other end over it. The other buckle I modified by taking out the middle bar and using as a ring in the fold of the strap. In my leather stash I had an old black belt. The leather was thick but flexible, and great for making the end of my straps. I folded, cut and carved tear drop shaped holes in the belt for the ends of the strap. One end I sewed on using waxed thread. The other I riveted together.

Photo description: Wood clamp holding the leather end and the woven end together so I could sew using the holes I punched into the leather.
Photo description: Finished strap with leather ends and metal slides
Photo description: Strap installed on the tenor ukulele.

I’m rather excited about having my ukulele on a strap since it makes it easier to hold at a good position for both my hands. I’m off to practice!

Ukulele strap part 1

I decided my ukulele needed a strap. Maybe it was mostly an excuse to design a new card woven pattern, maybe it was to use up cotton crochet thread, most likely I decided to make it myself because I don’t have enough works in progress.

I used this tablet weaving designer, and came up with this pattern.

Photo description: Tablet weaving pattern diagram generated in Tablet Weaving Draft Designer v1.5.0. Diagram shows how to setup the cards in the tablet, and which way to turn each card for each pass of the weft thread.

I warped my loom with #10 cotton crochet thread in black and rainbow. The rainbow warps I aligned by color. It was quite serendipitous that a color repeat in the thread was just a little longer than my warp length, so I could have all the colors, and very little waste.

Photo description: Handmade Inkle loom warped with black and rainbow thread with weaving cards made from an Uno deck.

I used the black thread as the weft, and started with a few passes held straight with lengths of 18 gauge wire, then doubled the weft back on itself for several rows. To end, I used a loop method to draw the weft back on itself to help lock the weaving in place.

Photo description: Weaving in progress showing a wavy green and black pattern with solid black edges and rainbow colored loops along the weft pass to use to draw the weft backwards.

I love this pattern. It is balanced so the twist does not build up in the warp, except when I make a mistake. Even when I miss a turn or double a turn, it still looks cool, and it is double sided! Win! I love the middle, but the edges vex me because they are not even (an artifact of the balanced weave). I may try a plain woven edge next time around (my youngest has requested one for her uke.)

Photo description: Finished woven band with color changes along the spectrum in the same wavy pattern.

Now to make it useful in addition to decorative.

Puff stitch cat mat

Crocheting cat mats is a great stash busting activity. Pairing worsted weight acrylic yarn with a puff stitch results in a cushy mat that seriously dips into the bag of leftovers.

Photo description: Multicolored mat made with crocheted puff stitches in rows of alternating color.

To make the mat use a size G hook with worsted or medium weight yarn in three or more colors.

Chain 43, or multiples of 2 +1 to get the desired size.

Row 1: Starting in the second chain from the hook, single crochet (sc) across.

Row 2: turn, chain (ch) 2, *yarn over, skip first sc and insert hook in the second sc, yarn over, pull up loop to match the height of 2 ch. 3 loops on the hook. In the same sc, yarn over, insert hook, yarn needle over, pull up loop. 5 loops on the hook. Repeat to get 7 loops on the hook. Yarn over and pull through all seven loops. Ch 1. Repeat from * across.

Row 3: Change color. Leave the other color attached if doing a three row repeat. Ch 2, *yarn over, insert hook in the first ch space, yarn over, pull up loop to match the height of 2 ch. 3 loops on the hook. In the same space, yarn over, insert hook, yarn needle over, pull up loop. 5 loops on the hook. Repeat to get 7 loops on the hook. Yarn over and pull through all seven loops. Ch 1. Repeat from * across.

Row 4: Repeat Row 3.

Row 5: Pick up the first color, which should be at the starting side. Continue with puff stitch pattern picking up the yarn color that was left off two rows down. If you want to change color every row and not have a three row repeat, or you run out of yarn, weave in the ends, or crochet over the ends as you go.

Continue making rows of puff stitches until you reach the desired length.

To finish the edge, single crochet along the top and sides for two rows. Pull yarn through last loop. Weave in ends.

Put mat where the cat can find it.

Photo description: Calico cat with a pleased expression sitting on a crocheted mat.