Chickens: 1 year plus, what has worked and what hasn’t (pt 3)

Nesting boxes and work bench

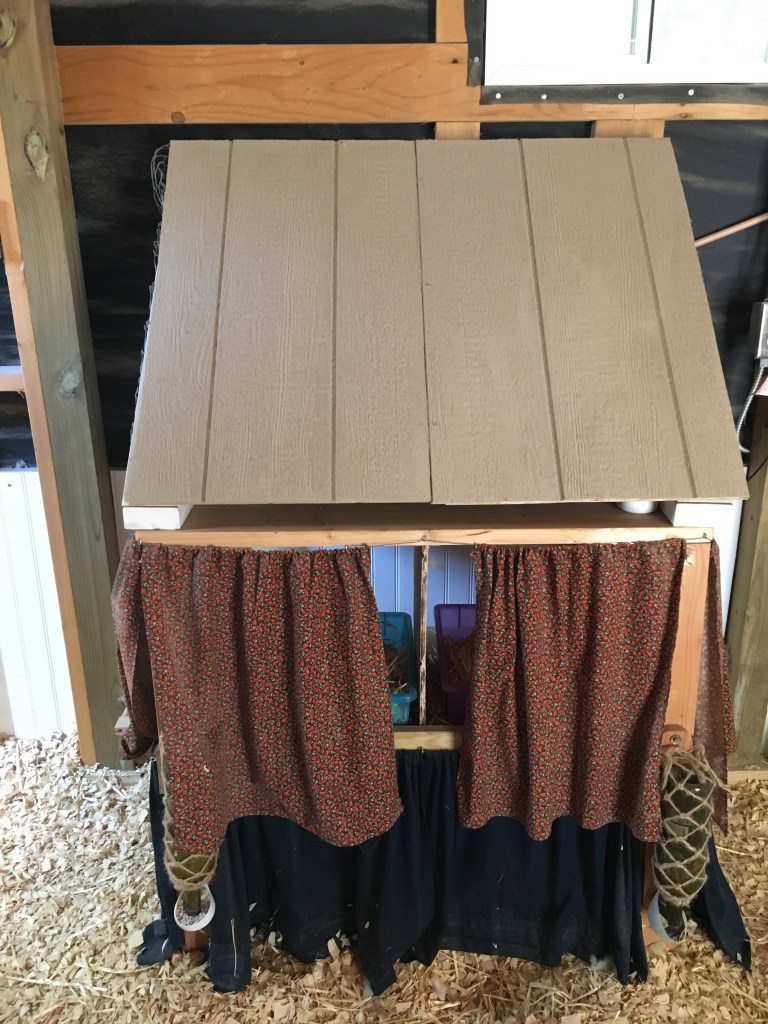
Work bench: Having a counter height work area inside the coop makes chicken health checks and treating bumble foot so much easier. I put a slanted lid over the work bench to keep the chickens from roosting on top, and they love the plastic bins on the shelves underneath (behind the curtains) for nesting. There are four nests under the bench, and all of them have been used. Because there is a lid on top, I can store my most used supplies and scale inside. I can even prop open the lid with one chicken under my arm.

Reused metal nest boxes

Reused nest boxes: I was worried about reusing nest boxes that I bought on a corner out of a truck. Not my most brilliant purchasing decision, but it worked out OK. I cleaned the heck out of it, gave it a new coat of paint (that worked with the galvanized steel), added a roost bar, and installed curtains. I was also worried about the small size, but a few of my chickens do squeeze themselves in there to lay occasionally.

Yup, I still have more to share tomorrow!

Chickens: 1 year plus, what has worked and what hasn’t (pt 2)

Single level roost with deep litter

Roost: The roost I built is plenty big! The eleven chickens only take up about half at night, mainly because some of the hens tuck themselves under their sisters. I don’t want more chickens, even though the coop is nice and roomy. We get enough eggs for the family and have enough to occasionally give some to neighbors as well. I discovered that butchering chickens is not for me, so there is no need to hatch more for meat. I don’t have a rooster, either, so no chicks anyway. I had grand schemes for a droppings catcher under the roost, but it scared the chickens, so we use the deep litter method instead. I get soft flake pine shavings to cover the floor and clean out the whole mess when the odor gets out of control (about every six months).

Isolation ward built between storage cabinets

Isolation ward: This has been brilliant. I built storage cabinets on one side of the coop, and made one that can also function as an isolation ward. I’ve used this to brood the chicks, when one of the chickens has an injury, when I need to give medicated water to just one, or when one is broody (broody chickens don’t lay eggs and can die trying to hatch dud eggs). For my broody hens, I usually just move them off the nest at night and put them back on the roost with their sisters. I’ve had a couple go hard enough broody that they yell at me when I approach the nest. That is when they get the isolation ward with a perch and no nest. It usually only takes a day in isolation to break the nesting need. The isolation ward is lined with plastic cardboard, which makes cleaning up much easier.

Feed storage

Metal locking cans: I store extra feed, scratch, and mealworms in the bottom cabinet in metal trash cans. I sprinkle diatomaceous earth around the outside of the bins to discourage bugs. So far, nothing has invaded the cans!

More tomorrow!

Chickens: 1 year plus, what has worked and what hasn’t (pt 1)

I thought I’d summarize some of the good and meh of our chicken choices so far! I’m going to break this up into parts, apparently I have much to discuss.

Faverolle hens

Faverolles: I do like this breed, even though mine are hatchery quality and not for show. After reading about what it takes to show chickens, I’m OK with not. My hens are friendly and will still get on my lap if it isn’t too hot. We do deal with bumblefoot often, but sanding down the roosts and perches seems to have helped. We get a variety of egg colors as well, which is interesting.

Tire Dust Bath: I was unsure of this at first, and so were the chickens, but after a few months, the hens really took to this dust bath. When I put in a new batch of wood ash, dirt, and diatomaceous earth, they somehow squeeze two of themselves in the tire to bathe together and there is a waiting line. Their feathers hold a ton of dust and the bath empties out faster than I can refill it. The tire came from our mechanic: I asked if they had any used and they had one that the recycler missed. It doesn’t hurt to ask!

Foot Baths: These are the best for my hens in the hot Texas summer. I bought large plant drip pans from the hardware store and I keep them filled with fresh water. When the temperature is forecast to be over 95, I put a gallon bottle of ice in too. I do clean these out 2 or 3 times a day, but I have a hose run into the coop with a spray handle, so it isn’t a big deal to do when I am out checking for eggs. The hens LOVE these. They go and stand in the water to cool off. Yes, they drink the water too (yuck), which is another reason I clean out the pans frequently. What didn’t work is the homemade AC unit using a styrofoam cooler, fan, and ice packs. It was a pain to setup, it was hard to keep the chickens from eating the styrofoam, and did not make an appreciable difference in the temperature of the coop.

There will be more lessons learned tomorrow!

Weaving wool

For Father’s Day I decided to weave my Dad a small tapestry with wool. I looked at the yarn I had available and decided I had the colors for a dog nose and tongue (yes, really). I wanted large blocks of color that didn’t need excessive detail, so a super closeup fit the bill.

Weaving the shapes upside down

I warped the loom with thin cotton, and used store bought black and pink merino wool and my own spindle spun orange wool (mostly merino) for the weft. I wove upside down because I figured that would be easier with the shapes I wanted. I did make a sketch and used that behind the weaving as my guide.

Woven base colors finished and removed from the loom

I found it easier to weave in the ends as I went. I finished with the fringeless method of pulling the weft through the work then weaving in. Although the shapes were recognizable as a tongue, probably a dog’s, I decided to add some embroidery to help define the shapes. I used a digital art program to sketch and refine the ideas before I attempted thread.

Digital sketch on photo of tapestry

I used the pink and black to outline and smooth out the blocks of color, then used a sparkly gray acrylic for the nose. I found the stem stitch served best. Definition on the tongue was made with a coral colored yarn.

Embroidered tapestry

To display the tapestry, I chose to mount it on a fabric covered frame. I had a pre-stretched cotton covered frame, to which I stapled thin batting, then a rough cotton fabric (of all the fabric in my stash, I like the texture of this best). I sewed the tapestry to the fabric using a curved needle and cotton thread. As I sewed I was able to even out the edges at least a little! I did label the back and attach hanging wire as well. The title of the piece is “Doggie Kisses”.

Mounted small tapestry

I may consider more small embroidered tapestries in the future. The process of making and even mounting this one was quite enjoyable!