Brown-shaded Gray Moth

Brown-shaded Gray Moth

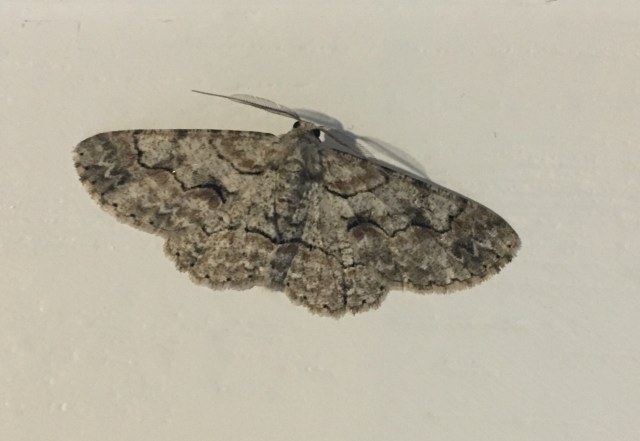
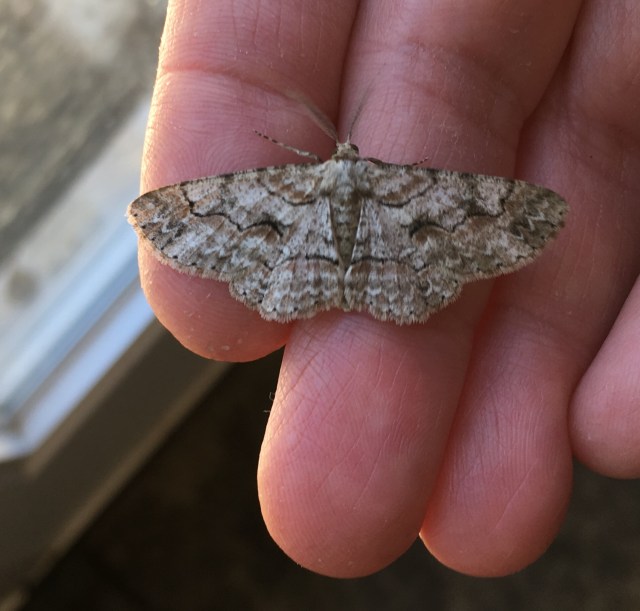
We have had a nice warm up, and our first moth in the house in months. I used the iNaturalist app to identify it. I do like this app, and as more people add observations, the better it gets. The first hit on this image was a moth observed mostly in Europe, which was not quite right. But down the list I found an image that matched with a corresponding observed area.

The Brown-shaded Gray Moth’s scientific name is Anacamptodes defectaria. My sister, a PhD in ancient history, tells me that “Anacampo” in Greek means “return”, and “Defectus” in Latin means “falling away”. According to Wikipedia, it does take wing February to November, and the larva feed on oak, poplar, sweet cherry and willow (we have many oak trees). It is also very difficult to find these moths when they are perched on tree bark.

Now I have to admit, I am guessing the species of this moth. I certainly didn’t closely examine the genitalia of the moth as suggested by this article from 1966 as the most definitive way to classify Anacamptodes. (Thank you again to my sister for unearthing the article.)

How do I personally feel about moths? I love the lacy pattern on the wings. Quite lovely.

Brown-shaded Gray Moth

Find the anomaly

Pantry anomaly

One of these things is not like the others. Can you spot the anomaly? Yes, I took a picture of my pantry. I cleaned and organized it recently, and although it is not magazine worthy, it is functional. It is the lurker that was picture worthy. Here, let me help you…

Cat in the pantry

Does that help? Silly cat found the stash of paper I’m saving for the chicks. We don’t get the newspaper, so I have been saving bags and packaging paper. Now it all smells like cat. But I’ve read that chickens don’t have a great sense of smell. Probably for the best.

She would get away with it too, but the paper crinkles fiercely when she settles down, so she gets caught and shooed out.

Doors!

Coop with front door and more trim

My folks are in town visiting and while the kids have been at school, my Dad and I have been working on the chicken coop. We now have doors! The weather will have to stay nice longer to get the doors and trim painted, but I’m so very exited that we are dried in!

Spoon!

My Dad recently had a birthday, and as he has suggested that I get back into wood working, I decided to make him a spoon.

Hand carved apple wood spoon

When I was younger I really enjoyed wood working and carving. Then kids came along and when they were young I needed to keep an eye on them, so I couldn’t disappear into the garage for hours. And bringing sharp objects into the house was a safety hazard (not to mention that the idea of having to clean up saw dust and wood chips inside unthinkable.) So I turned to more child-watching friendly options for creativity: crochet, jewelry making, and other things that could easily and quickly be put down to figure out why it was suddenly quiet upstairs.

The kids have been in school for many years now, but somehow I didn’t really get back into wood working. Turns out I missed it. Picking out a piece of wood and taking chisel and bandsaw and sander to it to turn it into something functional and beautiful is incredibly satisfying. I haven’t tried spoons before, but I will again! I took progress photos to share:

I cut a piece of applewood and used a fishtail gouge to shape the bowl of the spoon

This is after I used the bandsaw to cut away most of the excess. I wanted a flowing wavy shape to the spoon.

The back of the spoon after some time (and a few belts) on the belt sander.

Front of spoon after using the belt sander and following up with hand sanding.

After sanding down with progressively finer grit sand paper, I wet the spoon with water. The water helps raise the tiny splinters in the wood, and also gives you a good idea of what the final color will be.

After the spoon dried, I sanded again with 320 grit, I used a wood burner to make apple seed designs.

Back of the spoon with wood burned “apple” and my mark.

To finish the spoon I rubbed it with olive oil once each day for three days. I love the swirl of color in the wood on the back of the spoon bowl!

Wild plums

I’m quite excited to see a different kind of white bloom in our little woods. Wild plums! We actually have several of these little trees scattered through the property. I found many of them last fall and gathered and ripened the fruit (the tiny plums are too tart to eat straight, but make a nice jelly). I’m excited that I found at least two more this spring. Being the only tree in our yard with white blooms (we don’t have Bradford Pear or Callery Pear), they are easy to spot amongst all the other dormant branches. I’ve purchased some mylar ribbon to mark the trees so I can find them this November.

White blooms on a wild plum

Now I have had a couple slight panicky moments thinking that we were harboring the dreaded invasive Callery Pear, but it is possible to tell them apart before they bear fruit. Bearly. #punintentional

Wild plum blooms

While they both bloom white first thing in spring, and they both have blooms with five petals, the ends of the stamens on the wild plum are yellow, and those of the Callery pear are reddish. And those of the Callery pear stink.

Wild plum flower

I’m hoping for enough tree ripened fruit this year for a few jars of jelly!