Throwback Thursday: combo craft

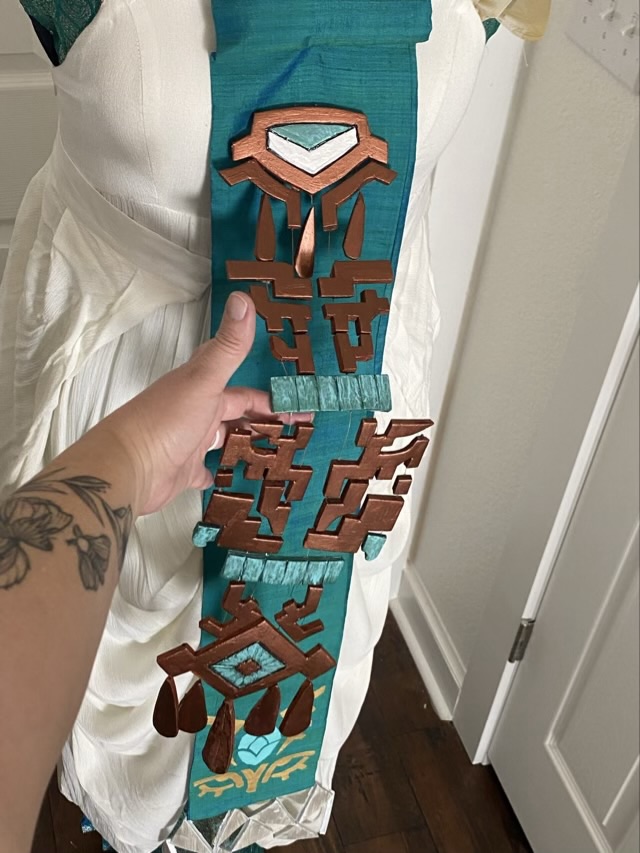
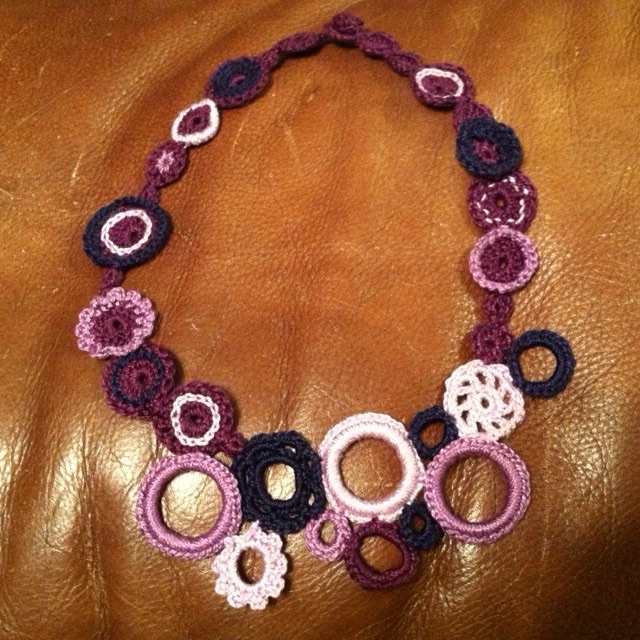
Back in December of 2014 I decided to combine crochet and jewelry making to create a light weight but bold necklace with pearlized cotton in shades of purple.

Photo description: crocheted circle necklace with hand made button clasp using four shades of purple pearlized cotton on a leather couch cushion

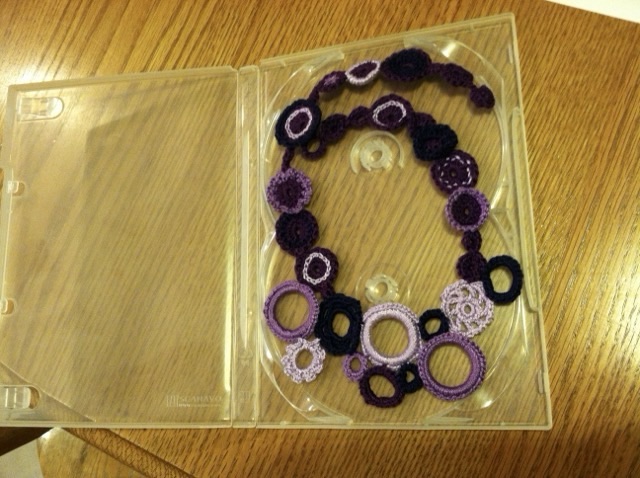
In 2014 I really had started to embrace taking pictures of my creations. I even took a picture of the CD case I repurposed into a guess-thwarting jewelry box.

Photo description: same purple crocheted necklace in a clear double CD case to keep it flat and give the recipient a moment of “hm?” before opening

I’m pretty sure since this is purple it went to my Mom. I’ve done more crocheted jewelry since. It is much lighter than traditional bold jewelry pieces, but does have to be laundered, starched, and laid flat to dry on occasion. I can personally tolerate a crocheted necklace for a little longer, if it isn’t too tight.

Throwback Thursday: resin earrings

In May of 2013 I was experimenting with circuits and epoxy resin. I made a set of earrings with components striped from a cell phone, epoxy, and sterling silver wire.

Photo description: hand-made, clear epoxy and sterling silver earrings with embedded upcycled phone components

This project did not stand the test of time. The epoxy yellowed and the silver tarnished. I thought I used “non-yellowing” epoxy, but I don’t have a record of the brand or type. I’ve drifted away from epoxy except as an adhesive for this reason.

Photo description: same earrings 12 years later

I have to say that I’m not entirely displeased with the aging of these earrings. The yellow and oxide have a more steampunk look than the newly made earrings. The epoxy is still solid, not cracked or degrading or sticky. I still wear the earrings.

Multi-use

My turned rosewood distaff made by Enid Ashcroft is a beautiful piece of work. I appreciate that the top end is just the right size for a pencil topper, and not only does it function well for its intended purpose of holding fiber for spinning, it can also function as a ring holder. Pictured below it is holding many sizes of quartz bead rings.

Photo description: ring distaff holding rings with a heart eyed emoji topper

The thought process that lead up to this discovery was “I need something that will keep these rings in size order during transport.”

Zelda cosplay part 5

The reveal! Here is the full Zonai panel for Zelda from the Tears of the Kingdom game.

Photo description: Cosplay outfit from Zelda Tears of the Kingdom with green under dress, off-white gathered over dress, and newly created front panel made of EVA foam sheet, acrylic paint, and silk

The jewelry panel is pinned to the silk with straight pins, because the EVA foam is easy to pin. The silk panel is safety pinned into the white dress that is a reused element from a previous Halloween. I sewed on the gold chiffon fabric the last time it was worn so that the dress wasn’t strapless. The under dress was my grandmother’s and is the same blue/green silk as the panel, but with a silver thread overlay pattern. I did sew knit side panels on that dress so that it had some breathing space.

Photo description: jewelry panel lifted from the silk panel to show they are different elements and not just painted on

And not so say that I have an impressive craft stash, but I bought very little for this assembly. Everything was reused or repurposed from previous projects. I did need to buy antique copper acrylic paint because I ran out, and as long as I was getting paint, also picked up a metallic dark green, which was a good choice for an under layer of the patina.

Zelda Cosplay part 2

I’m still working in the Zonai panel that Zelda wears in Tears of the Kingdom. Once I cut out shapes in the EVA foam sheet and gave them an initial coat of paint, I flipped them over on some wax paper to work on connecting all the pieces into a coherent whole. I used gold-colored, 49-strand cable beading wire inserted into a slit on the back of the pieces that I cut with a ruler and thin knife blade. It helped to use a small screw driver to tuck the wire into the slots. Once the wires were in place, I lifted the whole assembly to make sure everything hung evenly. To anchor the ends, I crimped on metal beads, then ran super glue down all the seams and ends.

Photo description: EVA foam pieces connected with cable beading wire inserted into slits

Once the wire was secure, I painted the back of the pieces, let it dry, then did the finishing coat of paint on the front.

Photo description: final coat of paint on the Zonai beaded panel using metallic copper acrylic paint and simulated green patina using metallic green base coat and light green wash

I absolutely love how this turned out. For cosplay, EVA foam is fantastic stuff. It is light, easily cut and carved, and paintable.