Starting something new

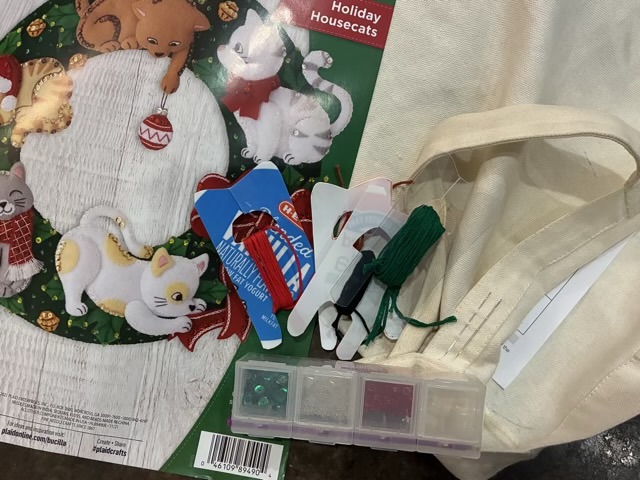
I bought a felt sewing kit two years ago, and just found it again while I was looking for something else. Since I have a dozen works in progress, what is one more? I really did try to put in back in the storage space, but it called to me. The first step was reading through the instructions (yes, I’m one of those), then prepping the materials and finding a project bag. I used bobbins cut from waste plastic to sort and hold the embroidery thread, and a small pill holder for the sequins and beads. The instructions suggest a plate, but I know myself and at the first distracted moment I would bump the plate and send seed beads all over the room. So I keep them on lock down. Yes, it takes a little longer to open the case, get out a bauble, then close the case, but it is better than picking them up off the floor and separating out the cat hair.

Photo description: “Holiday Housecats” felt kit with embroidery thread on bobbins, sequins and beads in a pill box, and a project bag with the needles threaded into the hem

Now to see how long it holds my attention and how long it takes to finish.

Weaving: camel

I used my Clover mini loom to weave a swatch of my two ply hand spun camel yarn. I like to double the warp and I chose a plain weave this time. I start and end my weaving with a twined row to help keep the ends in place.

Photo description: 2 ply camel yarn warped onto a Clover mini loom

To finish, I used an embroidery needle to run the looped warp ends back through the weft on the back. I rather like the ribbed edge created by doing so. I added an embroidered daisy with a stem and leaf because the front looked rather plain. The daisy and leaf are done with a lazy daisy stitch, and the stem is a stem stitch, which amuses me.

Photo description: back of the small woven swatch showing the woven in loops and the back of the embroidery
Photo description: front of the small weaving swatch done in hand spun camel yarn with five petal daisy, stem, and leaf, Missy the dog looking on in the background

It is interesting that the color of the yarn looks different in each picture. In real life, the color is a soft brown quite like milk chocolate. I did try to color adjust the final picture. I suspect the radical difference in backgrounds is the primary suspect for the color shift.

Rolled brim hat

So I thought a rolled brim knit cap was some kind of knitting voodoo. I was looking up patterns to see how to do it. Y’all, it is just knit. Stockinette stitch, which makes the familiar v shaped stitches that we associate with knitting, is unbalanced and curls without a stabilizing edge (like ribbing). So the rolled brim is the natural state of a knit tube. Hm. So I tried one, and sure enough the edge curls. I even managed to do the crown of the hat in knit using seven decreases, then ran the end of the yarn through the last seven stitches and pulled tight to form a nice little rosette in the center. I threw some embroidery on to see how that went.

Photo description: Green and white knit hat with vine embroidery.
Photo description: Crown of the hat showing seven slightly spiraled sections neatly closed at the top.

I used superwash merino sock weight yarn. I would do things differently next time, so I’m not going to write up a pattern. For posterity sake I’ll write down details, though. I used two size 2 circular needles; a slip, slip, knit decrease on each of the seven sections, sometimes separated by a row of knit; and attempted a stem stitch for the embroidery. The stem stitch stretches with the fabric, but I don’t like how it doesn’t make a continuous line. That might just need practice, though. I was hoping for more of a spiral on the top of the hat too.