I modified another t-shirt. I don’t care for crew neck t-shirts (sensory thing with fabric touching my neck), so I cut off the binding, and used black crochet thread to make a blanket stitch all around the neckline, then added a simple chain 3, double crochet repeat pattern row. I like 3/4 sleeves, so I used the same 3 chain, double crochet pattern to lengthen the short sleeves, and added a scalloped edging by making five chain 1, 1 double crochet in every other junction.
Photo description: Black Smashing Pumpkins t-shirt with black crocheted lace at the neck and sleeve.
I am not historically a lace person, but the practicality of it in our Texas heat is appealing. The idea of practical lace also amuses me.
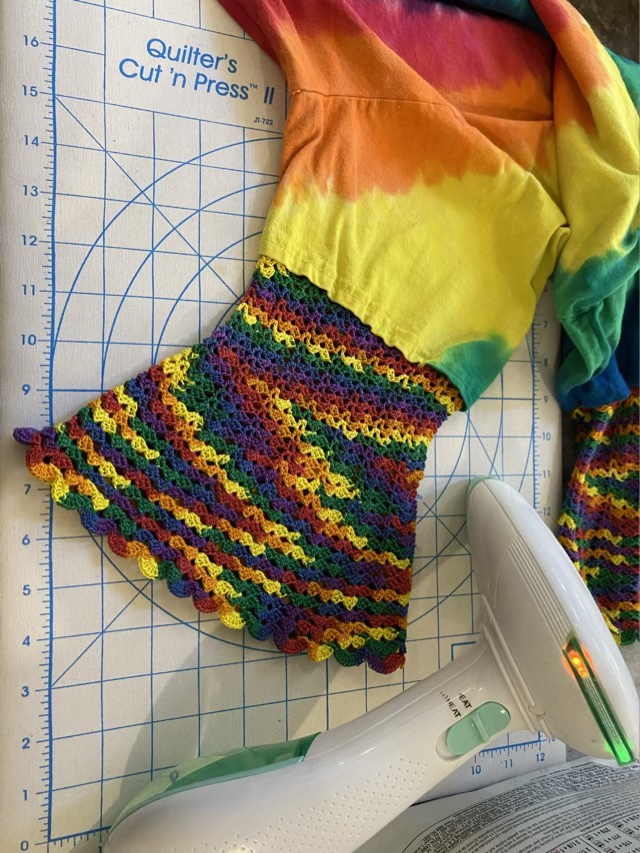
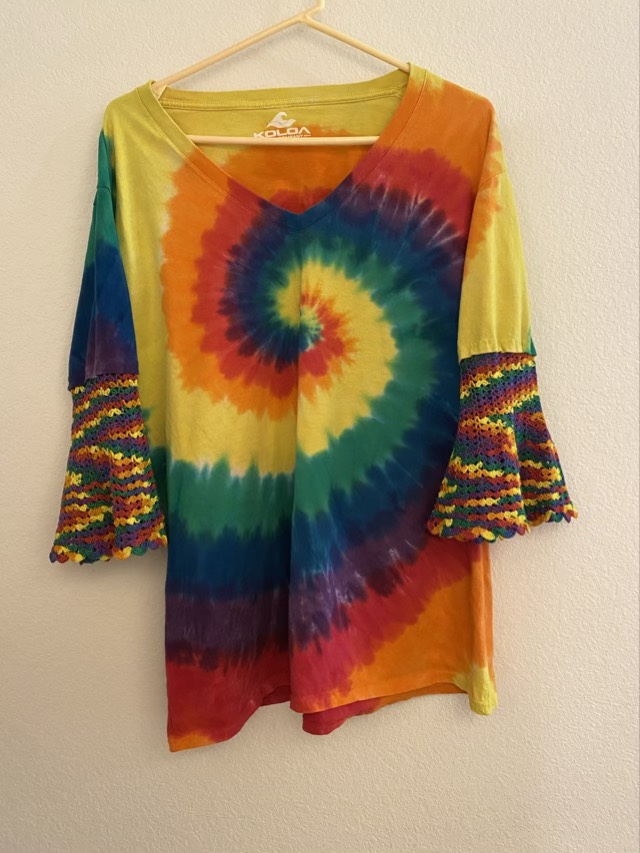
I really wanted bell sleeves on my tie-dyed t-shirt. My first attempt did not please me, so I ripped it out and tried again. I tried some crocheted lace with worsted yarn, but it was too thick and stiff. So I fell back on a crochet standard: number 10 cotton. This cotton is in every craft store, and nearly always comes in at least white, black, and rainbow. It is great for crocheting lace. I sewed a chain stitch to the inside of the sleeve hem, then crocheted in the round a simple alternating shell pattern.
Photo description: Rainbow colored fabric, with a rainbow colored cotton thread sewn as a chain stitch, showing the needle mid-stitch.Photo description: Rainbow colored crocheted lace bell sleeves on an ironing board with steamer at the ready.
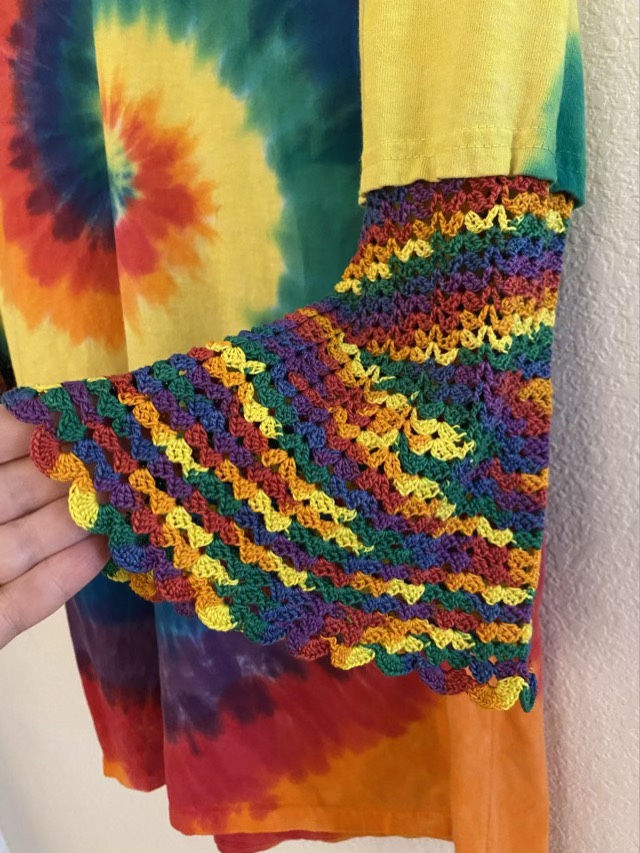
When the sleeves were done, I steamed them, which worked brilliantly to even out the stitches. The rainbow thread made serendipitous color pooling as the stitch pattern changed, which goes along with the tie-dye nicely.
Photo description: Rainbow tie-dyed spiral t-shirt with crocheted lace bell sleeves.Photo description: Close-up of bell sleeve being held open.
So here comes the crochet pattern and math, for those that are interested.
With needle and crochet thread, make an embroidered chain stitch around the inside hem of the sleeve. The size of the stitches should be slightly larger than a crocheted chain done with a size 0 hook.
Row A: With a size 0 crochet hook (2mm), join the thread to the first chain, chain (ch 3), double crochet (dc) into the same chain, ch 2, 2 dc in same chain. Skip 2 chains, (dc, ch 1, dc) in same chain. *Skip 2 chains, (2dc, ch2, 2dc), skip two chains, (dc, ch1, dc). Repeat from * around. At this point you can tell if the work is bunching up the fabric, or ruffling out, depending on how long the embroidered stitches were. If it is not to your liking, rip out and use a different number of skipped chains. This is the only place it will matter, just note how many shell sequences you make, so you can match it on the second sleeve. For instance, if you have 72 chains and 12 shell sets, each shell set will span 6 chains, so you’ll skip two chains between shells. A shell set consists of a shell stitch and a v-stitch.
Row B: Slip stitch (sl st) into the center of the first shell, (ch3, dc, ch2, 2dc) into same shell, (dc, ch1, dc) in next V-stitch, *(2dc, ch2, 2dc) in next shell, (dc, ch1, dc) in next v-stitch. Repeat from * around.
Repeat row B, 8 more times, or until the straight part of the sleeve is the length you want. Now we will start the bell.
Row C: Sl st into the center of the first shell, (ch3, 2dc, ch2, 3dc) into same shell, (dc, ch1, dc) in next V-stitch, *(3dc, ch2, 3dc) in next shell, (dc, ch1, dc) in next v-stitch. Repeat from * around.
Repeat row C, 4 more times.
Row D: Sl st into the center of the first shell, (ch3, 2dc, ch2, 3dc) into same shell, (2dc, ch2, 2dc) in next V-stitch, *(3dc, ch2, 3dc) in next shell, (2dc, ch2, 2dc) in next v-stitch. Repeat from * around.
Repeat row D, 4 more times.
Row E: Sl st into the center of the first shell, (ch3, 2dc, ch2, 3dc) into same shell, (3dc, ch2, 3dc) in each shell all the way around.
Repeat row E, 4 more times.
Row F: Sl st into the center of the first shell, (ch3, 3dc, ch3, 4dc) into same shell, (4dc, ch3, 4dc) in each shell all the way around.
Row G: Sl st into the center of the first shell, (ch3, 12dc) into same shell, (13dc) in each shell all the way around.
Join first shell, weave in ends, steam.
It writes up much more complicated than it works up.
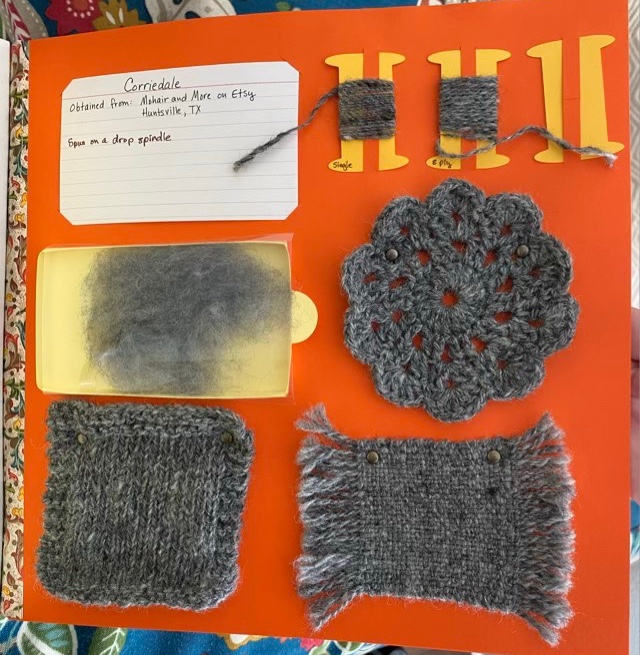
I did a fiber sample page for the Corriedale wool I’ve been using for teaching spinning. The woven sample is my best yet; I started the weaving with a pass of twined weft away from the edge of the loom. My weaving then stayed more even and consistent to the end, where I did another twined pass. The twining keeps the weaving in place better too, so I didn’t need to make knots. If I were making a piece that would see more action than laying in a book, I would secure the fringe better, either with more twined passes, or knotted or sewn fringe.
Photo description: clockwise from top left: 3×5 card with “Corriedale obtained from Mohair & More on Etsy, Huntsville, TX, spun on a drop spindle”; single ply on a paper bobbin; two ply on a paper bobbin; crocheted lace round; woven sample with two salvages; knitted sample with garter stitch edge; sample of un-spun fiber
Corriedale is very nice to spin, has a nice feel, but isn’t the softest. The blended dark and light fibers make it easier to see the twist, which is why I like it for learning.
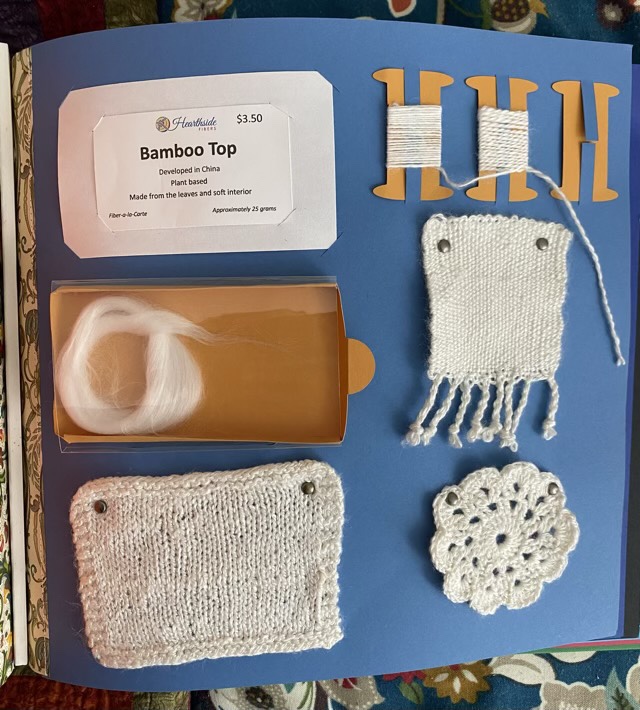
Photo description: Clockwise from top left: “Bamboo Top” card which reads “Developed in China, plant based, made from the leaves and interior”, single spun yarn on a paper bobbin, 2-ply yarn, swatch woven on a Clover mini loom with 3 selvages, crocheted lace round, knitted rectangle, unspun fiber in a paper box.
Spinning my bamboo sample was very enjoyable. The fiber is soft, and the staple is a nice length. I did have some static issues, but those that were resolved with a spritz of water. I spun the singles on a drop spindle, and I kept the fiber and spindle in my purse to spin during waiting times. I made the two ply yarn from a center-pull ball using the same spindle. The fiber has a beautiful luster.
Photo description: A hand holding a single spun bamboo yarn wrapped nostepinne style on a 3D printed spindle.
I finished recycling my Bernat blanket yarn mermaid tail into cat mats. In total, I made 7 large mats, 3 crate-sized mats, and one round basket liner. The yarn used was taken from the old unused blanket and scraps from other projects.
Photo description: Seven crocheted rectangles
To make the mats, using a 8mm hook or a hook that makes a tight but not difficult stitch, chain 30 for a large mat, or 20 for a crate sized mat. Single crochet each row until the mat measures about 17”. I donated most of the mats to the local no-kill cat shelter.