Fiber art tattoo

I’ve been wanting a tattoo wrapped around my forearm for a while, and I made the plunge! I worked on ideas for over a year, found a tattoo artist locally that does phenomenal floral work, and took my rough sketches to her. I’m very pleased with the outcome! In the tattoo are flax flowers (flax is the fiber used to make linen), cotton flowers (which occur before the formation of the iconic cotton boles), hemp (used to make rope and nets historically), a silk moth (the modern kind that has been bred for silk production), and a footprint each of several fiber producing animals: sheep, rabbit, bison, alpaca, goat. Then in the middle, in homage to the original spinner and weaver, a spider in a web.

Photo description: The central part of the design with the spider web and cotton blooms.
Photo description: Inside my forearm showing the flax bloom and silk moth.
Photo description: Outside of my forearm showing the animal prints.
Photo description: My elbow with the second flax flower.

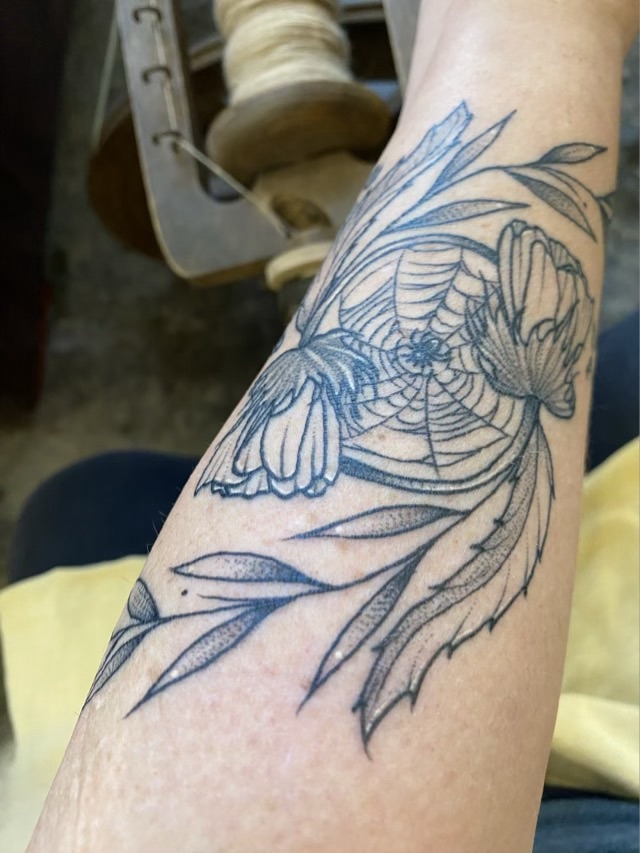
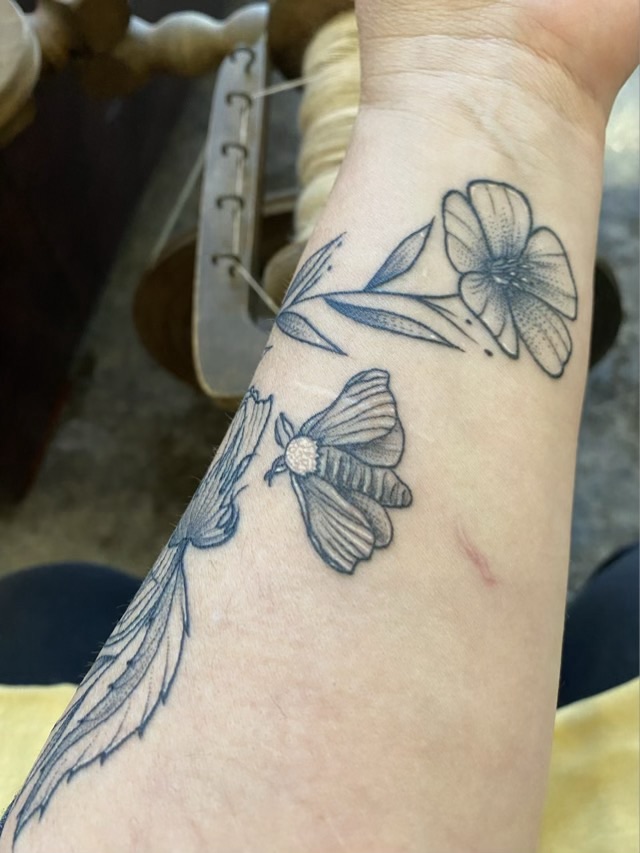
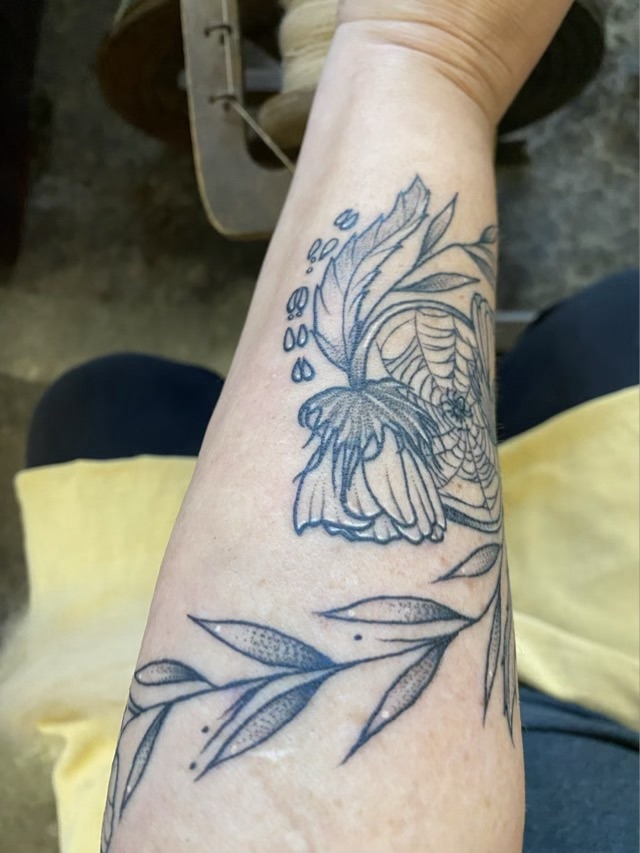
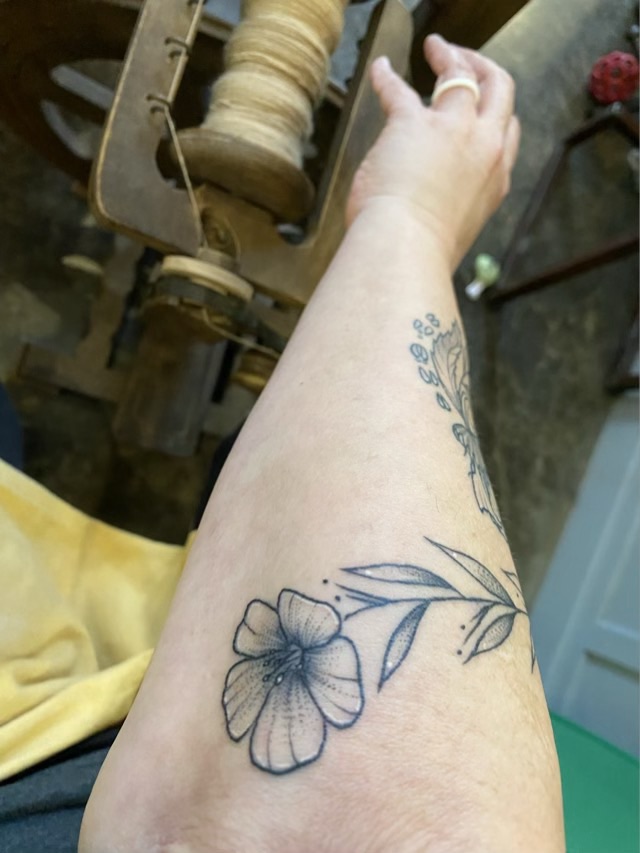
The tattoo artist is Paige Parman at Old Souls Ink in Weatherford, TX. I waited to take pictures until the tattoo was fully healed, and took them while I was spinning alpaca fiber on my Befra Willy spinning wheel (in the background of all the pictures).

Coffee art

I went to my favorite coffee shop and picked up a latte and a couple shots of expresso to go. I drank the latte, but used the expresso to make lots of shapes on water color paper.

Photo description: Six pages of watercolor paper laid out on the table with an assortment of coffee rings, drops, and splotches of expresso. One page in the back was treated with isopropyl alcohol first, which gave the coffee a diluted/faded effect.

My goal is to digitize the coffee stains to make amalgamated coffee art. First up, a coffee tree. Although I intended to use the shapes to make the tree, I decided to also try just painting an evergreen tree with expresso. It turned out great, so that turned into my base image. I scanned everything, including a scattering of sugar sprinkles. I digitally combined the tree, sprinkles, and a precisely placed coffee ring, and am quite pleased with the result. For fun, I changed the color of the sprinkles in Photoshop so I had two options.

Photo description: Two cards printed on recycled parchment paper, showing a evergreen tree painted in the sepia tones of expresso, topped with a double coffee ring, and festooned with round and star shaped sprinkles. One card has teal sprinkles, the other, red.

These cards are sold exclusively at The Full Cup in Weatherford, TX.

Dashing through the Snow

I made a new digital card design for our holiday cards. I started in Adobe Fresco on an iPad with an Apple Pencil, moved to the computer and used Adobe Illustrator, then to print, used Adobe inDesign to do the layout. I like black and gray word art, but to give it a little pop I printed on pearlescent paper.

Photo description: “Dashing through the Snow” in different fonts, with pine needle bunches, holly sprigs, two swooshes, and assorted gray snowflake designs. The shimmer of the pearlescent paper is evident in the upper left corner.

My plan is to put the design in Redbubble and cross post to my CarynsCreations.com site after the design is available.

New card

I had fun making a new holiday card design. My intention was to imitate a linocut technique, but in Adobe Illustrator, so instead of building shapes, I erased bits from the shapes. Then I applied a gradient color to the left over parts to imitate hand painting a stamp, and printed on recycled card stock. To finish off the cards, I used a rounded corner punch, and hand-stamped the greeting inside.

Photo description: Linocut-like design showing a quartet casually dressed singing around the tailgate of an old truck, corner punch shown in foreground.
Photo description: Two cards, one showing the front, the other open to show “Happy Holidays“ stamped inside, stamp and ink pad on the right.

Rider

I added a rider to my meadow deer for Halloween. The deer was purchased as a holiday decoration a couple years ago, and I liked having it in the meadow so much I decided to make it a year-round ornament. I have a few more projects on my plate this year than last, so an ornate Halloween sculpture wasn’t going to happen. But a simple three foot plastic skeleton twist tied to the back of the deer, with a length of scrap white ribbon for a bridle, well that was very doable.

Photo description: Golden wire and plastic deer sculpture with a white plastic skeleton riding on its back standing on the edge of a dry meadow.